how to pre record a video presentation on zoom
play

How to pre-record a video presentation on Zoom Most of us are - PDF document

How to pre-record a video presentation on Zoom Most of us are familiar with zoom for remote meetings and have utilised the record option to make a record of the meeting, and the share screen option to allow meeting participants to


  1. How to pre-record a video presentation on Zoom Most of us are familiar with zoom for remote meetings and have utilised the ‘record’ option to make a record of the meeting, and the ‘share screen’ option to allow meeting participants to view powerpoint slides or other documents. It is also possible to use zoom to record a presentation that results in a voiceover traditional powerpoint slides, with the resulting video including a small screen of the speaker. In short, you are holding a zoom meeting with yourself and sharing your screen with yourself in order to capture and record the image. Step 1: SET UP 1. Prepare your presentation slides in Powerpoint together with a corresponding script. 
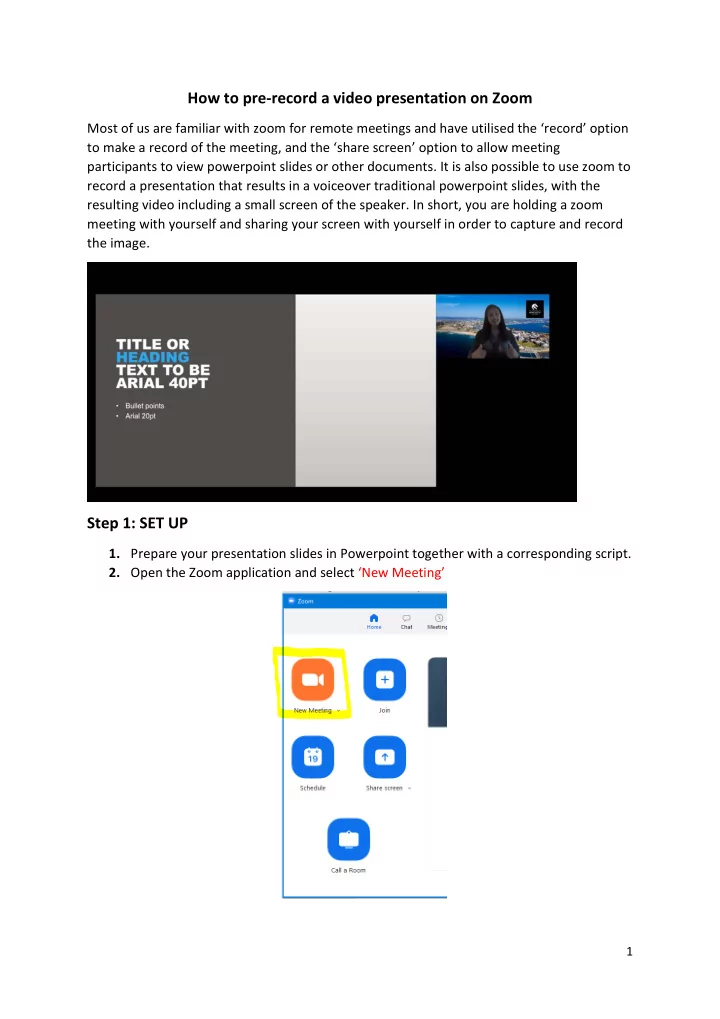
2. Open the Zoom application and select ‘New Meeting’ 1

  2. 3. There are 4 options you need to set: Unmute yourself, Start video, Click on Record and share screen (see next step). You will be asked to indicate where the recording will be saved – to the cloud or on the computer you are using. Both options work. Saving to the cloud requires an additional step where you will receive an email once the video has been uploaded to the cloud. 4. When you click on the ‘Share Screen’ button a few options will come up – select the monitor where you have your powerpoint presentation open. Commence the slide show in Powerpoint as you usually would. 2

  3. 5. Now the top of your screen will show the following options to indicate that you are sharing your screen and that it is being recorded. Step 2: MAKE THE RECORDING Note: Always do a test record + editing first before recording the whole session to and see if things are working! 6. Now go ahead and deliver your presentation like you normally would, clicking through the slides. If your video option is turned on, a video of you as presenter will show at the top right-hand corner of your presentation. If you do not have the video turned on you will just record the slides and your voiceover. 7. When you have finished the presentation click on stop recording. 8. Now click on ‘end meeting for all’ to initiate the zoom recording conversion. Step 3: SAVE THE RECORDING 9. If you opted to save the recording on to your computer the file will be saved in the folder This PC/documents/zoom and will automatically be named with the date and zoom meeting details. You may wish to rename the file so it is easier to retrieve. Double click on the ‘zoom’ file to view your recording. 3

  4. If you opted to record on ‘cloud’, you will get an email notification that your recording is ready. There will be an option for ‘host only’ with a link. Click on that link and sign in using your zoom credentials. Now you will have several options. Check your video by clicking on option ‘Shared screen with speaker view’. Step 4: EDIT THE RECORDING You may need to edit your recording (to tidy up the front and the end and get rid of any clumsy bits). If you saved your recording to the cloud you download it for editing by clicking on ‘Download’. Now you can edit your recording using any editing software. There are lots of free software available for video editing. At UON we use Panopto so that is what we have described here as a similar process will be required for any software. 10. Open Panopto  Click on create  some options will come up. 11. Select ‘upload media’ 4

  5. 12. Now select your recording from your downloads and follow the prompts 13. After the recording is processed, you can open it to edit the video. In the edit window, maximise the zoom (see pic below) using the + sign. Then click on the  sign and drag the thin grey bar to cut areas off. The areas which appear shaded grey will be deleted. Always double check by clicking on ‘play button’ to see if you have the end result you want. 14. Save your changes by clicking on ‘Apply’ at the top right-hand corner. Once you are happy with the final product, by 1 July, please send a link to Devin (caphiaed@gmail.com) and Susan (caphia.policy@gmail.com) to enable them to then download the video. 5

Download Presentation
Download Policy: The content available on the website is offered to you 'AS IS' for your personal information and use only. It cannot be commercialized, licensed, or distributed on other websites without prior consent from the author. To download a presentation, simply click this link. If you encounter any difficulties during the download process, it's possible that the publisher has removed the file from their server.

Recommend


More recommend