recording a video presentation using zoom
play

Recording a Video Presentation Using Zoom Recording a Video - PDF document

Recording a Video Presentation Using Zoom Recording a Video Presentation Using Zoom Before you begin recording, make sure you have a webcam and microphone connected to your computer. 1. Access Zoom by going to https://walsh.zoom.us/ and clicking


  1. Recording a Video Presentation Using Zoom Recording a Video Presentation Using Zoom Before you begin recording, make sure you have a webcam and microphone connected to your computer. 1. Access Zoom by going to https://walsh.zoom.us/ and clicking “Sign In” to configure your account.
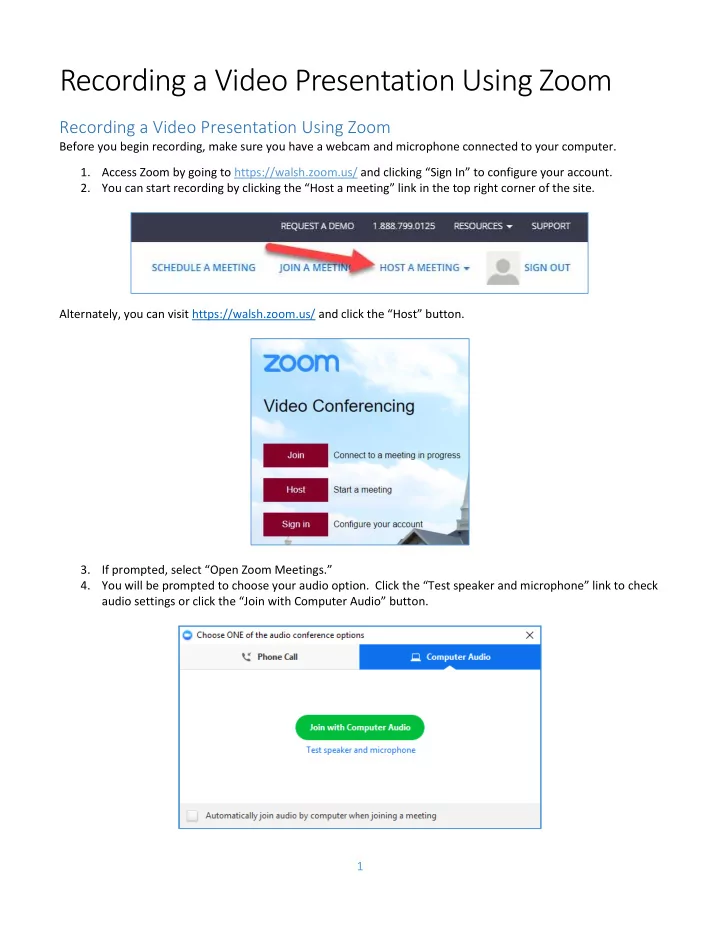
 2. Y ou can start recording by clicking the “Host a meeting” link in the top right corner of the site. Alternately, you can visit https://walsh.zoom.us/ and click the “Host” button. 3. If prompted, select “Open Zoom Meetings.” 4. You will be prompted to choose your audio option. Click the “Test speaker and microphone” link to check audio settings or click the “Join with Computer Audio” button. 1

  2. Alternately, you can select the Phone Call tab and elect to call into Zoom using the phone number and information provided on that tab. 5. Open any files, sites, etc. you plan to use during your Presentation. 6. You can b egin recording by clicking the “R ecord ” button. Note: If you do not see the “Record” button, the “Record on this Computer ” option may be selected through the “More” button. The upper left of the Zoom player will let you know you are recording. You may click the pause or stop button there during your recording. 7. If your webcam is on, the video you are recording will begin with YOU. This is a good time to provide a brief intro while you are accessing the files/sites/presentations you will be sharing during your presentation. To sha re your screen, click the “Share” button in the Zoom player. Zoom will display a selection of options you can click on to share. 2

  3. Clicking “Screen” will share everything which is open on your screen. If you prefer to share only your PowerPoint, for example, you would select that option instead of screen. (Note: Be aware that if you select “Screen” and have Outlook open, email alerts may also show up in your recording!) If you are only sharing one program, you may want to select it. If you are toggling between a PowerPoint and websites, you may want to select “Screen” when sharing. 8. Click the stop button to stop your recording (Note: You are limited to 40 minutes for your recording.) A message will indicate an mp4 will be created when the meeting ends. 9. Click the End Meeting button to end the meeting. 3

  4. Once the End Meeting button is selected, Zoom will begin converting your recording into a mp4 file. 10. When prompted, select where to save the file. Saving the file to OneDrive is recommended. 4

  5. Uploading a Zoom file to Microsoft Stream 1. Log into Office 365 at portal.office.com with your email address and password. 2. Click on the Stream icon. 3. Click Create -> Upload video. 4. Drag files to the window or click browse to find and upload the file. 5

  6. 5. Fill out the Details section. By default, the Name field will show your file name. It is helpful to change this to a more descriptive title, such as “Lesson One Presentation.” You may also choose to add additional information under the Description field. 6. Click on “Permissions” to expand this section. Make sure the “Allow everyone in your company to view this video” box is checked. 7. Click on “Options” to expand this section. Make sure the “Autogenerate a caption file” box is checked. 6

  7. 8. Click Publish now to publish the video. A checkmark will appear when the video is published, and an email will confirm the video has been published. 9. Click Share to copy a direct link to the video. This link can be pasted in ECN to submit the assignment and/or share the video. You may also choose to embed the video in ECN. The next section will explain how to do this. 7

  8. Embedding a Microsoft Stream Video in ECN 1. Click the Share link for the video and select the Embed tab. Click on the Copy button to copy the embed code. 2. Visit the Assignment or Discussion in ECN where the presentation is to be shared. Before entering text in the text box, click on the Source button. Note: If you do not click the Source button, the video will not embed properly. 8

  9. 3. Click in the text box and paste the embed code you copied from Microsoft Stream. If you click the Source button again, you will see an “IFRAME” box where the video will appear when the assignment/discussion post is submitted. 4. Click Submit or Post to finalize your submission/post. 9

Download Presentation
Download Policy: The content available on the website is offered to you 'AS IS' for your personal information and use only. It cannot be commercialized, licensed, or distributed on other websites without prior consent from the author. To download a presentation, simply click this link. If you encounter any difficulties during the download process, it's possible that the publisher has removed the file from their server.

Recommend


More recommend