Recording a Presentation to your Computer in Zoom Zoom is usually - - PDF document

recording a presentation to your computer in zoom
SMART_READER_LITE
LIVE PREVIEW

Recording a Presentation to your Computer in Zoom Zoom is usually - - PDF document

1 Recording a Presentation to your Computer in Zoom Zoom is usually used as a web conferencing tool to share video and screen to present to a remote audience but it can also be used to pre-record presentations. Prepare for the Recording For


slide-1
SLIDE 1

1 Instructional Technology and Training March 19, 2020

Recording a Presentation to your Computer in Zoom

Zoom is usually used as a web conferencing tool to share video and screen to present to a remote audience but it can also be used to pre-record presentations.

Prepare for the Recording

For best results, close any program on your Mac or PC that will not be needed for the presentation to reduce unwanted popup notifications and to optimize performance.

Record the Presentation

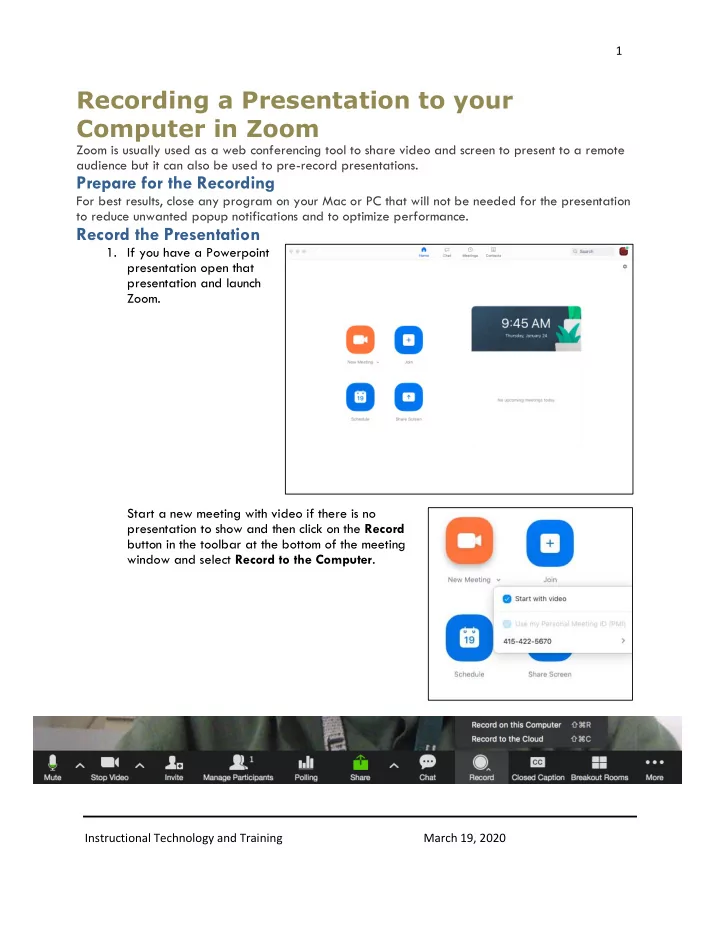
  • 1. If you have a Powerpoint

presentation open that presentation and launch Zoom. Start a new meeting with video if there is no presentation to show and then click on the Record button in the toolbar at the bottom of the meeting window and select Record to the Computer.

slide-2
SLIDE 2

2 Instructional Technology and Training March 19, 2020

If you have a Powerpoint presentation to show, launch that Powerpoint file and start a new meeting. Then click on Share Screen in the tools at the bottom of the meeting.

  • 2. You will see a selection of choices to share-select your presentation as the item to share.

Click Share Screen in the lower right corner of the share window to continue.

  • 3. At the top of the screen you will see a green bar with the meeting room ID; placing your

cursor over that bar will reveal a set of tools. In the More menu, select Record to the Computer to begin recording.

  • 4. Wait a moment until you see a small circle icon with the blinking red dot confirming that

you are recording.

  • 5. Proceed through your presentation as if you were presenting in class.
slide-3
SLIDE 3

3 Instructional Technology and Training March 19, 2020

  • 6. When you finish, pause a moment and then click on the stop record button in the bottom

toolbar for a video presentation. For a presentation that includes a Powerpoint slideshow click on the More menu again and select Stop Recording.

  • 7. End the meeting and your recording will be converted to a video file and the folder

where the video is saved to will open.

slide-4
SLIDE 4

4 Instructional Technology and Training March 19, 2020

Upload the recording to Google Drive

  • 1. Locate the recorded video file usually labeled as zoom_0.mp4 and rename it to the name
  • f the lecture or presentation.
  • 2. Login to your USF Google Drive and create a new folder.
  • 3. Name your folder for the content to

be shared.

slide-5
SLIDE 5

5 Instructional Technology and Training March 19, 2020

  • 4. Open the shared folder and open the folder containing your renamed Zoom video
  • recording. Drag and drop the video file from your computer to the Google drive shared

folder window to upload the file.

  • 5. Follow the same process for all of the Zoom recordings you need to share.

Sharing the content

You can now share the folder of content as a single link to those who need to access the recordings.

  • 1. Open the Google Drive shared folder and click on the name of the folder to bring up the

folder options menu and select Share.

slide-6
SLIDE 6

6 Instructional Technology and Training March 19, 2020

  • 2. In the Share Window, Click
  • n the link Advanced.
  • 3. In the Advanced Sharing

settings window, click on the Change… link in the section Who has access.

slide-7
SLIDE 7

7 Instructional Technology and Training March 19, 2020

  • 4. Select the choice Anyone with

the link from the list of link sharing and make sure that the access choice at the bottom of the window says Can view

  • nly. Click Save to finish.
  • 5. Copy the link in the field Link

to Share and you can paste the link into an email or in a Canvas course to share to the

  • students. The students will have

access to the shared folder and to any added content you upload to the folder.