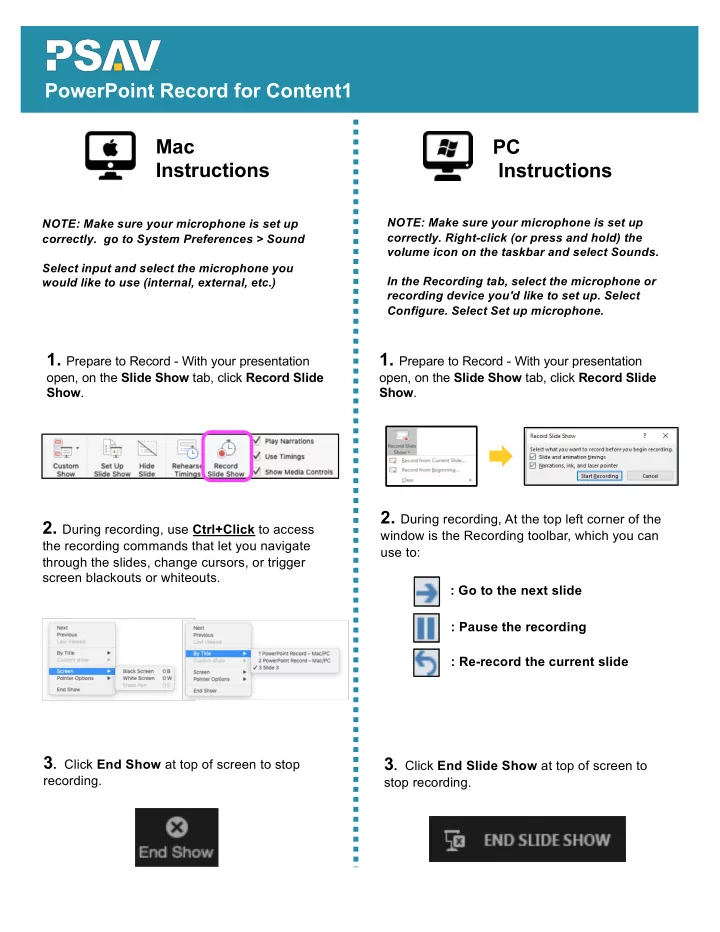

PowerPoint Record for Content1 Mac PC Instructions Instructions NOTE: Make sure your microphone is set up NOTE: Make sure your microphone is set up correctly. Right-click (or press and hold) the correctly. go to System Preferences > Sound volume icon on the taskbar and select Sounds. Select input and select the microphone you In the Recording tab, select the microphone or would like to use (internal, external, etc.) recording device you'd like to set up. Select Configure. Select Set up microphone. 1. Prepare to Record - With your presentation 1. Prepare to Record - With your presentation open, on the Slide Show tab, click Record Slide open, on the Slide Show tab, click Record Slide Show . Show . 2. During recording, At the top left corner of the 2. During recording, use Ctrl+Click to access window is the Recording toolbar, which you can the recording commands that let you navigate use to: through the slides, change cursors, or trigger screen blackouts or whiteouts. : Go to the next slide : Pause the recording : Re-record the current slide 3 . Click End Show at top of screen to stop 3 . Click End Slide Show at top of screen to recording. stop recording.
PowerPoint Record for Content1 Mac PC Instructions Instructions 4 . A Save dialog box appears. Click Yes to 4 . A Save dialog box appears. Click Yes to save your recording, or No if you want to record save your recording, or No if you want to record it again. it again. 5 . Click Play From Start to preview your 5 . Click Play From Beginning to preview your recording. recording. How to Save a Your Recorded How to Save Your Recorded Presentation with Audio Presentation with Audio On the File menu, select Save to ensure all your On the File menu, select Save to ensure all your recent work has been saved in PowerPoint recent work has been saved in PowerPoint presentation format (.pptx). presentation format (.pptx). Content1 will convert your recorded audio into html Content1 will convert your recorded audio into html during upload, do not export your presentation as a during upload, do not export your presentation as a video file. video file.
PowerPoint Record for Content1 TIPS • Use video preview to make sure everything is set up correctly before recording. • For higher quality, use an external web cam and/or microphone • You can’t record narration in PowerPoint for the web. Use a desktop version of PowerPoint to record your narration • Built-in cameras and microphones are suitable for most tasks. But if you want more professional-looking video, consider using an external web cam, if you’re able. If you’re using PowerPoint on a tablet or laptop and you’re inking with a stylus, an external camera and microphone allows you to minimize stylus noise. • PowerPoint doesn’t record audio or video during transitions between slides, so don’t speak while advancing the slide. Also, include a brief buffer of silence at the beginning and the end of each slide to make the transitions smooth and ensure that you don’t cut off audible narration while transitioning from one slide to the next. • Record a few seconds of silence by turning off audio and video to advance after a set time. • As soon as you finish your first slide recording, play it back. • Recordings are added to the presentation on a per-slide basis, so if you want to change a recording, you only need to re-record the affected slide or slides. Also, you can rearrange the order of slides after recording without having to re-record anything. This also means it’s easy to pause for a break while recording a presentation. • For slides that you want to record gestures (such as ink) on, make multiple copies of the slide so that you can easily record multiple takes. Then delete the extraneous slides when you’re done. • You can adjust and edit the length of your video and thickness of the ink in edit view. • If it’s possible that your audience may use PowerPoint for the web to experience the recording, use the transitions that are supported by PowerPoint for the web (Cut, Fade, Push, Wipe, Split, Random Bars, Shape, Morph). • Presentation recording works even smoother with touch-screen PCs that have a web camera. If you have any questions or concerns please contact PSAV at https://www.psav.com/virtual-event
Recommend
More recommend