guide to creating a powerpoint presentation with audio
play

Guide to creating a PowerPoint presentation with audio (Mac) and - PDF document

Guide to creating a PowerPoint presentation with audio (Mac) and uploading to Moodle This is a guide to creating an audio enhanced PowerPoint presentation using the Mac version. The PowerPoint programme is available free to Lancaster University


  1. Guide to creating a PowerPoint presentation with audio (Mac) and uploading to Moodle This is a guide to creating an audio enhanced PowerPoint presentation using the Mac version. The PowerPoint programme is available free to Lancaster University students as part of the Office 365 Suite of Office products. Office 365 is available at: www.lancaster.ac.uk/office365 This guide assumes you have already created a non-audio PowerPoint presentation and now wish to add audio. Please note a dummy PowerPoint presentation has been created for the purposes of this guide. 
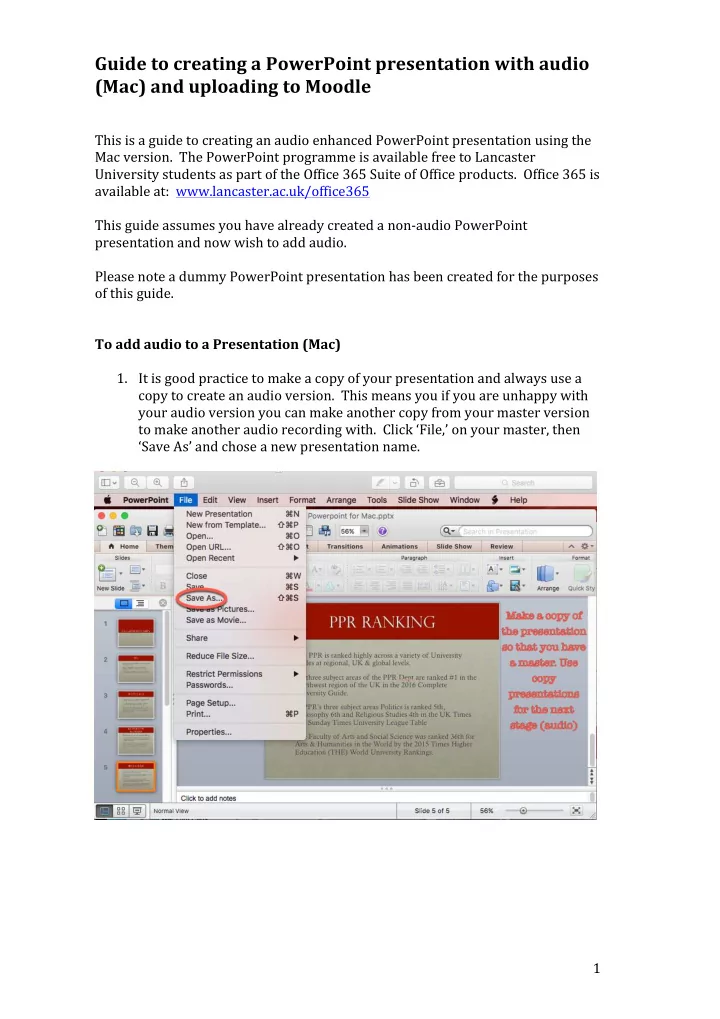
To add audio to a Presentation (Mac) 1. It is good practice to make a copy of your presentation and always use a copy to create an audio version. This means you if you are unhappy with your audio version you can make another copy from your master version to make another audio recording with. Click ‘File,’ on your master, then ‘Save As’ and chose a new presentation name. 1

  2. 2. With your copy presentation open you are now ready to add audio. First, check your microphone is working. To do this click on the Apple icon of your system toolbar and select ‘System Preferences’. 3. Click on the ‘Sound’ icon. 2

  3. 4. In the Sound window click the ‘Input’ button (a) to reveal the number of sound devices your computer has installed. Select the device you wish to use for recording from the list (b). This computer has an external microphone plugged into a USB port. Most laptops have an inbuilt microphone. Ensure the volume is set to an appropriate level by sliding the control on input volume (c) and test it by speaking. The bars of the ‘Input level’ respond to your voice. 5. Close the Sound and System Preferences Windows once you have checked the microphone is working and return to your copy PowerPoint presentation. Choose and click on the ‘Slide Show’ tab on the top bar of PowerPoint. 3

  4. 6. You now need to prepare for what you want to narrate. You may wish to make notes or write out exactly what you want to say. The recordings work on a slide-by-slide basis so you need to prepare for each slide. 7. Once you are ready ensure you are at the start of the presentation. Prepare to click the record button. Be aware the voice recording will start IMMEDIATELY. 8. When you click ‘Record Slide Show’ you will be presented with the slide and a countdown of the seconds/minutes of your recording. When you have finished recording for the slide, click the right hand arrow to advance to the next slide. 4

  5. 9. When you have completed your recording, click ‘Exit Show’ at the top of the screen. 10. You will be prompted by a pop-up window that asks if you want to save your slides timings. Click yes and you will save your narration. 5

  6. 11. Your presentation will now have audio attached the slides. This is indicated by a speaker icon in the bottom right-hand corner. (See screen shot below(a)) 12. You can now play your narrated presentation by clicking the ‘From Start button’ (b) (see the above screenshot) 6

  7. 13. You now need to automate the slide transitions. Under the ‘Slide Show’ tab there is a lower tab called “Set Up Show.” (c.) Click this and a drop down box appears. Ensure the “Using timings, if present” (d.) is set. (The presentation will use the narration timings you recorded as the points to advance slides.) 18. Now save your presentation. 7

  8. 19. To upload your presentation to Moodle, sign in and select the relevant module course and click the ‘Add new discussion topic’ as you would normally to make a contribution. 8

  9. 20. You can now add your presentation along with any heading and comments in the ‘Discussion Topics’ fields. To add your presentation, simply select the presentation on your computer and drag into the attachment box and when ready click the ‘Post to Forum’ button. 21. Your comments and your presentation will appear on the Moodle forum for other participants to access. 9

Download Presentation
Download Policy: The content available on the website is offered to you 'AS IS' for your personal information and use only. It cannot be commercialized, licensed, or distributed on other websites without prior consent from the author. To download a presentation, simply click this link. If you encounter any difficulties during the download process, it's possible that the publisher has removed the file from their server.

Recommend


More recommend