How to Narrate Your Power Point Presentation- PowerPoint 2018 These - - PDF document

how to narrate your power point presentation powerpoint
SMART_READER_LITE
LIVE PREVIEW

How to Narrate Your Power Point Presentation- PowerPoint 2018 These - - PDF document

How to Narrate Your Power Point Presentation- PowerPoint 2018 These instructions were developed using Windows 10. For Mac computers, we advise you to use Keynote or QuickTime instead of PowerPoint for Mac which omits audio from the final video


slide-1
SLIDE 1

Updated May 2020

How to Narrate Your Power Point Presentation- PowerPoint 2018

These instructions were developed using Windows 10. For Mac computers, we advise you to use Keynote or QuickTime instead of PowerPoint for Mac which omits audio from the final video

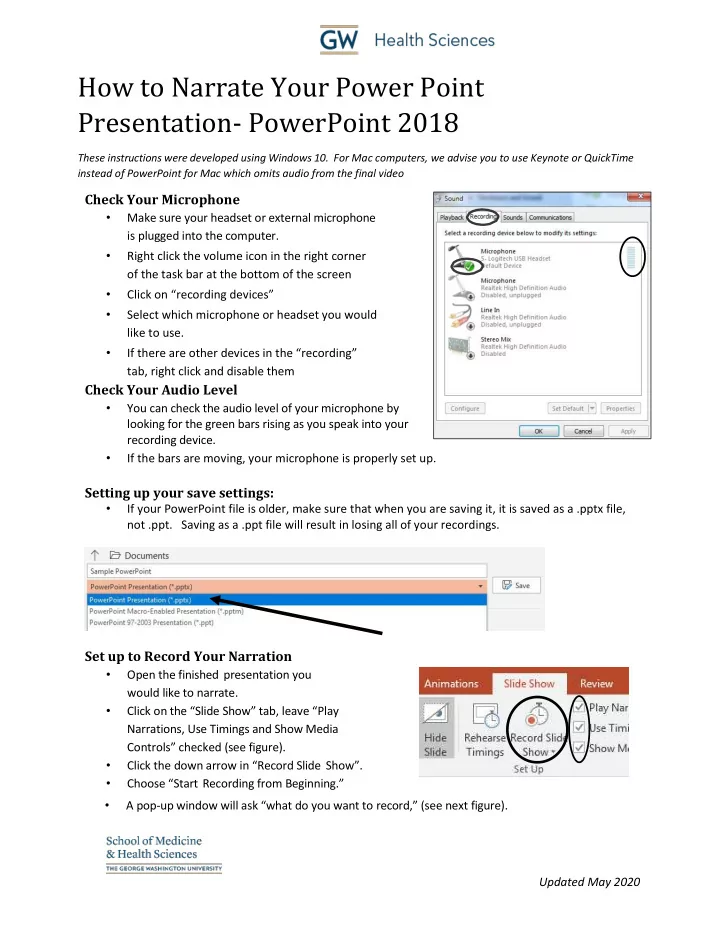
Check Your Microphone

  • Make sure your headset or external microphone

is plugged into the computer.

  • Right click the volume icon in the right corner
  • f the task bar at the bottom of the screen
  • Click on “recording devices”
  • Select which microphone or headset you would

like to use.

  • If there are other devices in the “recording”

tab, right click and disable them

Check Your Audio Level

  • You can check the audio level of your microphone by

looking for the green bars rising as you speak into your recording device.

  • If the bars are moving, your microphone is properly set up.

Setting up your save settings:

  • If your PowerPoint file is older, make sure that when you are saving it, it is saved as a .pptx file,

not .ppt. Saving as a .ppt file will result in losing all of your recordings.

Set up to Record Your Narration

  • Open the finished presentation you

would like to narrate.

  • Click on the “Slide Show” tab, leave “Play

Narrations, Use Timings and Show Media Controls” checked (see figure).

  • Click the down arrow in “Record Slide Show”.
  • Choose “Start Recording from Beginning.”
  • A pop-up window will ask “what do you want to record,” (see next figure).
slide-2
SLIDE 2

Updated May 2020

  • “Slide and animation timings” and “Narrations and laser pointer” are selected by default, (see

figure below). Leave them selected. (If the “Narrations, ink, and laser pointer” option is greyed

  • ut, it is most likely because your microphone is not

plugged in or not set up properly. Choose “Cancel” and see the “Check the Microphone” section at the beginning of this guide.)

Start Recording

  • Click “Start Recording” in the pop-up window, (see figure above).
  • The presentation will open in full screen slide show mode and recording will begin immediately.
  • There should be a small “Recording” toolbar in

the upper left-hand corner where you can pause recording at any time, (see figure).

  • You can use the arrow in this tool bar to move to the next slide. The timing of this slide advance is

recorded in time with the narration.

  • When you are finished recording the slide or the entire presentation, press the Esc button on

your keyboard to stop.

  • Each slide with an audio recording should now have an audio icon on it, (see figure).
  • After recording a few slides, play them back in Slide Show mode to confirm the

recording was done correctly.

Re-Recording a Slide

  • While recording a slide, if you decide you want to re-record the audio for the slide you are on:
  • Click on the “Repeat” arrow in the recording toolbar, (see figure above).
  • The recording will pause and the timer will return to “00:00.”
  • Click “Resume Recording” to re-record the audio for the current slide.
  • Press the Esc button on your keyboard to stop, or,
  • You can continue to the next slide by clicking the arrow.
  • If you are done recording the narration for the entire presentation and wish to go back and re-

record a slide:

  • Select the slide, and in the “Slide Show” tab, click the arrow next to “Record Slide

Show.”

  • Click “Start Recording from Current Slide.”
  • When you are finished re-recording the audio for that slide, press the Esc button on

your keyboard to stop.

  • If you want to keep re-recording a number of slides in a row, continue advancing with the right

arrow and stop when you are finished. You will record over the original narration for those slides.

Deleting Audio

In the Slide Show tab, click the down arrow next to “Record Slide Show” and choose “Clear” to delete the narration from one slide or the entire presentation.

slide-3
SLIDE 3

Updated May 2020

Saving your Presentation as a Video

  • To save your narrated presentation as a video so the audio will play as the slides advance.

Go to “File” and select “Export” and select “Create a Video.”

  • Under the first box, use the down arrow to select

“Internet Quality.” (see figure)

  • Be sure the “Use Recorded Timings and Narration”

box is also selected.

  • Click “Create Video.” Choose a location where you

want to save your video. PowerPoint will automatically save the video as a “MPEG-4”

  • video. Select “Save.”

After you have saved your narrated presentation, you can upload the video to YouTube and embed it in Blackboard to easily share with your students. See the tutorial “How to Upload a Video to YouTube and Embed it in Blackboard.”

Extra Tips

  • If you want to use your PowerPoint “Notes” as you speak, print them out or have them
  • pen in another application, for example in a Word document. You won’t be able to see

them because recording is done while your presentation is in full screen mode. Actually, it’s a good idea to type a script when possible. A script helps keep you focused.

  • To advance slides during your recording, instead of clicking on the arrow in the Recording

toolbar, you could use the right arrow key on your keyboard, or click your mouse (left side)

  • r click the space bar. Whatever you find more comfortable.
  • To stop recording the audio for a slide, instead of using the Esc keyboard button, you could

also click on the close button (X) in the Recording toolbar, or right click the slide and choose “End Show.” Need more assistance? Linda Cotton Senior Instructional Technologist cottonl@gwu.edu Laurie Lyons Director Instructional Design and Technology lbl@gwu.edu Alison McGuire Instructional Technology Specialist alisonmcguire@gwu.edu