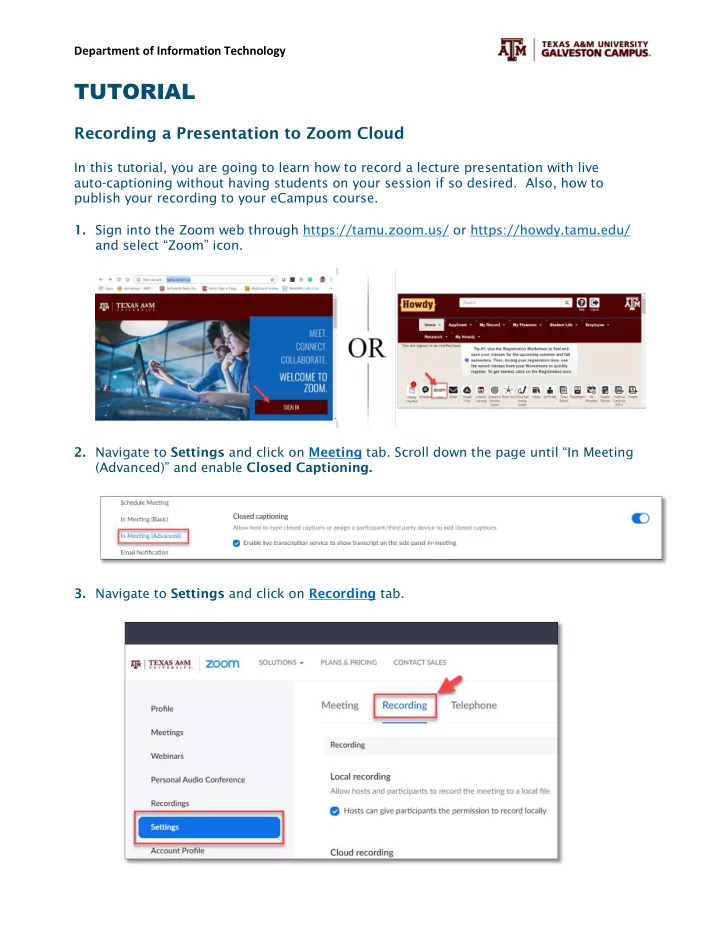

Department of Information Technology TUTORIAL Recording a Presentation to Zoom Cloud In this tutorial, you are going to learn how to record a lecture presentation with live auto-captioning without having students on your session if so desired. Also, how to publish your recording to your eCampus course. 1. Sign into the Zoom web through https://tamu.zoom.us/ or https://howdy.tamu.edu/ and select “Zoom” icon. 2. Navigate to Settings and click on Meeting tab. Scroll down the page until “In Meeting (Advanced)” and enable Closed Captioning. 3. Navigate to Settings and click on Recording tab.
Department of Information Technology 4. Under the Cloud Recording section, set the following: 4.1. Enable “ Cloud recording ”. 4.2. Enable “ Record active speaker with shared screen ”. 4.3. Disable “ Record gallery view with shared screen ”. 4.4. Disable “ Record active speaker, gallery view and shared screen separately ”. 4.5. Disable “ Display participants' names in the recording”. 4.6. Enable “ Record thumbnails when sharing ”. 5. Under your TAMU Zoom webpage, click on “ HOST A MEETING ” on the top-right of the screen, choose with video off or on. An alternative way is opening your Zoom client app, selecting “ Home ” menu, and “ New Meeting ”. Option A. Using tamu.zoom.us Option B. Using Zoom Client
Department of Information Technology 6. During your Zoom session, you will need to: 6.1. Turn ON your video if you want to record it. 6.2. Open your Power Point presentation (in slide show) or content that you are planning to use during your lecture. 6.3. Select “ Share Screen ” on your Zoom controls, select “ Screen ” (if you have multiple screens, select the one that is displaying the content you want to record), check “ Share computer sound ” if your content has recorded sound or music, and finally click “ Share ” to confirm.
Department of Information Technology 6.4. Display your Zoom controls, now located on the top of your screen (move your mouse over), select “ More ”, select “ Live Transcript ”, and “ Enable Auto- Transcription ”. If you are NOT sharing your screen the Zoom controls will appear on the bottom of your screen as “ Live Transcript ”. 6.5. To avoid distractions on your screen, it is recommended to hide your subtitles. Select “ More ” under your Zoom controls and select “ Hide Subtitle ”. After you record the presentation the viewers will have the option to enable or disable closed-captioning while streaming your video. 6.6. Display your Zoom controls on the top of your screen (move your mouse over), select “ More ” and select “ Record to the Cloud ” when you are ready to record the session.
Department of Information Technology 6.7. Pause or stop the recording if needed by selecting “ More ” and “ Pause Recording ” (if you are planning to continue recording later) or “ Stop Recording ” (if you want to end the recording or start a new recording). 6.8. If you are not sharing your screen, your recording options will display at the bottom of the screen on your Zoom controls. 6.9. After you complete your recording(s), end your meeting and after a few hours check your recordings on https://tamu.zoom.us/recording. Select “ Share ” under the name of your meeting (verify the correct meeting by checking the start time). 6.10. Select the preferred options and select “ Display detailed information ” to copy the URL of your recording. Select “ Done ” to save any updates.
Department of Information Technology 6.11. Open your eCampus course. Select or create the content area to include your recorded lectures, then select “ Build Content ” on your content area menu, and choose “ Web Link ”. Review this tutorial to learn how to create a new content area in eCampus. 6.12. Type a name for your web link and paste the URL you copied from your Zoom website. Type a description for your lecture recording (optional), select your preferred options, and select “ Submit ”. 6.13. Inform the students that there is a new recording and where it is located.
Recommend
More recommend