recording a presentation in zoom
play

Recording a Presentation in Zoom IMPORTANT : It is recommended that - PDF document

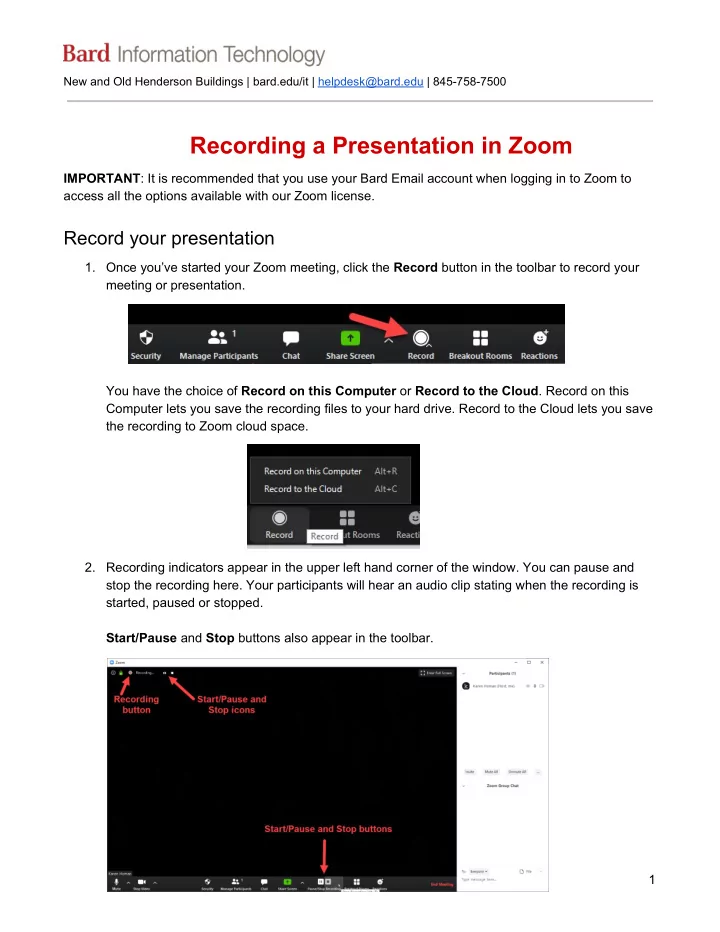
New and Old Henderson Buildings | bard.edu/it | helpdesk@bard.edu | 845-758-7500 Recording a Presentation in Zoom IMPORTANT : It is recommended that you use your Bard Email account when logging in to Zoom to access all the options


  1. New and Old Henderson Buildings | bard.edu/it | ​ helpdesk@bard.edu ​ | 845-758-7500 Recording a Presentation in Zoom IMPORTANT ​ : It is recommended that you use your Bard Email account when logging in to Zoom to access all the options available with our Zoom license. Record your presentation 1. Once you’ve started your Zoom meeting, click the ​ Record ​ button in the toolbar to record your meeting or presentation. You have the choice of ​ Record on this Computer ​ or ​ Record to the Cloud ​ . Record on this Computer lets you save the recording files to your hard drive. Record to the Cloud lets you save the recording to Zoom cloud space. 2. Recording indicators appear in the upper left hand corner of the window. You can pause and stop the recording here. Your participants will hear an audio clip stating when the recording is started, paused or stopped. Start/Pause ​ and ​ Stop ​ buttons also appear in the toolbar. 1

  2. New and Old Henderson Buildings | bard.edu/it | ​ helpdesk@bard.edu ​ | 845-758-7500 NOTE ​ : There are no options to turn on captions during a Zoom meeting/recording session. However, Zoom does save a transcript of the recording which can then be viewed and edited in the Zoom cloud. See ​ Record to the Cloud ​ below for more details. 3. After you stop your meeting/presentation, you’ll see a window confirming your recording is being produced. Leave this window alone unless you want to stop converting the recording. This may take some time depending on the length of your meeting. Record on This Computer If you chose ​ Record on This Computer ​ , you’ll then be asked where you want the recordings to be saved on your hard drive. Browse to the folder you want the file saved and click ​ OK ​ . (You might want to create a folder ahead of time to put the files in.) There will be three files: ● The ​ mp4 ​ version of your recording is the one you will use for playback and or sharing. ● (You should rename the mp4 file something more recognizable.) ● There is NO transcript file provided. The mp4 file is simply a playback of your recorded Zoom meeting. 2

  3. New and Old Henderson Buildings | bard.edu/it | ​ helpdesk@bard.edu ​ | 845-758-7500 Record to the Cloud 1. If you chose ​ Record to the Cloud ​ , you will get an email about your files letting you know that your cloud recording is available. A short time later, you also receive a separate email letting you know that the audio transcript for the recording is available. These emails include links to view your recording and transcript. Included in the email are links to the Zoom cloud. ● The first link will enable you to view, download and edit your recording. ● The second link is to share your recording with the integrated transcript.This recording with transcript is ONLY available to be viewed in the Zoom cloud. To share the recording with someone, you can send them the second link. 2. To edit the recording, click on the first link. (If you misplace or can’t find the email with these links, you can always login to Zoom directly by clicking on the ​ red Login button ​ in the Bard Zoom Portal ​ . ​ https://bard.zoom.us/ ​ ) 3

  4. New and Old Henderson Buildings | bard.edu/it | ​ helpdesk@bard.edu ​ | 845-758-7500 Whether you login using the Zoom portal or you click on the first link in the email, you will be brought to Zoom’s website, your account, and the recording you want to edit. On the left menu there is a Recordings button and if you click on it you will see all the recordings you have saved to the Zoom cloud. ● To edit your recording transcript, click on the ​ video file ​ . ​ (1) On the right hand side of the screen click the pencil icon next to any part of the transcript you’d like to edit. Make your corrections in the text box that opens and then click ​ Save ​ . 4

  5. New and Old Henderson Buildings | bard.edu/it | ​ helpdesk@bard.edu ​ | 845-758-7500 Embedding the Transcript The transcript is automatically embedded within the audio and video file, but is hidden by default. To see the transcript embedded in the audio or video file: 1. Open the audio or video file 2. Click the ​ Play ​ button. 3. Click the ​ CC ​ icon at the bottom right of the screen. Note: ​ The text displays on top of the video, similar to closed ​ captioning ​ . ● To download your recording files, click ​ Download ​ . ​ (2) You’ll be asked to save three files, the transcript, the mp4 of the video and an audio m4a file. Click on the ​ Save ​ button to save these files. (You might want to create a folder ahead of time to save the files to.) ● To get a sharable link to the file, click ​ Copy sharable link ​ . ​ (3) This link can then be shared in an email or posted in an LMS to be viewed. ● To delete the recording click on the ​ trashcan icon ​ next to the ​ Copy Shareable link ​ icon. IMPORTANT: ​ Please note that cloud recordings will be deleted automatically after they have been stored in the cloud for 60 days due to storage constraints. It is therefore recommended that you download the files for safekeeping. 5

  6. New and Old Henderson Buildings | bard.edu/it | ​ helpdesk@bard.edu ​ | 845-758-7500 Merging a Video File with the Transcript in Google One of the ways to merge a video file that includes the transcript as captions is to do this in Google Drive. You begin by downloading your files from the Zoom cloud. See ​ Record to the Cloud ​ section above. Download your recording files to your computer, then upload them to ​ Google Drive ​ . Keep them together in a folder. They will look similar to this: 1. In ​ Google Drive ​ , select the ​ mp4 file ​ (NOT m4a) and then click on the ​ three dots menu ​ in the upper right corner of the Drive window or right-click on the file and select ​ Manage Caption Tracks ​ . 2. Click ​ Add New Caption Tracks ​ in the next window. 6

  7. New and Old Henderson Buildings | bard.edu/it | ​ helpdesk@bard.edu ​ | 845-758-7500 3. Find the transcript file in Google Drive and click ​ Select ​ in the lower left corner of the window. (It should have the word transcript in it.) 4. Click ​ Upload ​ to sync the files. 5. Then you can click to preview the video and download the video with text added. Issues ​ : ● The caption file must be less than 2 MB. ● you cannot edit the transcript afterwards. ● If the caption file is longer than the source video, they won't be able to auto-sync. ● Relies heavily on network availability. 7

Download Presentation
Download Policy: The content available on the website is offered to you 'AS IS' for your personal information and use only. It cannot be commercialized, licensed, or distributed on other websites without prior consent from the author. To download a presentation, simply click this link. If you encounter any difficulties during the download process, it's possible that the publisher has removed the file from their server.

Recommend


More recommend