Creating a PowerPoint Presentation with Narration Create your - - PDF document

creating a powerpoint presentation with narration
SMART_READER_LITE
LIVE PREVIEW

Creating a PowerPoint Presentation with Narration Create your - - PDF document

Creating a PowerPoint Presentation with Narration Create your PowerPoint presentation (the same way you normally would) Using your computers microphone or a headset microphone, follow the directions on Microsofts support page (Link


slide-1
SLIDE 1

Creating a PowerPoint Presentation with Narration

  • Create your PowerPoint presentation (the same way you normally would)
  • Using your computer’s microphone or a headset microphone, follow the directions on

Microsoft’s support page (Link Here)

  • Please note that a headset microphone tends to provide higher sound quality
  • Make sure you stop speaking your narration during every slide advance to avoid

any loss of audio in your recording

  • Once finished, test the file to ensure the audio level quality and also that the

slides advance properly

  • When the sound is all set, please save this file with your first and last name, abstract

number and COS2020.

  • Then save the PowerPoint presentation as an MP4 video file. Please follow the

instructions below.

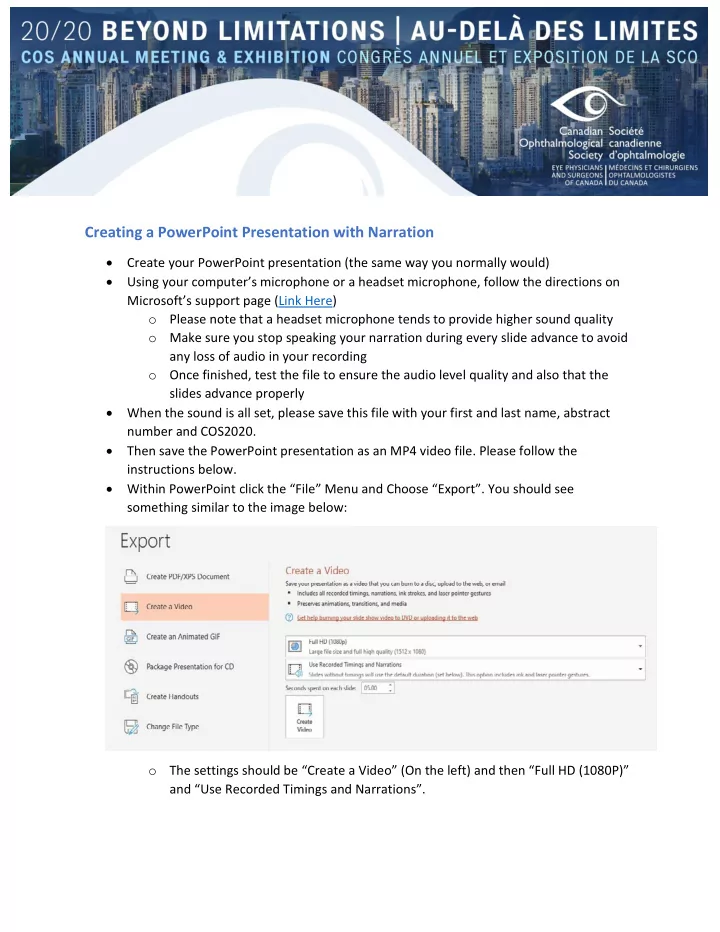
  • Within PowerPoint click the “File” Menu and Choose “Export”. You should see

something similar to the image below:

  • The settings should be “Create a Video” (On the left) and then “Full HD (1080P)”

and “Use Recorded Timings and Narrations”.

slide-2
SLIDE 2
  • Click the “Create Video” button and save the file as an MP4 – Note: This will save

int eh same location as your presentation file on your computer and the process may take a few minutes, depending on the complexity of your slides. You will see a progress bar in the bottom right of your screen as the video is being encoded:

  • Once the file is saved as an MP4, close out of PowerPoint and open the MP4

video on your computer. It should playback now as a video on your machine.

  • With this MP4 file, you are ready to upload your presentation to the COS Annual

Meeting

Creating an Apple Keynote Presentation with Narration

  • Create your Keynote presentation (the same way you normally would)
  • Select the slide where you want the narration to start
  • Click the [Play] menu and select [Record Slideshow…]
  • In recording mode you will see current time, current slide and the next slide. You

can change what you see by clicking the layout icon in the upper right

  • The recording controls are at the bottom left of the window
  • To start recording, click the [Red Circle] icon at the bottom of the window in the

recording controls. The timer begins a 3-second countdown before recording starts.

  • Begin speaking into the microphone. You can pause recording by clicking the

pause button at any time.

  • Advance to the next slide using the [Shift] + [Down Arrow]. Make sure you stop

speaking your narration during every slide advance to avoid any loss of audio in your recording.

  • When you have finished recording click the [Red Circle] icon to stop recording.
  • Press the Escape [Esc] key or the [Exit] button in the upper left to save the

recording and exit recording mode

slide-3
SLIDE 3

KEYNOTE RECORDING MODE SCREEN

  • To export your presentation to a movie file, click the [File] menu and select [Export To]

then [Movie]. Select Playback [Slideshow Recording] and Resolution [1080p] then export your presentation:

  • With this file, you are ready to upload your presentation to the COS Annual Meeting

*NOTE: Adding a new slide to your presentation after recording narration will trigger an alert that the recording could be out of sync with the presentation. To delete a voiceover narration in a presentation, in the [Play] menu, select [Clear Recording[. To delete your narration in recording mode click the [Trach Can] icon in the lower left.