HOW TO RECORD NARRATION OVER A POWERPOINT PRESENTATION This guide - - PDF document

how to record narration over a powerpoint presentation
SMART_READER_LITE
LIVE PREVIEW

HOW TO RECORD NARRATION OVER A POWERPOINT PRESENTATION This guide - - PDF document

SUPPORTING STUDENT LEARNING ONLINE 11 HOW TO RECORD NARRATION OVER A POWERPOINT PRESENTATION This guide explains how to record narration over a PowerPoint presentation. You can also do this via Collaborate Ultra (this is explained in a


slide-1
SLIDE 1

HOW TO RECORD NARRATION OVER A POWERPOINT PRESENTATION

This guide explains how to record narration over a PowerPoint presentation. You can also do this via Collaborate Ultra (this is explained in a separate guide). Using audio-visual materials, such as narration over PowerPoint, can enhance students’ engagement and reinforce

  • learning. Audio enables you to provide nuance and emphasis on the materials through the modulation of your voice, this

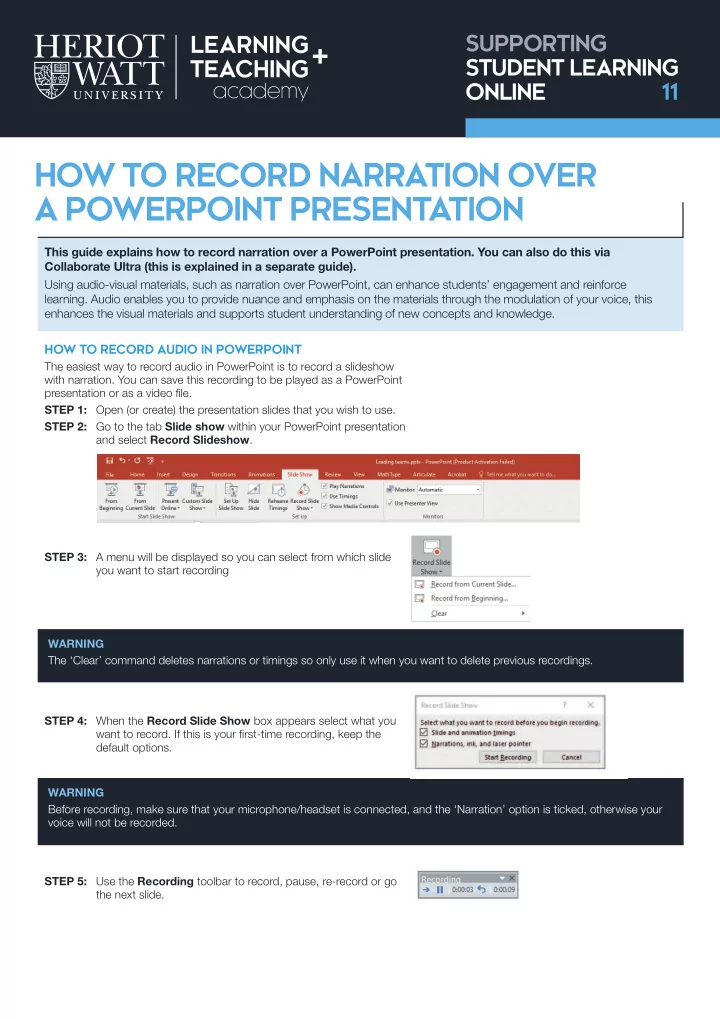
enhances the visual materials and supports student understanding of new concepts and knowledge. HOW TO RECORD AUDIO IN POWERPOINT The easiest way to record audio in PowerPoint is to record a slideshow with narration. You can save this recording to be played as a PowerPoint presentation or as a video fjle. STEP 1: Open (or create) the presentation slides that you wish to use. STEP 2: Go to the tab Slide show within your PowerPoint presentation and select Record Slideshow. STEP 3: A menu will be displayed so you can select from which slide you want to start recording STEP 4: When the Record Slide Show box appears select what you want to record. If this is your fjrst-time recording, keep the default options. STEP 5: Use the Recording toolbar to record, pause, re-record or go the next slide. WARNING The ‘Clear’ command deletes narrations or timings so only use it when you want to delete previous recordings. WARNING Before recording, make sure that your microphone/headset is connected, and the ‘Narration’ option is ticked, otherwise your voice will not be recorded.

SUPPORTING STUDENT LEARNING ONLINE 11

slide-2
SLIDE 2

When you fjnish recording your narration, a sound icon appears in the lower-right corner of each slide that has narration. STEP 6: To end your recording, right-click the fjnal slide of your presentation and click End Show. If this is the first time that you are recording audio as a narration in PowerPoint, leave the default timing settings. ANOTHER WAY TO RECORD AUDIO IN POWERPOINT As some users may fjnd it a challenge to record voice over while delivering a slide presentation, there is an alternative way of recording audio for which you do not have to worry about timings or moving to the next slide when you are recording. This is also a more suitable option if you want to use an external fjle as a narration or if you just want to record slide by slide. STEP 1: From the main menu of PowerPoint, select ‘Insert’ then Audio. STEP 2: To record audio for this slide, select the option Record Audio.

  • If you want to use an external audio fjle, select the option Audio on

my PC and upload the fjle to your presentation.

  • From the different external audio fjles supported by PowerPoint, we

recommend using the formats mp3 and m4a which are the most effjcient formats in terms of quality and fjle size. LISTEN TO YOUR RECORDING Both recording methods create an audio icon on the slide. Click on the icon to listen to your recording. ADVANCED RECORDING SETTINGS For more information on how to record a narration in PowerPoint and how to use advanced settings, visit the Microsoft website. SAVING YOUR PRESENTATION AS A VIDEO Once you have recorded your narration, you can:

  • Continue to save the presentation as a PowerPoint fjle which can then

be shared with students.

  • Export the content as a video fjle by selecting the option File > Export

> Create a video. Usually the options Internet Quality or Low quality are best for streaming your video from online platforms such as Stream or Vision. Your presentation will be exported as an mp4 fjle. WARNING Some students may have limited bandwidth or access to the internet,

  • nly use video where it is essential for pedagogic purposes.
slide-3
SLIDE 3

TOP TIPS

  • Before recording, make sure that the microphone/headset is

connected and the ‘Narration’ option is ticked, otherwise your voice will not be recorded.

  • For higher quality audio, use an external microphone or headset.
  • If this is the fjrst time that you are recording audio as a narration in

PowerPoint, leave the default timing settings.

  • PowerPoint does not record audio or video during transitions

between slides, so don’t speak while advancing the slide.

  • Recordings are added to the presentation on a per-slide basis, so

if you want to change a recording, you only need to re-record the affected slide or slides.

  • You can rearrange the order of slides after recording without

having to re-record anything.

  • Exporting your presentation as video can take up considerable

bandwidth so if you have a long PowerPoint presentation, consider breaking it sub-presentation or save slides and narration as a PowerPoint presentation.

  • You cannot record narration in PowerPoint for the web. Use a

desktop version of PowerPoint to record your narration.

TROUBLESHOOTING

  • Most recording problems are caused by PowerPoint not

recognising the microphone or headset so start by checking your audio settings.

  • Visit the

Microsoft community for advice on how to troubleshoot most of the common problems with PowerPoint. FURTHER RESOURCES Microsoft PowerPoint Help and Learning https://support.offjce.com/en-gb/powerpoint Microsoft ‘You can make a narrated PowerPoint video’ https://www.youtube.com/watch?v=Y5dgwwa5XRA

SHARING WITH STUDENTS Once you have saved your fjle as a PowerPoint presentation

  • r as an mp4 video, then this can be shared with students

by adding to Vision (See SSLO Toolkit guide 01 Uploading materials to Vision for guidance on how to do this). If you want the recording to be automatically available on Vision, we recommend that you record in Collaborate Ultra (see the SSLO Toolkit for guidance on how to do this.) NOTES CONTACT US E: LTAcademy@hw.ac.uk FOLLOW US @LTA_HWU

www.lta.hw.ac.uk

This work is licensed under a Creative Commons Attribution-NonCommercial-ShareAlike 4.0 International License