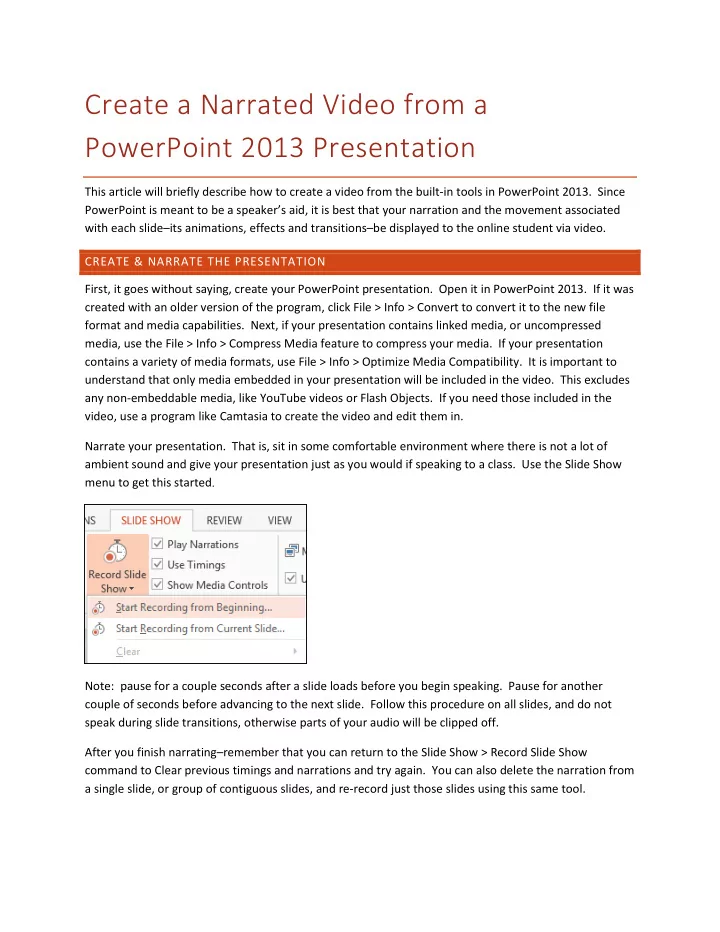

Create a Narrated Video from a PowerPoint 2013 Presentation This article will briefly describe how to create a video from the built-in tools in PowerPoint 2013. Since PowerPoint is meant to be a speaker’s aid, it is best that your narration and the movement associated with each slide–its animations, effects and transitions–be displayed to the online student via video. CREATE & NARRATE THE PRESENTATION First, it goes without saying, create your PowerPoint presentation. Open it in PowerPoint 2013. If it was created with an older version of the program, click File > Info > Convert to convert it to the new file format and media capabilities. Next, if your presentation contains linked media, or uncompressed media, use the File > Info > Compress Media feature to compress your media. If your presentation contains a variety of media formats, use File > Info > Optimize Media Compatibility. It is important to understand that only media embedded in your presentation will be included in the video. This excludes any non-embeddable media, like YouTube videos or Flash Objects. If you need those included in the video, use a program like Camtasia to create the video and edit them in. Narrate your presentation. That is, sit in some comfortable environment where there is not a lot of ambient sound and give your presentation just as you would if speaking to a class. Use the Slide Show menu to get this started . Note: pause for a couple seconds after a slide loads before you begin speaking. Pause for another couple of seconds before advancing to the next slide. Follow this procedure on all slides, and do not speak during slide transitions, otherwise parts of your audio will be clipped off. After you finish narrating–remember that you can return to the Slide Show > Record Slide Show command to Clear previous timings and narrations and try again. You can also delete the narration from a single slide, or group of contiguous slides, and re-record just those slides using this same tool.
CREATE THE VIDEO Click on the File tab > Export > Create a Video.
CONFIGURE THE VIDEO Now, configure the video. You must choose a screen resolution. These are your choices: Note that the resolutions are all at the 16:9 aspect ratio because that is the ratio at which the slide show was created. Had we created the slide show using the 4:3 aspect ratio our choices would be 4:3 aspect ratio (960x720; 640x480;320x240). Next, tell PowerPoint to use the timings and narrations you have just recorded. (Don’t be confused by the dialog field that says ”Seconds to spend on each slide” followed by the 5.00 control. This will only apply if you choose NOT to use your own narrations and timings.
CREATE THE VIDEO Now click Create Video. You will have to specify what to call the file and where to put it on your system. It is wise to include the resolution you have chosen in the file name, for example, Filename1280x720.mp4 , so that you can later easily recall this detail. Your computer will go to work. Get a cup of coffee because video production is processor intensive and can take a good long time, depending on the resolution you have chosen and the length of your presentation and narrative. For learning purposes, research has shown that several short videos are better than one long one. You will see a progress bar in the status bar of PowerPoint to indicate how it is getting along. CREATE A LINK TO THE VIDEO That’s it! You now have an MP4 version of your presentation including your narration and animations. Place it where your students can get at it. How? 1. We recommend you place it on YouTube. This is the most generic possible solution for getting your video on the web and guaranteeing it will play on whatever equipment your students have. If you are concerned about strangers happening upon your video, it can be set as an “Unlisted” video at YouTube, meaning it will not be searchable or easily found except by those to whom you provide the link. Embedding in Blackboard is the best option to insure exclusive access. 2. If you do not want your video on YouTube, and you work at Palomar College, then we recommend you place it in your Palomar web space and create a URL (“external”) link to it in your Blackboard course. If you have not used Palomar web space yet, call Chris Norcross at ext. 2862 and he will explain how to login and begin using your space. Once the video is uploaded to your Palomar web space simply link to it from Blackboard, or anywhere else you wish. 3. You may also want to post your video within some cloud-based file storage service (e.g. OneDrive, Dropbox) and link to the video. Most services will offer some security options, but for maximum student access you may want to mark the video as publically accessible. 4. If you wish to upload the video itself into Blackboard we recommend you first convert it to an MP4 file, if it isn’t one already. There are many video conversion utilities you might use, and your computer may already contain one. Blackboard does not properly support the WMV file type, which is why we recommend the MP4 format.
Recommend
More recommend