SLIDE 1
Using OBS Studio and webcams in the classroom for presentation
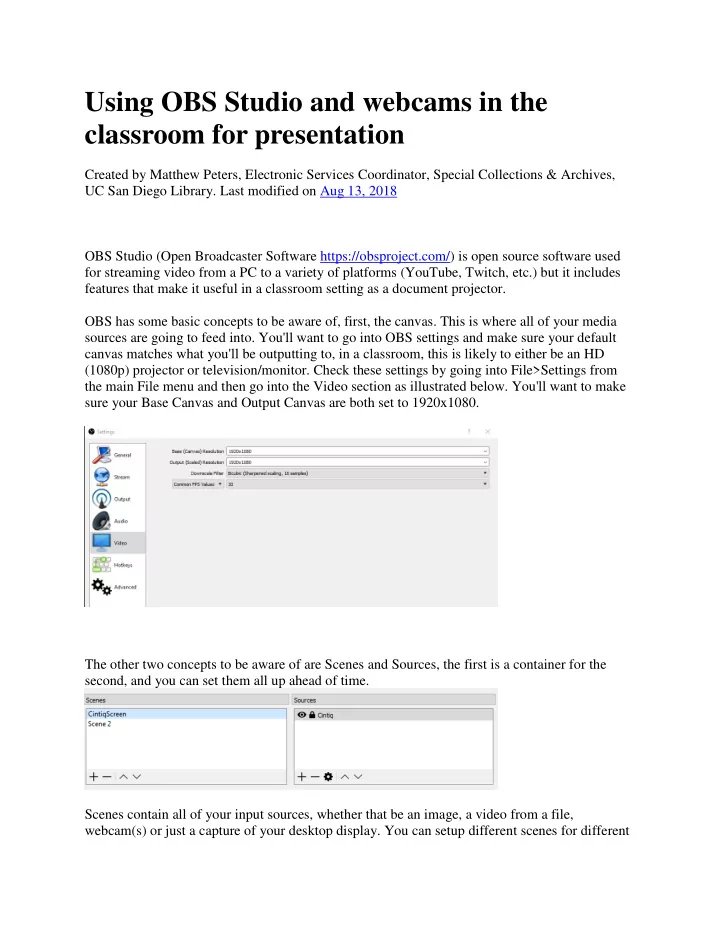
Created by Matthew Peters, Electronic Services Coordinator, Special Collections & Archives, UC San Diego Library. Last modified on Aug 13, 2018 OBS Studio (Open Broadcaster Software https://obsproject.com/) is open source software used for streaming video from a PC to a variety of platforms (YouTube, Twitch, etc.) but it includes features that make it useful in a classroom setting as a document projector. OBS has some basic concepts to be aware of, first, the canvas. This is where all of your media sources are going to feed into. You'll want to go into OBS settings and make sure your default canvas matches what you'll be outputting to, in a classroom, this is likely to either be an HD (1080p) projector or television/monitor. Check these settings by going into File>Settings from the main File menu and then go into the Video section as illustrated below. You'll want to make sure your Base Canvas and Output Canvas are both set to 1920x1080. The other two concepts to be aware of are Scenes and Sources, the first is a container for the second, and you can set them all up ahead of time. Scenes contain all of your input sources, whether that be an image, a video from a file, webcam(s) or just a capture of your desktop display. You can setup different scenes for different
SLIDE 2 purposes and move between them. E.g., you could set up an initial scene that just had an image as the source welcoming people to the class. You can create and delete scenes and sources with the +/- buttons beneath their sections. To create a scene simply hit the + and give it a name in the dialog box. Assuming we want to set up a scene that contains our webcam let’s call it Webcams. This creates an empty scene. Now
- ver in sources we can add a webcam by clicking on the + and choosing Video Capture Device.
You can see from the menu all the different source options, and you can have multiple sources stacked on top of each other. The one at the top of your list is going to be the main window source and other sources will visually stack on top of that one as you go down the list. So say you have one webcam on a swing arm point at a large map on a table -- you want that to be your screen filler. But under that, you could add a second webcam that is pointing at you so that the folks in the back of the class can see you clearly; that window can be scaled down and situated in a corner out of the way. Once you have the webcam added as a source you likely need to right click on it and select Properties in the pop-up menu to get it to display at its highest resolution possible. This will likely take a bit of fiddling unless one of the presets happens to work (you'll want the main document camera to be running at 1920x1080 so it's not scaling the image up to fill your canvas).
SLIDE 3
The two settings you want to pay most attention to here is Resolution and FPS. You might need to adjust the FPS setting until a picture shows up in OBS, if you aren't seeing anything, try setting the FPS to a static number (start with Highest FPS, then 30, hopefully something shows up at 30, if not, drop it lower). You are likely going to want to be running OBS on a laptop, with it plugged into the projector/monitor, but instead of mirroring your display to the monitor you will want to have it extend your screen to that monitor. In Windows 10 this is done by right clicking on your desktop, choosing Display Settings scrolling down to Multiple Displays and choosing "Extend these displays". Windows 7 and MacOS have similar settings. Once you have your scene composed to your liking you can then shoot the scene to the projector/tv/monitor in the room. You do this simply by right clicking on the Scene and selecting "Fullscreen Projector (Scene)" and then choosing the monitor you want to project to (likely Display 1, Display 0 is usually your laptop screen). Do you have multiple scenes set up you want to change between, just flip between them by repeating this step.