Uploading Adobe Presenter Presentation through FTP These - - PDF document

uploading adobe presenter presentation through ftp
SMART_READER_LITE
LIVE PREVIEW

Uploading Adobe Presenter Presentation through FTP These - - PDF document

UTHSC Teaching and Learning Center Uploading Adobe Presenter Presentation through FTP These step-by-step instructions will demonstrate how to successfully upload your published Adobe Presenter Presentation to the web server through FTP. I. Once


slide-1
SLIDE 1

UTHSC Teaching and Learning Center

tlc@uthsc.edu • uthsc.edu/tlc

1

Uploading Adobe Presenter Presentation through FTP

These step-by-step instructions will demonstrate how to successfully upload your published Adobe Presenter Presentation to the web server through FTP.

  • I. Once your presentation has been created and saved, Click on Publish
  • n the Adobe Presenter ribbon.
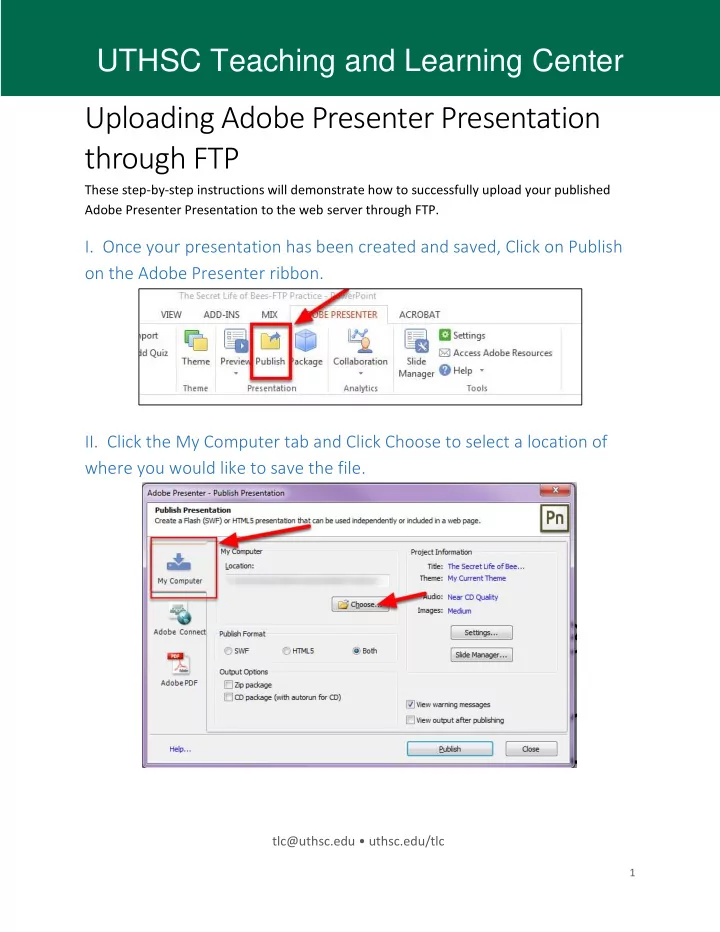
  • II. Click the My Computer tab and Click Choose to select a location of

where you would like to save the file.

slide-2
SLIDE 2

UTHSC Teaching and Learning Center

tlc@uthsc.edu • uthsc.edu/tlc

2

  • III. Choose a folder in which to publish the file.
  • 1. Right click on the location you would like to save the presentation.
  • 2. Go to New and select Folder
  • 3. Type a name for the folder (preferably without any spaces or special characters)
  • 4. Make sure the newly created folder is selected and click OK.

NOTE: There will already be a folder created with the name of your PowerPoint presentation on your coumputer, this folder will be contains source files created by Adobe Presenter. Do not publish to this folder.

slide-3
SLIDE 3

UTHSC Teaching and Learning Center

tlc@uthsc.edu • uthsc.edu/tlc

3

  • IV. Under Publish Format, make sure that "Both" is selected then click

Publish.

  • V. Once the publishing process is complete, open the FileZilla Client

application.

You can find The FileZilla Client either on your desktop or under All Apps/Programs in your Start menu.

slide-4
SLIDE 4

UTHSC Teaching and Learning Center

tlc@uthsc.edu • uthsc.edu/tlc

4

  • VI. Once FileZilla Client is opened, type in authentication information.
  • 1. In the Host field, type sftp://connect.uthsc.edu.
  • 2. Type your UTHSC NetID and password in the username and password fields.
  • 3. In the Port field, type in the number 22.
  • 4. Click on Quickconnect to connect.
  • 5. If the connection to the server was successful, you will see success on the last Status line.

NOTE: If you are off campus, you must be connected to the VPN to be able to connect to the

  • server. Instructions for connection to the VPN can be found at www.uthsc.edu/vpn/
  • VII. Transferring the files
  • 1. On the right hand side, in the Remote site section, expand the folder that is labeled with

your NetID to reveal the public_html folder

  • 2. On the left hand side, under Local site, find the folder I which you saved your presentation

(Step III).

  • 3. Drag it to the public_html folder under your NetID that is located in the Remote site section
  • n the right hand side. This will start the transfer process.
  • 4. Once the files are transferred, you will see File transfer successful.

NOTE: Make sure to always drag the folder into the public_html folder on the server.

slide-5
SLIDE 5

UTHSC Teaching and Learning Center

tlc@uthsc.edu • uthsc.edu/tlc

5

  • VIII. Accessing and Sharing the Presentation

Now that the files have been uploaded to the server, open a web browser and type connect.uthsc.edu/~netid/Folder Name in the address bar: This is the URL to your presentation; you can use it to share your presentation. NOTE: Folder Name is the name you gave your folder in step III.