SLIDE 1
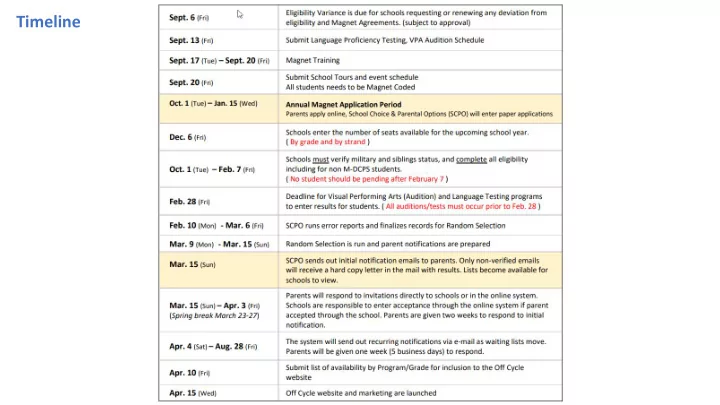
Timeline
SLIDE 2 Notes:
- Only the applications provided by School Choice and Parent Options are to be
used for registration. No additional applications can be used.
- Only one application per student is allowed. For double registration, the first
submitted application will be used.
- Transportation is not provided or handled by School Choice and Parent
- Options. Parents are to talk to the schools for possible transportation
solutions.
- No changes are allowed after the application has been submitted. Parents will
be able to add programs after submission if they did not select all their five
- ptions.
- All school related questions should be addressed by the school. Do not refer
parents to call our office to answer questions about your school.
SLIDE 3 Notes:
- Students must be registered full time in order to enter and remain in the
magnet program.
- We will no longer be accepting incoming 11th or 12th grade applications. All
upcoming 11th and 12th grade inquiries should contact each school directly after April 15 (Off-Cycle) regarding program space availability.
- All notifications are being sent out electronically via email. Only applications
without an email will be sent a letter via postal mail.
- Need schools to review ineligible applications for consideration
- All Magnet Schools must Magnet code their students. Failure in coding
impacts issues with budget, program viability and transportation. Please note we updated our Magnet codes.
- Consult with the Magnet office with any issues or questions.
SLIDE 4 Application Management - Access
Log into your employee portal and go to Apps and services
- section. Look for the Magnet Application system link. If you
do not see an option to log into the Magnet Application System please consult your principal to make sure they gave you permission to access the system. For access to our system principals will need to log into Quad A+ and give you “SCSS-SMARTCHOICE SCHL SITE” authorization.
SLIDE 5
Application Management – Overview
Displays the Program’s Applications you have access to view Allows you to view applications for different years
View and search thru all your applications View items related to the lottery system. Enter your Seat Numbers or View Lottery Results View your Testing or Auditions Schedules This section is used by Testing and VPA schools View and Export Reports View List of Parents registered View and search Student Records
SLIDE 6 Application Management – Search
Filter by Program Application Status Settings Access more search filters Filter by Keyword
- Ie. Student name or Student ID
View or Save your Search Filter Parameters Click “clear all filters” To Reset your search filter Filter by Grade or Lottery Result Status Filter by Application Flag Notices
SLIDE 7
Application Management – Search
SLIDE 8 Application Management – Save Search
After you select all your filter items and hit the filter button to display your results you can then save and access your filter settings by going into the “Saved Lists” “Saved Lists” will pop open a window where you can click on the “Store Current View as a Saved List,” to give your list a reference name. Once saved, you will have the option to Load your list, Edit or Remove. Loading will display your applications based on your saved filter parameters. Some sample Filters you can create:
- Pending Military Verification (based on the flag filter)
- Pending Sibling Verification (based on the flag filter)
- Pending Twin Verification (based on the flag filter)
SLIDE 9
Application Management
The Captured Selected tool which is located between the Search Parameter box and Application List allows you to perform special bulk tasks. For example you can send a Bulk Email, create a pre-formatted Print Letter, or a Report to all the applications you select in your list.
SLIDE 10
Application Management – Captured Selected Feature
First select the applications you want to capture. You can click on the check box in the blue bar to select all or manually select each application by clicking the check box in the list. Select an action option from the first and second drop down and click Capture Selected.
SLIDE 11 Application Management – Captured Selected Feature
If you select “Print Letters”, you will be given a second option to select what letter you want to
- print. After you select the letter type, click the
Capture Selected button. A New window will open to print. Each letter will be pre-filled with the applicant’s information.
SLIDE 12
Application Management – Capture Selected Feature
If you select email, click the Capture Selected button to enable your email options. Enter requested information. You have the option to send a pre-existing email template message or create a custom message. Selecting “Existing Letter Template” will give you an option to select a Template. Selecting “One Time Message” will open an editor to type in a custom message.
SLIDE 13
Application Management – Application Edit Screen
SLIDE 14
Application Management – Application Edit Screen
Additional information/tools about the student and application.
SLIDE 15 Application Management – Application Edit Screen
The “Change History” screen details a list of any changes made to the
- application. Click on the blue info icon to expand change details.
SLIDE 16
Application Management – Application Edit Screen
The Email History screen shows a list of emails sent to the applicant, and email status. Roll over the envelop icon to view if email was opened or if it bounced back.
SLIDE 17 Application Management – Application Edit Screen
The Flags section displays a list of any issues with the application. Check off the box once the issue has been resolve. List of possible flags: Important flags:
- Military
- Missing Transcript
- Non M-DCPS students with Transcripts
- Potential In-eligible Students
- Sibling(s) Currently Attending
- Twins/Multiples Applying
- Unable to Determine Eligibility
- Audition Schedule Required
- Virtual School Transcript
Uploaded
SLIDE 18 Eligibility Rules
- A. Basic Criteria
- A minimum of 2.0 Grade Point Average in each core academic
subject area (e.g. language arts, mathematics, science, social studies) for the previous year and the first grading period of the current year combined.
- A minimum of 2.0 Grade Point Average in conduct for the core
academic subject areas (e.g. language arts, mathematics, science, social studies) for the previous year and the first grading period of the current year combined.
- All effort grades in core academic classes must be a “2” or higher
for the previous year and the first grading period of the current year combined.
- No more than 10 unexcused absences for the previous year and 5
unexcused absences for the first semester of the current year.
- Parents must schedule any required language skills testing for
International Studies programs by January 15.
- Secondary schools with a six period schedule may review FSA
scores to determine if a student has at least one elective period available to take Magnet theme courses.
- Visual & Performing - Parents must schedule auditions/interviews
by January 15.
- B. Enhanced Criteria
- A minimum of 2.5 Grade Point Average in each core
academic subject area (e.g. language arts, mathematics, science, social studies) for the previous year and the first grading period of the current year combined.
- A minimum of 2.0 Grade Point Average in conduct for the
core academic subject areas (e.g. language arts, mathematics, science, social studies) for the previous year and the first grading period of the current year combined.
- All effort grades in core academic classes must be a “2” or
higher for the previous year and the first grading period of the current year combined.
- No more than 10 unexcused absences for the previous year
and 5 unexcused absences for the first semester of the current year.
- May require that student(s) complete and receive credit for
Physical Science Honors and Algebra 1 Honors prior to the start of the school year for which he/she is applying. Proof
- f course enrollment or completion must be submitted by
January 15.
- Secondary schools with a six period schedule may review
FSA scores to determine if a student has at least one elective period available to take Magnet theme courses.
SLIDE 19
Application Management – Application Edit Screen
Once eligibility process is completed you will be able to override ineligible applications to eligible. Once an application is marked “ELIGIBLE” you will not be able to reverse it. If the student is a Non M-DCPS student and transcripts has been submitted, you can proceed to declare the student’s eligibility.
SLIDE 20 Application Management – Application Edit Screen
Processing Eligibility
- Check off “Yes” or “No” for each eligibility item
- Set Eligibility
- Enter reason of in-eligibility
- Save
When you “Override Eligibility” you will need to enter the reason for the override. Testing schools has an option to Pass or Fail and enter test score.
SLIDE 21
Application Management – Application Edit Screen
Within the Family Information section, some fields are only editable if the applicant is not a M-DCPS student Make sure the email address on file is correct. You must upload documentation proof if a parent is active military or full-time reserves. By clicking “Yes” an upload field will appear.
SLIDE 22 Sibling Policy
Admission priority is given to applicants with siblings currently attending and who will attend the same Magnet School for the school year for which you are applying (a minimum of one concurrent year). Acceptance is based upon the availability of open seats in the grade level for which the student is applying. This priority is not applicable for audition-based Magnet
- Programs. To be considered for Sibling Status, the
following must be met:
- provide the correct Miami-Dade County Public
Schools Student Identification Number for both the applicant and applicant’s sibling(s),
- meet all entrance requirements,
- the sibling must reside in the same household as the
student who is applying, or documentation of joint custody must be provided.
Multiple Birth Policy
Applicants who are part of a multiple birth (twins, triplets, quadruplets, etc.) must submit an individual application for each applicant. The entrance requirements are reviewed for each applicant
- individually. Parents/guardians must link the students in
the multiple birth section in order for them to run together in the random selection. Failure to do so may result in the students running separately and their acceptance results may differ. The multiple birth link is
- nly applicable for random selection programs, not for
audition-based programs. No special consideration will be given if non-linked multiple birth (twins, triplets, quadruplets, etc.) siblings do not share the same results.
SLIDE 23 Application Management – Application Edit Screen
Schools will need to verify if applicant has a sibling attending. Click on the Green Check mark to verify or Click on the red X to decline proof. For Twins ONLY not siblings applying, when you click the Green Check Mark, a window will pop
- pen to find the matching twin’s
- application. Make sure that their
birthday’s match and they must be applying to the same school.
SLIDE 24 Application Management – Application Edit Screen
For Non M-DCPS students you will need to upload a copy of the student’s transcript. Once uploaded you will see an option to view transcript. If applicable, upload proof of Virtual School documents. Documents will only need to be uploaded
- nce; all stakeholders will have access to
uploaded documents. After verifying the appropriate documents, check off if the applicant is eligible for Military or Sibling Priority.
NEW FEATURE: MUILTPLE DOCUMENT UPLOAD
SLIDE 25 Application Management – Application Scheduling
Select the your Test/Audition dates highlighted in the calendar to view registered applicants. Select a name within the schedule time slot to Confirm, Reschedule or Cancel
- appointment. After saving, parent will
receive a confirmation email based on the status of their appointment. Make sure to insert detail notes if you cancel appointment. After the Test/Audition you can mark the attendance of the appointment.
SLIDE 26
Application Management – Application Scheduling
Bulk update allows you to quickly update multiple appointments. It is import to mark appointment as confirmed and attended status to prevent. Once confirmed, parents will not be able to reschedule within the application portal Programs can opt to have appointment removed based on eligibility.
SLIDE 27
Application Management – Application Scheduling
Select “View” will open the appointment management window. You can view appointment schedule within the application detail page.
SLIDE 28 Application Management – Application Scheduling
Select a date within the calendar. Make sure the date you selected is shown within the blue date bar over the time slots. Select “Add Slots” within your time block and insert the number
- f space arability for the appointment. To
delete the time slot enter “0”. To Add more time slots, go back into the Scheduling section and click on “Add New Appointment”
SLIDE 29
Application Management – Application Scheduling – Export Appointment List
Within the application search page you are able to filter your list based on Appointment Schedule status. After you filter your list, select all applications and select “Appointment Detail Report” from within the Capture Selection drop down options. Click on the “Capture Selection” button to be taken to a report you can export to excel.
SLIDE 30 Application Management – Application Scheduling – Emails
List of emails
- Transcript Upload reminder – Sent to non-M-DCPS student
who have not uploaded any documents.
- Schedule an appointment reminder – Sent after an
application is submitted with no appointment scheduled. Sent every 5 days.
- Appointment confirmation – sent after admin confirms
- appointment. Parent will not be able to reschedule.
- Re-schedule appointment – Sent if parent or admin
changes appointment dates.
- Appointment Canceled – Sent if admin cancels
- appointment. Parent will be allowed to re-schedule within
their application.
- Appointment Canceled due to ineligibility – for schools
that do not audition based on eligibility. Parents will not be able to re-schedule.
- Appointment coming up– sent 5 days before, reminding
parents about their upcoming appointment.
- Attendance confirmation – sent after admin confirms
attendance status.
SLIDE 31
Application Management – Application Edit Screen
Within the Lottery Status box schools can accept or decline individual student‘s seat (After March 15). We recommend parents to do this through their Application Dashboard. You MUST have a signed Declaration of Acceptance before you accept their seat manually.
By accepting a seat, the student will be declining seats from all other programs they were accepted. The student will remain on the random selection list for the schools to which they are currently wait listed. By declining, the student will forfeit their seat at your school.
Click on the lottery ranking link to view the program’s full lottery list Changes to the lottery status will ask you for a reason of change.
SLIDE 32 Application Management – Application Edit Screen - VPA
Click on “Edit Lottery Ranking” to assign a seat placement for the applicant. Click on the lottery ranking link to view the program’s full lottery list Select a placement for the applicate and enter a reason for placement note. Placement options are as follow:
- Accepted: Your are accepting the student
- Waiting List: Your are putting the student on the
waiting list; this option will ask you to give it a wait list position number.
- Not Selected: The student attended the audition but
did not make the cut or did not attend the audition.
SLIDE 33
Application Management – Lottery Cutoff Numbers
In the LOTTERY Tab click on the Manage Cutoff Numbers Letters/Acceptance: This is the number of students that will be invited; the lottery will run from this number. This number is usually greater than the available seats due to the ratio of acceptance letters declined. Actual Seats: The real number of available openings for the particular program and grade level. This number is used for our reports to better understand the number of accepted letters against the actual seats.
SLIDE 34
Application Management – Lottery Cutoff Numbers
For Boundary Schools Enter the number of letters and actual seats for both boundary and out of boundary students (by program and grade level). For District Wide Schools Enter the number of letters and actual seats(by program and grade level). For Visual & Performing Arts Schools Only enter the number of seats available (by program and grade level). After entering your data make sure to click the Save Cutoff Numbers button located towards the top or bottom right side of your content boxes.
SLIDE 35 Application Management – Lottery
To access lotter features, go into the Lottery section of the
- site. Once within the lottery then click on the "View Lottery
Runs & Manage Wait Lists". Select the Program for which you want to view the random selection
- results. You can click on the view
button associated to the program or you can check the Check boxes to the left of the program and click “View Selected” below the list.
SLIDE 36
Application Management – Lottery
The program random selection page displays a legend explaining placements associated to a student. Note that your random selection result page might look different than the screen shot provided.
The system is programed to move up a wait listed student to the acceptance list when the number of declines exceed your actual seat number.
By Clicking the icon located next to the students name will take you to the application allowing you a quick access to accept or decline student. You might find icons next to student. You can roll over icons to get explanations.
SLIDE 37
Application Management – Lottery
Explanation of elements: General Pool - assigned: This is the number of students assigned a seat. General Pool - letters: This is the number of invitations sent out. General Pool - seats: This is the number of actual seats available. (your inputted cut-off) LINK SIB: Display linked siblings. ACPT: Display if the student accepted or declined their seat. PRI: This is the student's priority level based on the legend located at the top of the page. Pool: Ignore - This is an internal code note.
SLIDE 38
Application Management – Reports
SLIDE 39
Application Management – Report Download
The fastest and easiest way to download the list of selected students is to go into the report section of the application manager.
You will have the option to view three different reports. When viewing the results you will need to scroll your browser to the right to see the export data button. You must first change the “per page” view to “All” and after the page reloads click on the export data.
SLIDE 40 Enrollment
All students registering for a magnet program MUST have a signed Declaration of Acceptance by a
- parent. The registration process will continue to be
handled by the school. It is the responsibility of the schools to provide parents with the instructions and requirements for registration. We suggest schools have a registration packet available to include items such as: basic registration documents, Magnet Declaration of Acceptance, Magnet Enrollment Agreement, subject selection sheet, etc.
SLIDE 41
Enrollment
As per School Board Policy 2370 (Section B, Item 9), the School Choice & Parental Options office has developed an Enrollment Agreement for parents and students to better understand the benchmarks and goals that are required for students to remain enrolled in a Magnet program. There are two versions of the document; one for generic programs (those which fall under categories A, C and D of the Eligibility Guidelines), and the other is generally for high schools which fall under category B of the Eligibility Guidelines.
SCPO standard enrollment agreement contracts must be used for all incoming students unless an Enrollment Agreement Variance Request form is reviewed by SCPO and approved by the respective Region Office
SLIDE 42