scanning 35mm slides
play

Scanning 35mm Slides This workstation includes a large-format - PDF document

Scanning 35mm Slides https://courses.ucsf.edu/pluginfile.php/135941/mod_resource/co... Scanning 35mm Slides This workstation includes a large-format scanner; it can be used to scan reflective documents (e.g. photographs, large printed works) as


  1. Scanning 35mm Slides https://courses.ucsf.edu/pluginfile.php/135941/mod_resource/co... Scanning 35mm Slides This workstation includes a large-format scanner; it can be used to scan reflective documents (e.g. photographs, large printed works) as well as transparent documents (e.g. radiographs, film negatives, 35mm slides). Use this document to learn how to scan 35mm slides, up to 30 at a time. Before you begin Scanning 35mm slides requires the use of the transparency guide and slide holder, shown above . These items are available from 8:30am-5pm, Monday through Friday; if no one is available at the main Help Desk in CL240, please knock on the door of CL243, located between the two group study rooms. 
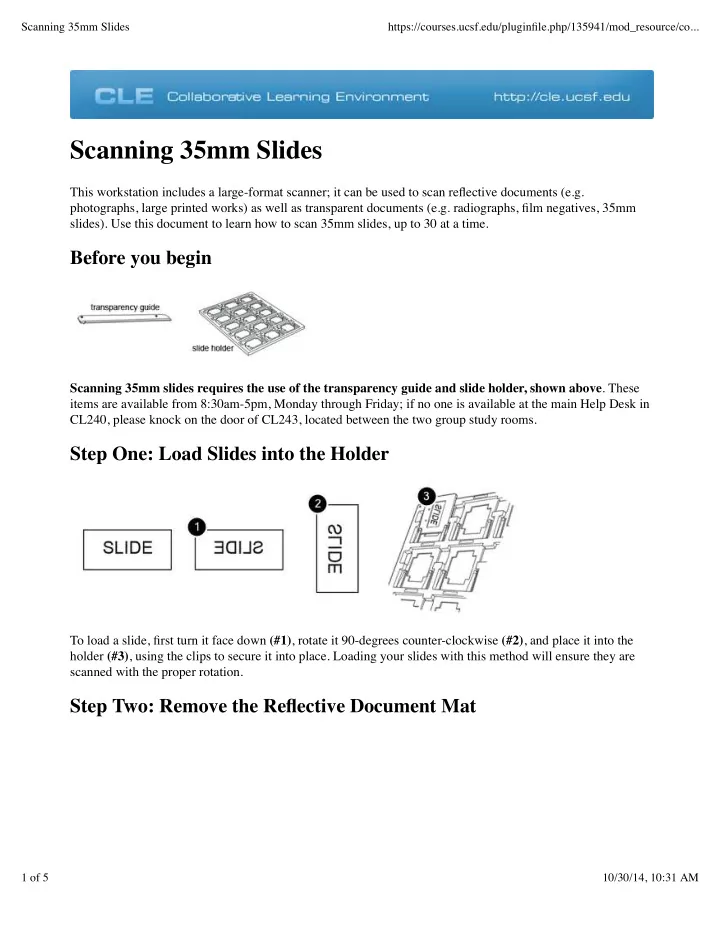
Step One: Load Slides into the Holder To load a slide, first turn it face down (#1) , rotate it 90-degrees counter-clockwise (#2) , and place it into the holder (#3) , using the clips to secure it into place. Loading your slides with this method will ensure they are scanned with the proper rotation. Step Two: Remove the Reflective Document Mat 1 of 5 10/30/14, 10:31 AM

  2. Scanning 35mm Slides https://courses.ucsf.edu/pluginfile.php/135941/mod_resource/co... First, open the lid of the scanner. Grasp the white reflective document mat by its top edge and gently pull it upward (#1) . This will free the bottom edge of the mat, which you can gently pull downward (#2) to free the mat completely. Set the mat aside, or place it in the storage pocket located on top of the scanner (#3) . Step Three: Place the Transparency Guide Place the transparency guide at the back edge of the document glass (#1) , so that its alignment pins fit into the holes as shown (#2) . Step Four: Place the Holder(s) onto the Scanner Place the slide holder on the document glass with the mounting clips facing up, and align the arrow on the holder with the arrow on the transparency guide as shown. Each holder can accommodate up to 15 slides; if 2 of 5 10/30/14, 10:31 AM

  3. Scanning 35mm Slides https://courses.ucsf.edu/pluginfile.php/135941/mod_resource/co... you need to scan more than 15 slides, place a second holder on the glass next to the first holder. Close the scanner lid. Step Five: Open the scanning software To begin, open the EPSON scan software from the menu along the bottom of the screen. Its icon, shown above, looks like an open scanner. Step Six: Select General Settings Use the Mode drop-down menu to switch into Home Mode . Set the document type to Positive Film (#1) , and select whether your slides are in color, grayscale, or black and white. Under Destination , the default option is Printer at 300 dpi ; this is an acceptable level of quality for most purposes. If you would like to scan your slides at a higher resolution, click Other (#2) and select a resolution from the drop-down menu. The recommended range for slides is between 300 and 2400 dpi; keep in mind that the higher the resolution you choose, the longer the scanning process will take. From the bottom of the Settings window, click Configuration . 3 of 5 10/30/14, 10:31 AM

  4. Scanning 35mm Slides https://courses.ucsf.edu/pluginfile.php/135941/mod_resource/co... Near the bottom of the Configuration window, set the Thumbnail Cropping Area to Large (#1) and click OK (#2) . This will prevent the edges of your slides from being unnecessarily cropped during scanning. When you are finished selecting settings, make sure the Thumbnail box (#1) is checked, then click Preview (#2) . Step Seven: Previewing Your Slides In this window you will have an opportunity to preview your slides. If a slide is rotated incorrectly in this preview, click on the slide's preview thumbnail and then use the Frame buttons (#1) to rotate or flip the slide. Any rotation settings applied in the preview window will be applied during the scanning process. To apply rotation settings to select multiple slides, simply click on multiple thumbnails, or use the All button (#2) . Selected slides will be highlighted with a blue border. To ensure that the entire content of your slides is scanned , click the All button (#2) and then click the Delete Marquee button (#3) . This will remove the dashed lines that appear on each slide's thumbnail (#4) . If you do not perform this step, only the area of the slide within the dashed lines will be present in the final scan. To get a closer look at a slide, switch to the Full Size tab (#5) to view larger previews, one slide at a time. If you would like to exclude a particular slide from the scanning process, uncheck its numbered box (#6). Step Eight: Scan Slides 4 of 5 10/30/14, 10:31 AM

  5. Scanning 35mm Slides https://courses.ucsf.edu/pluginfile.php/135941/mod_resource/co... After previewing, return to the main EPSON Scan window (the same window used in Step Six) and click the Scan button. You'll be presented with a number of options for saving your files; under Location, the default setting is to save to the My Pictures folder. To save to a different location, or to create a new folder for your scanned images, select Other (#1) and then click the Browse button (#2) . To quickly and easily identify your scanned slides later, type a descriptive but short prefix (#3) under the File Name area. This prefix will be used with the Start Number to name the files as they are created. For example, using the settings as shown, images will be named img001, img002, etc. Images will automatically be saved in JPG format, which is fine for most purposes; if you need a different format, click the Type menu (#4) and select a format from the list. Additional options related to compression, if you need them, can be found under the Options menu (#5) , but the default settings are recommended for most users. All other options on this screen should be left at their default values. When you are done, click OK , and the scanning process will begin. When the scanning process has completed, a window displaying the finished files will appear. To scan another batch, place a new batch of slides in the holder, and repeat steps 4 though 8. Before Leaving When you are finished scanning, please remember to place the Reflective Document Mat back inside the scanner, and return the Transparency Guide and Slide Holders to a Tech Commons or LTG staff member. 5 of 5 10/30/14, 10:31 AM

Download Presentation
Download Policy: The content available on the website is offered to you 'AS IS' for your personal information and use only. It cannot be commercialized, licensed, or distributed on other websites without prior consent from the author. To download a presentation, simply click this link. If you encounter any difficulties during the download process, it's possible that the publisher has removed the file from their server.

Recommend


More recommend