how to scan 35mm slides
play

How to Scan 35mm Slides Make sure the scanner cable is plugged into - PDF document

DIGITAL MEDIA LAB at the new lenox public library How to Scan 35mm Slides Make sure the scanner cable is plugged into the iMacs USB port. 1 Tie scanner cable is cream-colored. 2 Turn the scanner on by pressing the power button. Tie power


  1. DIGITAL MEDIA LAB at the new lenox public library How to Scan 35mm Slides Make sure the scanner cable is plugged into the iMac’s USB port. 1 Tie scanner cable is cream-colored. 2 Turn the scanner on by pressing the power button. Tie power button is at the front of the scanner, in the bottom left corner. 3 Make a folder on the desktop. You will scan your images to this folder. It can be confusing to try and fjnd a fmash drive through the SilverFast software, so this is my workaround. Right click (or ctrl + click) on the desktop, and select “New folder.” Type in a new name. Hit enter to name the folder. 4 Launch SilverFast 8 by clicking on its dock icon. It will bounce to show it is loading. Once the software loads, click the small “Start” button on the bottom right. At this point, if you forgot to turn the scanner on, you will receive an error message at the top of the welcome window. If that happens, close SilverFast, power on the scanner, and reload SilverFast. 5 Load the slides into their holder, and place it into the scanner. If you need to, use the gray dust-removal tool (gray and looks like a big version of those blue nasal aspirators for babies) to blow away any dust that has accumulated on your slides. After all twelve slides are in, place the holder on top of the glass. Make sure the holder is set into place, so that the “feet” are set into their proper divots, and the white arrows are pointing at each other. 6 
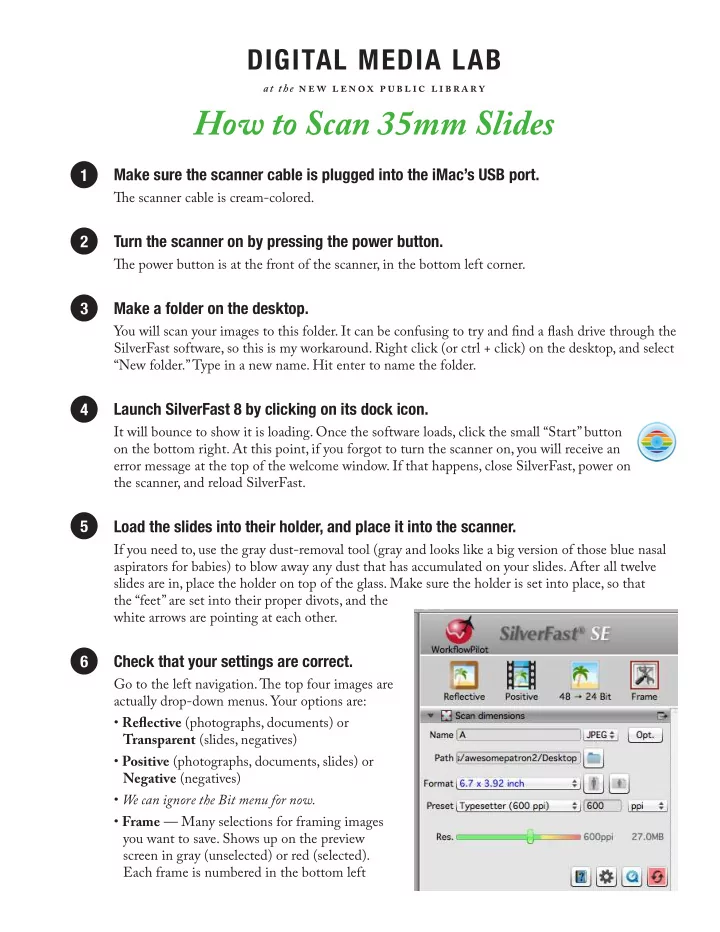
Check that your settings are correct. Go to the left navigation. Tie top four images are actually drop-down menus. Your options are: • Refmective (photographs, documents) or Transparent (slides, negatives) • Positive (photographs, documents, slides) or Negative (negatives) • We can ignore the Bit menu for now. • Frame — Many selections for framing images you want to save. Shows up on the preview screen in gray (unselected) or red (selected). Each frame is numbered in the bottom left

  2. How to Scan 35mm Slides corner, indicating in what order each image will be scanned. Tie default is one big frame (roughly 8.5x11). Tie Scan Dimensions options are: • Name — What your fjles will be named. Tiis is only applicable when you are scanning one image at a time; if you are batch scanning, you will name your fjles in the batch scan dialog box later. • “JPEG”/etc. drop down menu — Tiough you may want to scan your fjles as JPEGs, typically the scanner software will default to TIFF regardless of your choice here, or scanning a few images as JPEG and the rest as TIFF. I recommend scanning as a TIFF (they are higher quality) and then converting to JPEG using Adobe Bridge and Photoshop later on. A second tutorial will cover that process. Note: You can also choose to scan as Photoshop PSD fjles, or PDF fjles. PDF is recommended for documents. • “Opt.” drop down menu — Tiis menu will only be clickable when JPEG is chosen. You can use this to choose what quality level of JPEG you want (I always suggest the highest, 12), and how it will load on a Website (largely irrelevant because our patrons rarely want to put these online; also, with faster download speeds than dial-up, you often won’t watch an image fjle load any more). • Path/Folder — Click on the folder to fjnd where you want to save your fjles. Make sure you are inside the folder before choosing it. If you only click on the folder so it is highlighted, your photos will save alongside the folder, not inside of it. • Format — Format should automatically set itself. Slides are very small (about 1 x 2). You can also set vertical or landscape framing, but you can also do this on the frames themselves. • Preset — Tiere are a few preset options. Always choose the highest quality for your scanned item. You can always decrease an image fjle’s quality for the Web through Photoshop (for example), but you cannot increase quality. (Tiere is no “enhance” in real life!) o 72 or 96 ppi — For Web quality (worst quality) o 150 ppi — Text documents, lower quality o 300 ppi — Very good quality for documents (recommended); good quality for photographs o 600 ppi — Extremely good quality for documents; very good quality for photographs o 1200 ppi — Very good for smaller items that need to be enlarged a bit o 3200 ppi — Required for slides and negatives, because they are so small ( Troubleshooting and an issue with ppi: Tie ppi should automatically set when you choose Refmective/Transpar- ency and Positive/Negative. HOWEVER, when you are scanning slides (with Transparency & Positive), it may reset itself to 300 ppi. As far as I can tell, this is because the scanner cable has been unplugged from the computer and plugged back in. Tie scanner will throw odd fjts if it was not plugged in before the iMac was booted. If the ppi sets itself to 300 and will not change back to 3200, you must restart the iMac. Do not restart before making sure every- thing you’ve already worked on has been saved to a fmash drive or to the Tiawspace folder. If you restart without saving externally, all work will be lost. Once the iMac has been restarted with the cable already plugged in, the ppi should stay at 3200 when set.) • Res. — Tiis is just a slider bar to help you set the “preset” option. Green is good, yellow is a little ifgy, and red is too large for your item type. You can get a little into the yellow without harm. • “27.0MB” — Tiis text estimates how large your scanned fjle will end up being.

  3. How to Scan 35mm Slides 7 Prescan the slides. Click on “Prescan” at the top of SilverFast (fjrst icon, on the left): Tie scanner will warm up fjrst, and then prescan. (See the left navigation bar, very bottom for progress.) We prescan in order to make sure our slides are set up correctly, and to set up our frames for scanning. 8 Once the prescan appears, set up your frames. Tie frame might begin with one big default frame, or many little frames. Tie process is the same. Here is an example of the large default frame:

  4. How to Scan 35mm Slides To select all 12 slides, click on the “Frame” icon on the left navigation menu. In the drop-down menu, select “Find frames,” and then “Slide 35mm holder.” (Tie menu has changed with a recent update. Tie holder options will now be on top.) All twelve slides will have a frame around them now. If they don’t quite fjt, move them around and adjust the edges so they do fjt.

  5. How to Scan 35mm Slides 9 Color correct if necessary. Auto CCR (automatic color correction) is a huge time-saver. Tiough there are many manual ways of color correcting in SilverFast, most people just want to get the right colors and move on. To do this, click on one of your photo frames (it will turn from gray to red when selected) and click “Auto” or “Auto CC” on the top menu (second icon — hold it down for more options). For example, before: And after: Or before: And after:

  6. How to Scan 35mm Slides Sometimes very dark slides will turn green or gray; that is when someone may want to play with the manual controls a little, but they don’t often turn out very well. Kodachrome slides fade to red, and Ektachrome fade to blue — this can also be corrected in the software, often by the Auto CCR. 10 Batch scan (scan multiple images at once). You have two options when doing your fjrst batch scan of the day. • Either click on the “Scan” icon and hold it down until the menu appears, then choose “Batch Scan,” or • Go to the very top menu at the top of the iMac screen, click on “Image,” and select “Batch Scan” from there. (Either way, after you do your fjrst batch scan, the “Scan” icon above will change to “Batch Scan,” and you can just click on that from now on.) You will see this dialog box to the right. We are going to fjnd our folder on the desktop. • Click on awesomepatron (1 or 2) on the left side. • Double-click on Desktop on the right side. Tien, double-click on the folder you created. (My example is Scanning Stafg.)

  7. How to Scan 35mm Slides You should now see inside your empty folder, like this: If you’ve already scanned items into this folder, you will see them here, as well. • Directory: /Users/awesomepatron#/Desktop/YOUR FOLDER NAME — that’s when you know you are inside your folder. • Name: Tie fjrst part of the fjle name for every photo you are about to scan. You can leave it defaulted, or name it something else, such as RockiesVacation. If you want to put a year in, like RockiesVacation1965, put a dash or underscore in, like RockiesVacation1965_. Tiis is because the scanner will number all of your images. • Example: Tiis shows you where your fjles will be saved, and what the fjle name will look like. • Start index at: Tiis is where the scanner will number your images. If you know you will have 99 fjles or less with this name, you can start at 01. If you may have more, I suggest starting at 001. (Sometimes the computer will want to start at 00, which will then go on to 01, 02, etc. Tiis bugs me, so I always change it.) Keep “index active” checked unless you don’t want the computer to number your slides (not recommended). Checking “Space” will put a space between your Name and your Index number if you like. Click the Scan button on the dialog box. 11 Your slides will now scan. All fjles will be saved into your folder on the desktop. Tiis screen (located on the bottom left corner) should say 3200DPI. Unfortunately, if it does

Download Presentation
Download Policy: The content available on the website is offered to you 'AS IS' for your personal information and use only. It cannot be commercialized, licensed, or distributed on other websites without prior consent from the author. To download a presentation, simply click this link. If you encounter any difficulties during the download process, it's possible that the publisher has removed the file from their server.

Recommend


More recommend