recording your presentation in blackboard collaborate
play

Recording Your Presentation in Blackboard Collaborate Ultra 1. - PDF document

Recording Your Presentation in Blackboard Collaborate Ultra 1. Navigate to the Blackboard Collaborate Ultra Tool. This could be titled Blackboard Collaborate Ultra or your instructor may have designated it something else: Presentations,


  1. Recording Your Presentation in Blackboard Collaborate Ultra 
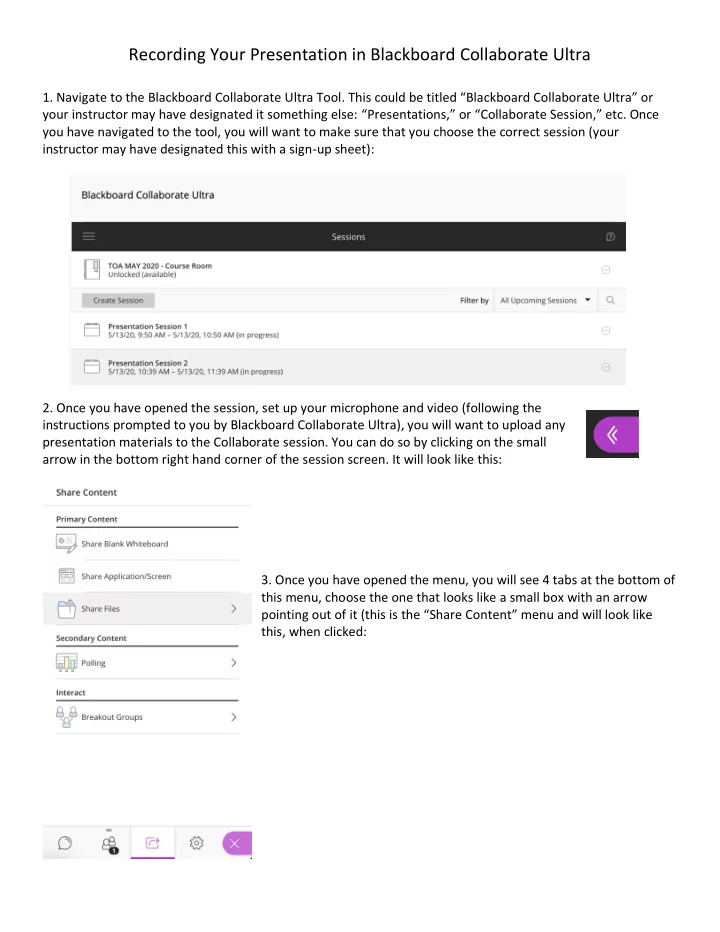
1. Navigate to the Blackboard Collaborate Ultra Tool. This could be titled “Blackboard Collaborate Ultra” or your instructor may have designated it something else: “Presentations,” or “Collaborate Session,” etc. Once you have navigated to the tool, you will want to make sure that you choose the correct session (your instructor may have designated this with a sign-up sheet): 2. Once you have opened the session, set up your microphone and video (following the instructions prompted to you by Blackboard Collaborate Ultra), you will want to upload any presentation materials to the Collaborate session. You can do so by clicking on the small arrow in the bottom right hand corner of the session screen. It will look like this: 3. Once you have opened the menu, you will see 4 tabs at the bottom of this menu, choose the one that looks like a small box with an arrow pointing out of it (this is the “Share Content” menu and will look like this, when clicked:

  2. 4. Choose “Share Files,” Drag your file, or click the “Add Files” button to add your file (PowerPoint, etc.) to the session. Once you have chosen the correct file, click on “Share Now.” This will put your file in the main screen of the Blackboard Collaborate session, so that you can follow along with it. 5. Recording your session. To record your session, you want to open up the menu in the top left-hand corner of the Blackboard Collaborate session screen. It will look like this: 6. Choose “Start Recording” from the menu that opens:

  3. 6. Stop Recording. You will use the same menu to turn off the recording, the menu option will be in the same location as the “Start Recording” option. 7. To access your Recording. The first thing you want to note is that the recording will not appear immediately. You will want to give up to several hours (depending on the length of the recording) for it to appear in the list of sessions. To access your recordings, you will want to return to the Blackboard Collaborate Ultra TOOL in your Blackboard course – where you originally clicked to join the session. Here you will see a menu button on the left-hand side of the screen (clicking on Sessions will bring you back to the list of sessions): From here, you want to find your specific recording. It will be named for the session title that you used and numbered in order of creation. Pick the one that matches the Date and Time that you recorded your session, and find the menu button that looks like a circle with 3 dots inside. From there, you will choose to “Copy Link” and you can provide this link to your professor for your assignment submission. Be sure to paste that link in the specific location that your instructor has asked you to do so, in order to get credit.

Download Presentation
Download Policy: The content available on the website is offered to you 'AS IS' for your personal information and use only. It cannot be commercialized, licensed, or distributed on other websites without prior consent from the author. To download a presentation, simply click this link. If you encounter any difficulties during the download process, it's possible that the publisher has removed the file from their server.

Recommend


More recommend