LAB3 : Client Request Servlet - - PDF document

lab3 client request servlet 1 client servlet
SMART_READER_LITE
LIVE PREVIEW

LAB3 : Client Request Servlet - - PDF document

IT311 Server Side Programming: Lab Information Technology Division LAB3 : Client Request Servlet 1 Client


slide-1
SLIDE 1

IT311 Server Side Programming: Lab Information Technology Division Lecturer: Dr.Sayan Unankard

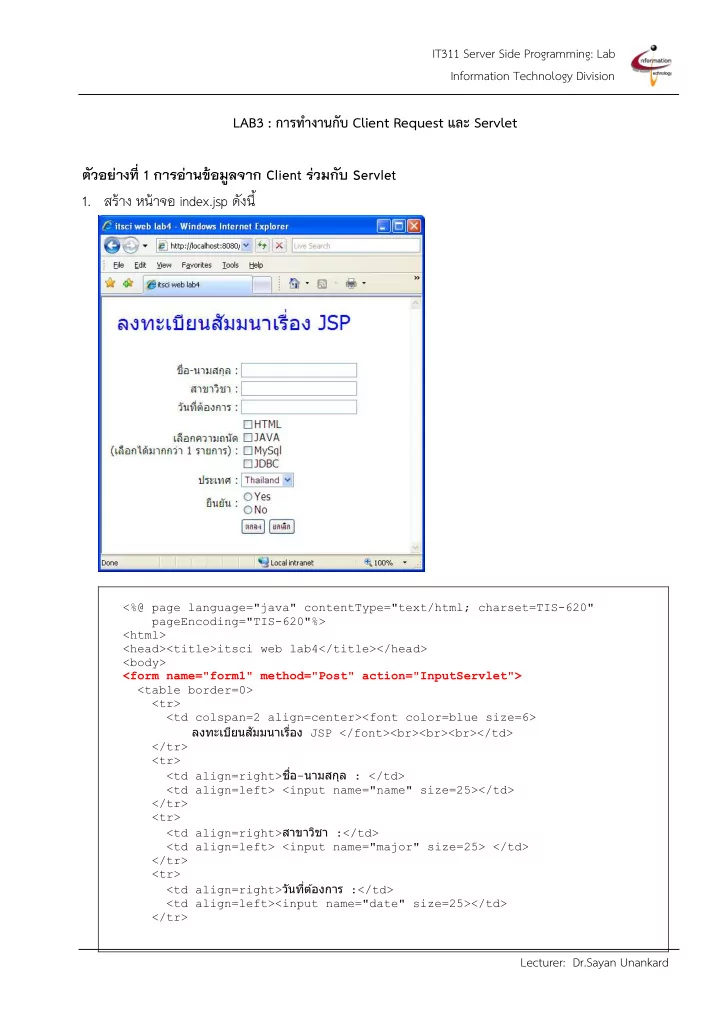
LAB3 : การท างานกับ Client Request และ Servlet ตัวอย่างที่ 1 การอ่านข้อมูลจาก Client ร่วมกับ Servlet

  • 1. สร้าง หน้าจอ index.jsp ดังนี้

<%@ page language="java" contentType="text/html; charset=TIS-620" pageEncoding="TIS-620"%> <html> <head><title>itsci web lab4</title></head> <body> <form name="form1" method="Post" action="InputServlet"> <table border=0> <tr> <td colspan=2 align=center><font color=blue size=6> ลงทะเบียนสัมมนาเรื่อง JSP </font><br><br><br></td> </tr> <tr> <td align=right>ชื่อ-นามสกุล : </td> <td align=left> <input name="name" size=25></td> </tr> <tr> <td align=right>สาขาวิชา :</td> <td align=left> <input name="major" size=25> </td> </tr> <tr> <td align=right>วันที่ต ้ องการ :</td> <td align=left><input name="date" size=25></td> </tr>

slide-2
SLIDE 2

IT311 Server Side Programming: Lab Information Technology Division Lecturer: Dr.Sayan Unankard

<tr> <td align=right>เลือกความถนัด <BR>(เลือกได ้ มากกว่า 1 รายการ) : </td> <td><input type="checkBox" name="citems" value="HTML">HTML<BR> <input type="checkBox" name="citems" value="JAVA">JAVA<BR> <input type="checkBox" name="citems" value="MySQL">MySql<BR> <input type="checkBox" name="citems" value="JDBC">JDBC </td> </tr> <tr> <td align=right>ประเทศ : </td> <td align=left><select name="country"> <option value="THA">Thailand</option> <option value="JPN">Japan</option> <option value="USA">USA</option> </select></td> </tr> <tr> <td align=right>ยืนยัน : </td> <td align=left><p> <input type="radio" name="items" value="1">Yes<br> <input type="radio" name="items" value="0">No</p></td> </tr> <tr> <td align=right> </td> <td align=left><input type="submit" name="Submit" value="ตกลง"> <input type="reset" name="Submit2" value="ยกเลิก"></td> </tr> </table> </form> </body> </html>

  • 2. ก าหนด Form ดังนี้ <form method="post" action="InputServlet"> หมายถึงสั่งให้ Server ท างานที่

method post และ ส่งไปยัง InputServlet โดยจะจัดเก็บค่าลงในคลาส Person ดังนี้

package lab3; public class Person { private String name; private String major; private String date; private String[] skill; private String country; public String getName() { return name; } public void setName(String name) { this.name = name; } public String getMajor() { return major; } public void setMajor(String major) { this.major = major; } public String getDate() { return date; } public void setDate(String date) { this.date = date; } public String[] getSkill() { return skill; } public void setSkill(String[] skill) { this.skill = skill; } public String getCountry() { return country; } public void setCountry(String country) { this.country = country; } }

slide-3
SLIDE 3

IT311 Server Side Programming: Lab Information Technology Division Lecturer: Dr.Sayan Unankard

  • 3. ส่วนของไฟล์ servlet จะใช้ค าสั่งในการเรียกข้อมูลจาก index.jsp โดยใช้ค าสั่ง ดังนี้

package lab3; import java.io.IOException; import javax.servlet.RequestDispatcher; import javax.servlet.ServletException; import javax.servlet.http.HttpServletRequest; import javax.servlet.http.HttpServletResponse; public class InputServlet extends javax.servlet.http.HttpServlet implements javax.servlet.Servlet { static final long serialVersionUID = 1L; public InputServlet() { super(); } protected void doPost(HttpServletRequest request, HttpServletResponse response) throws ServletException, IOException { Person person = new Person(); String name = request.getParameter("name"); String major = request.getParameter("major"); String date = request.getParameter("date"); String[] skill = request.getParameterValues("citems"); String country = request.getParameter("country"); String confirm = request.getParameter("items"); if ("1".equals(confirm)){ person.setName(name); person.setMajor(major); person.setDate(date); person.setSkill(skill); person.setCountry(country); request.setAttribute("person", person); goTo("/result.jsp",request,response); }else{ response.sendRedirect("notConfirm.jsp"); } } //เมธอดส าหรับการส่งค่าไปยังหน้าจอโดยส่งตัวแปรผ่าน request.setAttribute() protected void goTo(String url, HttpServletRequest request, HttpServletResponse response) { if (url != null) { RequestDispatcher dispatcher = getServletContext().getRequestDispatcher(url); try { dispatcher.forward(request, response); } catch (Exception e) {} } } }

slide-4
SLIDE 4

IT311 Server Side Programming: Lab Information Technology Division Lecturer: Dr.Sayan Unankard

  • 4. จากนั้น servlet จะส่งค่า request ทั้งหมดไปหน้าจอ result.jsp ดังนี้

<%@ page import="lab3.Person" %> <% Person person = (Person) request.getAttribute("person"); %> <html> <head><title>itsci result lab4</title></head> <body> ชื่อ : <%= person.getName() %><br> สาขาวิชา : <%= person.getMajor() %><br> วันที่ต ้ องการ : <%= person.getDate() %><br> <br> เรียน คุณ <%= person.getName() %>: <br><br> <font color=blue size = 5>ยินดีต ้ อนรับเข ้ าสู่งานสัมมนา <font color=red>'พื้นฐาน JSP'</font></font><br><br> กรุณาพิมพ์เอกสารหน้านี้ พร้อมทั้งลงชื่อเพื่อเข ้ าร่วมสัมมนาในวันที่ <%= person.getDate() %> ด ้ วย <br><br> ความถนัด : <% String[] skill = person.getSkill(); for(int i=0;i< skill.length;i++) { %> <%= skill[i]%>,&nbsp; <%}%><BR><BR> จากประเทศ : <%= person.getCountry() %><BR><BR> ลงชื่อ ______________ </body> </html>

  • 5. ผลลัพธ์ที่ได้จะแสดงดังหน้าจอต่อไปนี้
slide-5
SLIDE 5

IT311 Server Side Programming: Lab Information Technology Division Lecturer: Dr.Sayan Unankard

  • 6. เช็คเงื่อนไขถ้า เลือก Yes จึงจะแสดงแบบฟอร์ม (ดังรูปข้อ 5) แต่ถ้าตอบ No ให้แสดง ในหน้า

notconfirm.jsp ดังรูป ตัวอย่างที่ 2 การจัดการ Attribute ในคลาส Servlet

  • 1. สร้าง Servlet ที่ชื่อว่า CounterServlet ใน Package ที่ชื่อว่า lab3

package lab3; import java.io.IOException; import javax.servlet.RequestDispatcher; import javax.servlet.ServletException; import javax.servlet.http.HttpServletRequest; import javax.servlet.http.HttpServletResponse; public class CounterServlet extends javax.servlet.http.HttpServlet implements javax.servlet.Servlet { static final long serialVersionUID = 1L; private int count = 0; public CounterServlet() { super(); } protected void doGet(HttpServletRequest request, HttpServletResponse response) throws ServletException, IOException { count++; request.setAttribute("count", "" + count); goTo("/index.jsp",request,response); } protected void doPost(HttpServletRequest request, HttpServletResponse response) throws ServletException, IOException { doGet(request,response); }

slide-6
SLIDE 6

IT311 Server Side Programming: Lab Information Technology Division Lecturer: Dr.Sayan Unankard

//เมธอดส าหรับการส่งค่าไปยังหน้าจอโดยส่งตัวแปรผ่าน request.setAttribute() protected void goTo(String url, HttpServletRequest request, HttpServletResponse response) { if (url != null) { RequestDispatcher dispatcher = getServletContext().getRequestDispatcher(url); try { dispatcher.forward(request, response); } catch (Exception e) {} } } }

  • 2. เพิ่มโค้ดในหน้าจอ index.jsp ส าหรับแสดงผลตัวแปร count ที่ได้จาก Servlet ดังนี้

คุณเข ้ ามาเป็นคนที่ : <%= (String) request.getAttribute("count") %>

  • 3. วิธีในการเรียกใช้จะต้องรันโปรแกรมจากหน้า CounterServlet ก่อนเสมอ เพื่อให้ได้ค่า count มาแสดงผลใน

หน้า index.jsp หากรันจากหน้า index.jsp เลยจะท าให้ตัวแปร count เป็นค่าว่าง การแสดงผลตัวแปร count ซึ่งจะเป็นตัวแปรประเภทที่ ทุกๆ client รู้จักและจัดการ ที่ค่าเดียวกันเนื่องจากเป็น ตัวแปรที่เป็น attribute ของ คลาส

slide-7
SLIDE 7

IT311 Server Side Programming: Lab Information Technology Division Lecturer: Dr.Sayan Unankard

โจทย์ฝึกหัด

  • 1. ต้องการสร้างคลาสส าหรับค านวณ GPA ของนักศึกษาประกอบด้วยคลาส Subject และ Student ดังนี้
  • 2. สร้างหน้าจอ index.jsp ส าหรับรับค่าจ านวนวิชาที่ลงทะเบียนในภาคเรียนนี้ โดยให้เลือกเป็น dropdownlist

(1-6 วิชา) โดยเมื่อเลือกจ านวนวิชาแล้ว โปรแกรมจะสร้างหน้าใหม่ (inputSubject.jsp) โดยสร้าง textbox ส าหรับรับค่ารหัสนักศึกษา ชื่อนักศึกษา รหัสวิชา และชื่อวิชา dropdownlist ส าหรับเลือกหน่วยกิต (1-3 หน่วยกิต) และ เกรด (A-B-C-D-F) ตามจ านวนที่เลือกมาจากหน้า index.jsp

index.jsp inputSubject.jsp

slide-8
SLIDE 8

IT311 Server Side Programming: Lab Information Technology Division Lecturer: Dr.Sayan Unankard

  • 3. เมื่อกดปุ่มค ำนวณจำกหน้ำ inputSubject.jsp แล้วจะส่งค่ำไปที่หน้ำ AddSubjectServlet.java เพื่อรับค่ำจำก

หน้ำจอไปจัดเก็บในคลำสต่ำง ๆ พร้อมทั้งส่งผลไปแสดงที่หน้ำ result.jsp result.jsp