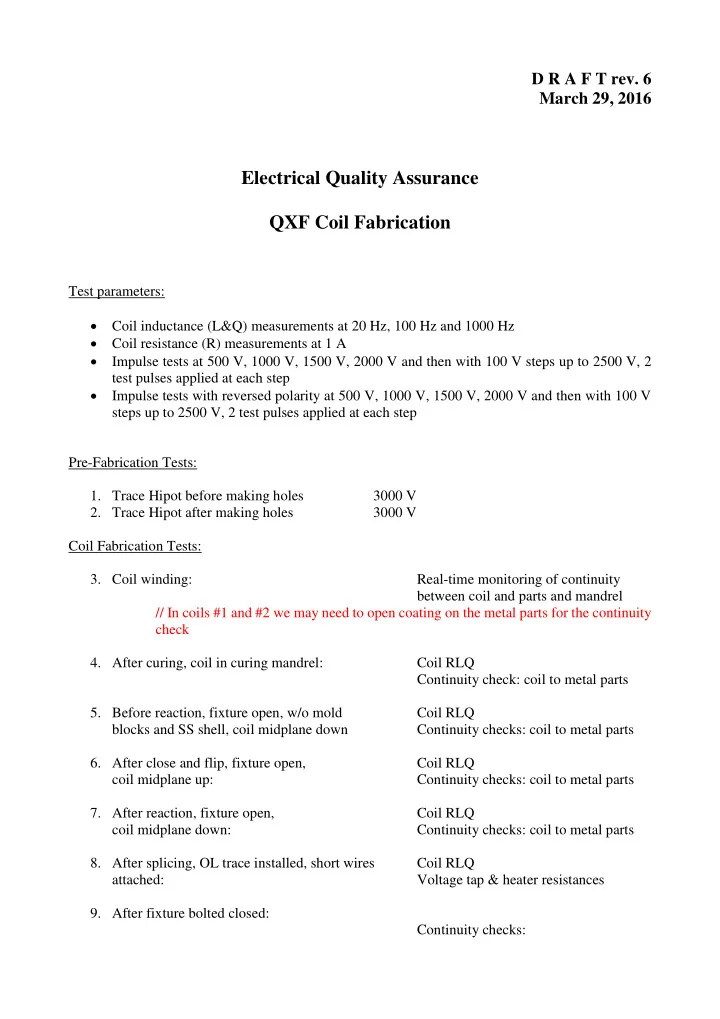
Electrical Quality Assurance QXF Coil Fabrication Test parameters: - - PDF document

electrical quality assurance qxf coil fabrication
SMART_READER_LITE
LIVE PREVIEW

Electrical Quality Assurance QXF Coil Fabrication Test parameters: - - PDF document

D R A F T rev. 6 March 29, 2016 Electrical Quality Assurance QXF Coil Fabrication Test parameters: Coil inductance (L&Q) measurements at 20 Hz, 100 Hz and 1000 Hz Coil resistance (R) measurements at 1 A Impulse tests at 500 V,


slide-1
SLIDE 1

D R A F T rev. 6 March 29, 2016

Electrical Quality Assurance QXF Coil Fabrication

Test parameters:  Coil inductance (L&Q) measurements at 20 Hz, 100 Hz and 1000 Hz  Coil resistance (R) measurements at 1 A  Impulse tests at 500 V, 1000 V, 1500 V, 2000 V and then with 100 V steps up to 2500 V, 2 test pulses applied at each step  Impulse tests with reversed polarity at 500 V, 1000 V, 1500 V, 2000 V and then with 100 V steps up to 2500 V, 2 test pulses applied at each step Pre-Fabrication Tests:

  • 1. Trace Hipot before making holes

3000 V

  • 2. Trace Hipot after making holes

3000 V Coil Fabrication Tests:

  • 3. Coil winding:

Real-time monitoring of continuity between coil and parts and mandrel // In coils #1 and #2 we may need to open coating on the metal parts for the continuity check

  • 4. After curing, coil in curing mandrel:

Coil RLQ Continuity check: coil to metal parts

  • 5. Before reaction, fixture open, w/o mold

Coil RLQ blocks and SS shell, coil midplane down Continuity checks: coil to metal parts

  • 6. After close and flip, fixture open,

Coil RLQ coil midplane up: Continuity checks: coil to metal parts

  • 7. After reaction, fixture open,

Coil RLQ coil midplane down: Continuity checks: coil to metal parts

  • 8. After splicing, OL trace installed, short wires

Coil RLQ attached: Voltage tap & heater resistances

  • 9. After fixture bolted closed:

Continuity checks:

slide-2
SLIDE 2

coil-to-saddles, coil-to-heaters, saddle-to-saddle, heaters-to-saddles // Do we need a Coil to Gnd (mold-blocks) continuity check ?

  • 10. After flip, fixure open, coil midplane up:

Coil RLQ Continuity checks: coil to metal parts

  • 11. After IL trace installed, short wires attached:

Coil RLQ Voltage tap & heater resistances

  • 12. Before impregnation, fixture bolted closed:

Coil RLQ Continuity checks: coil-to-saddles, coil-to-heaters, saddle-to-saddle, heaters-to-saddles

  • 13. After impregnation, fixture open,

Coil RLQ Wires extended, Coil midplane up: Continuity checks: coil-to-saddles, coil-to-heaters, saddle-to-saddle, heaters-to-saddles, coil to pole, pole segment to segment, coil to end spacers Voltage tap & heater resistances

  • 14. After close and flip, fixture open,

Continuity checks: coil midplane down: coil-to-OL spacers Hipots: Coil-to-Heaters 2500 V (2000 V in previous draft) Coil-to-Endshoe 1000 V (instead of 1200 V) Coil-to-Central Island 500 V * Heater-to-Endshoe 2500 V (instead of 1000 V) Endshoe-to-Endshoe 600 V Impulse test at 2500 V Before shipping // Hipots can be done after step #13 instead

  • 15. Final, after final connectors installed, coil on

Coil RLQ shipping tool: Voltage tap & heater resistances,

slide-3
SLIDE 3

Impulse test at 2500 V After shipping Hipots: Coil-to-Heaters 2500 V (2000 V in previous draft) Coil-to-Endshoe 1000 V (instead of 1200 V) Coil-to-Centr. Island 500 V * Heater-to-Endshoe 2500 V (instead of 1000 V) Endshoe-to-Endshoe 600 V *Comment: To be verified