
SLIDE 1
1
RP88X series: Issue A - Oct 2015
DESCENDER
- climb. work. rescue.
+
2 1
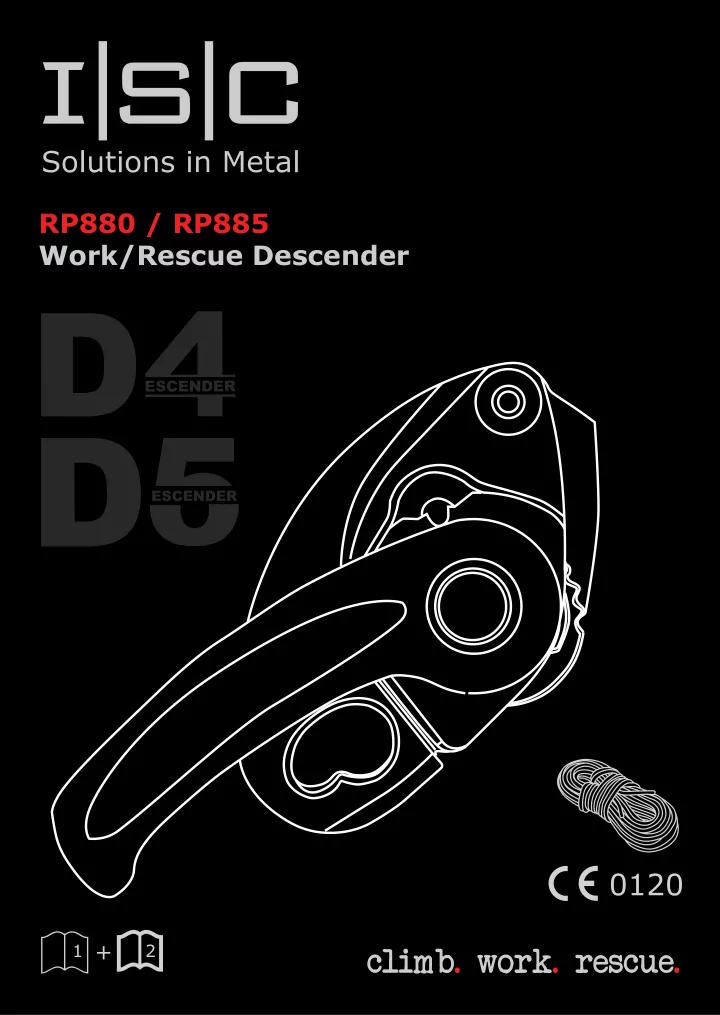
RP880 / RP885 Work/Rescue Descender
DESCENDER + 1 2 climb. work. rescue. 1 RP88X series: Issue A - - - PDF document
RP880 / RP885 Work/Rescue Descender DESCENDER + 1 2 climb. work. rescue. 1 RP88X series: Issue A - Oct 2015 1 + 2 Activites at height are inherently dangerous. Understand anc accept the risk involved before participating. You are
1
RP88X series: Issue A - Oct 2015
+
2 1
RP880 / RP885 Work/Rescue Descender
2 3
RP88X series: Issue A - Oct 2015 RP88X series: Issue A - Oct 2015
English Český Dansk Deutsch Español Suomeski Français Italiano Nederlands Norsk Polski Português Svenska General Instructions for Use Obecné pokyny k použití Generelle brugerinstruktioner Allgemeine Bedienungsanleitung Instrucciones generales de uso Yleinen käyttöohje Instructions générales d’utilisation Istruzioni generali d’uso Algemene gebruiksinstructies Generell bruksanvisning Ogólne instrukcje dotyczące użytkowania Instruções gerais de utilização Allmänna användarinstruktioner 00 00 00 00 00 00 00 00 00 00 00 00 00
EN CS DA DE ES FI FR IT NL NO PL PT SV
Markings A
Activites at height are inherently dangerous. Understand anc accept the risk involved before
product, read and understand all instructions and warnings that accompany it and familiarize with its proper use, capabilities and limitations. We recommend that every climber seeks proper training in the use of the equipment. Failure to read and follow these warnings can result in severe injury or even death! Use: Rope Access, Rescue. RP880 & RP885 Work/Rescue Descender The D4tm Work/Rescue Descender features a unique and innovative cam action, which offers precise control at slow or fast speeds. The progressive cam works by way of one cam operating inside another cam. The D4tm has a 240kg (500lbs) Working load limit which means it is suitable for two-person rescue, without the need for the creation of extra friction. The handle mechanism is designed to rotate through 360º making its use easier and simpler. The handle itself is made from aluminium rather than plastic and is coated which provides extra grip. Cleverly, the handle rotation is accompanied by audible clicks which help the user identify the correct position of the handle.
+
2 1
RP880 D4tm Descender RP885 D5tm Descender
Product name/brand Rope size Always read and follow the instructions supplied by the manufacturer. Manufacturers Identifjcation Body controlling the manufacture of PPE Personal Fall Protection Year of manufacture / Production batch / Incremental number.
1 2 3 5 6 7 4
4 5
RP88X series: Issue A - Oct 2015 RP88X series: Issue A - Oct 2015
Nomenclature Terminology B C Position Wear Inspection D E Installation on Rope F
Moving side plate Cam Top Bobbin Fixed side plate Attachment point
Principal Materials: Aluminium, Stainless Steel, Plastic - Derlin, Bronze sintered.
Frame locking Push button
Brake hand Český Dansk Deutsch Español Suomeski Français Italiano Nederlands Norsk Polski Português Svenska Braking side of rope Český Dansk Deutsch Español Suomeski Français Italiano Nederlands Norsk Polski Português Svenska
Handle
PRIMED PARK PANIC DESCEND RESET
Operational Check G
7 1 2 3 4 5 6
6 7
RP88X series: Issue A - Oct 2015 RP88X series: Issue A - Oct 2015
Horizontal Movement H Misuse I Misuse I
Back-up lines required Thumb grip
8 9
RP88X series: Issue A - Oct 2015 RP88X series: Issue A - Oct 2015
Rigged for Rescue/Anchor Pick off Rescue J K
Mule knot
Work Position Descent one person M L
2m /per second 2m /per secondClick
Park
10 11
RP88X series: Issue A - Oct 2015 RP88X series: Issue A - Oct 2015
EN English
These instructions must be read and fully understood in conjunction with the generic instructions supplied. Nomenclature of parts. 1 – moving side plate, 2 – cam, 3 – top bobbin, 4 – handle, 5 – fjxed side plate, 6 – push button, 7 - attachment point. Handle position – primed, park, descend, reset. Brake hand, braking side of rope. Principal materials: Aluminium, Stainless steel, Plastic – Acetal, Bronze Inspection (book 1, book 2) Make sure the wear indicator is not visible in the top bobbin (Fig E). Check for cracks, corrosion, sharp edges and deformation. Check for loose fasteners / components. Verify that the cam, when in primed position, moves freely. Ensure side plates align correctly (Fig J). Pay attention to the frame locking push button to ensure it engages fully into the moving side plate. You will hear an audible ‘click’ when the frame seats correctly. Verify that the handle rotates freely and that there are 3 audible ‘clicks’ during rotation. Check the interaction of the cam and handle is fully functional. To do this:
While steps 3 and 4 are carried out the function of the handle and cam should move together. When the ‘handle’ reaches PANIC the ‘cam’ must snap forwards in the direction of applied pressure. Installation on rope Connect the D4 to your harness using a locking karabiner. ISC recommend an Oval Karabiner e.g. KH411 and KH311. Put the handle into PRIMED position to allow the cam to move freely. Open the moving side plate. Insert the rope as indicated (Fig F). Close the moving side plate. WARNING: The moving side plate must be properly engaged on the frame locking push button and the karabiner must be fjtted through the attachment eye of both frames. (See Fig J). Please be aware of foreseeable misuse!
+
2 1
Ascending N
PRIMED RP220 Hand Ascender RP890 REDtm Back-up Device RP209 Mini Ropegrab
Horizontal Lines O
12 13
RP88X series: Issue A - Oct 2015 RP88X series: Issue A - Oct 2015
Pre-use checks (See Fig G). Conduct all pre-use checks whilst using a backup safety system. Before each use verify the correct installation of the rope. Ensure full handle rotation is not impeded or compromised. WARNING: Do not let anything interfere with the correct operation of the device or its components. Ensure the handle of the D4 and the gate of the connector do not come into contact with any objects or surfaces which may impede its function or cause cross-loading – see misuse. With the handle in the PRIMED position: Try to pull the device down the rope – it should not travel down the rope. If it does, check that the rope is installed correctly, and that there is no sign of wear. The D4 should still travel up the rope. Gradually put your weight on the device, and with one hand holding the braking side of the rope slowly pull on the handle to allow the rope to slide through the device. Ensure the movement can be controlled and is smooth. If this does not work, check the installation of the rope. Release the handle and check that the device stops. If it does not stop do not continue to use the device. Horizontal movement (Fig H) On sloping or horizontal terrain, or with light loads the panic brake activates easily. To enable you to travel smoothly, use the thumb-grip on the cam. WARNING: do not use the thumb-grip during a vertical descent. Descent (work). To control the device in descent, your non-braking hand is used to control the position of the handle, and your braking hand is used on the braking side of the rope, to give you extra security and fjne adjustment of speed control. If you pull the handle too far the device will engage the panic function causing the device to stop. Please note that descent speed will increase prior to engagement of the panic brake. This is a normal function of the device. To RESET the device, from the PANIC position, rotate the handle in the same direction (see Fig D). This will allow you to continue your descent. Whilst it is not a requirement, if a second karabiner is used to add friction to the system, you must ensure that it is located away from the main descender attachment point – see Fig I. Work positioning. After stopping at your working position, lock the device on the rope by moving the handle in the opposite direction to that used for descent. Once you reach the PARK position the handle will not travel any further in that direction (you should hear an audible ‘click’). To continue with your descent after completing your work, whilst holding the control side of the rope, pull the handle to the PRIMED position and to begin your descent continue to rotate the handle. Expert use (for trained operators, with appropriate knowledge and training)
the information provided.
Rigged for rescue / Anchor (Fig J). The handle of the D4 must be in the PARK position. It must be backed up using a suitable knot (e.g. Mule) in the free end at least 1m from the D4. This is to allow slippage in the event of overloading the system. The slippage reduces the impact force and must not be hindered by the knot. In the event of a rescue, remove the knot and begin to lower. Holding the control side of the rope, move the handle to PRIMED position, rotate the handle gradually to allow the rope to slide through the device. Control is aided by varying the grip on the control side of the
panic function activates too easily, use the thumb-grip on the cam. Whilst it is not a requirement, if a second karabiner is used to add friction to the system, you must ensure that it is located away from the main descender attachment point – see Fig I. Pick-off rescue (Fig K). The D4 is rated for 240kg which allows for a variety of rescue scenarios. Additional friction can be added if required, but is not always necessary. Ascending (Fig N). With the device in PRIMED position, using a hand ascender (RP220) take up slack as you stand up.Never allow slack between the hand ascender and D4. Progress capture/Horizontal lines/Tyrolean (Fig O). The D4 can be used to capture the progress
tensioned, using a tensioning pulley and a ropegrab (RP209/RED) or by hand, until the desired tension is reached, at which point the handle should be moved to the PARK position. It must be backed up using a suitable knot (e.g. Mule) in the free end at least 1m from the D4. This is to allow slippage in the event
Extreme care must be taken when working with horizontal lines to avoid overloading of the rope, anchors, and hardware – specialist training and knowledge is required to ensure that this type of system is rigged and operated safely. When to retire your equipment
dynamic load event
Ensure the equipment is destroyed to prevent further use. Markings. D4tm RP880 – product code 240kg - Max rated load EN1891 rope 10.5 – 11.5mm Meets NFPA 1983 Meets ANSI z359 CE0120 Notifjed body controlling the manufacture of PPE Legislation The ISC D4 is an EN12841:2006 Type C rope adjustment device. The primary function of the D4 is progression along the working line. The D4 descending device must be used in conjunction with a Type A backup device (e.g. ISC RED) on a second rope (safety rope). The D4 is not suitable for use in an EN363 fall arrest system. Certifjcation testing was carried out at SATRA Technology Centre (NB0321) and was performed using 240kg mass using Mammut Performance Static 10.5mm and BEAL Industrie 11.5mm ropes. The D4 must be used with an anchor point/system conforming with EN795 or in accordance with ANSI z359, or any other specifjc recognised International Standard or industry best practice relating to the specifjc use, or a non-engineered anchor point capable of withstanding appropriate loads.
14 15
RP88X series: Issue A - Oct 2015 RP88X series: Issue A - Oct 2015
Český Český
16 17
RP88X series: Issue A - Oct 2015 RP88X series: Issue A - Oct 2015
Český Český
18 19
RP88X series: Issue A - Oct 2015 RP88X series: Issue A - Oct 2015
Dansk Dansk
20 21
RP88X series: Issue A - Oct 2015 RP88X series: Issue A - Oct 2015
Dansk Deutsch
22 23
RP88X series: Issue A - Oct 2015 RP88X series: Issue A - Oct 2015
Deutsch Deutsch
24 25
RP88X series: Issue A - Oct 2015 RP88X series: Issue A - Oct 2015
Deutsch Español Español
26 27
RP88X series: Issue A - Oct 2015 RP88X series: Issue A - Oct 2015
Español Español
28 29
RP88X series: Issue A - Oct 2015 RP88X series: Issue A - Oct 2015
Suomeski Suomeski
30 31
RP88X series: Issue A - Oct 2015 RP88X series: Issue A - Oct 2015
Suomeski Suomeski Français
32 33
RP88X series: Issue A - Oct 2015 RP88X series: Issue A - Oct 2015
Français Français
34 35
RP88X series: Issue A - Oct 2015 RP88X series: Issue A - Oct 2015
Français Italiano
36 37
RP88X series: Issue A - Oct 2015 RP88X series: Issue A - Oct 2015
Italiano Italiano
38 39
RP88X series: Issue A - Oct 2015 RP88X series: Issue A - Oct 2015
Italiano Nederlands Nederlands
40 41
RP88X series: Issue A - Oct 2015 RP88X series: Issue A - Oct 2015
Nederlands Nederlands
42 43
RP88X series: Issue A - Oct 2015 RP88X series: Issue A - Oct 2015
Norsk Norsk
44 45
RP88X series: Issue A - Oct 2015 RP88X series: Issue A - Oct 2015
Norsk Norsk Polski
46 47
RP88X series: Issue A - Oct 2015 RP88X series: Issue A - Oct 2015
Polski Polski
48 49
RP88X series: Issue A - Oct 2015 RP88X series: Issue A - Oct 2015
Polski Português
50 51
RP88X series: Issue A - Oct 2015 RP88X series: Issue A - Oct 2015
Português Português
52 53
RP88X series: Issue A - Oct 2015 RP88X series: Issue A - Oct 2015
Português
Item, Položka, Element, Artikel, Artículo, Tuote, Élément, Articolo, Onderdeel, Artikkel, Pozycja, Item, Objekt. Serial Number, Sériové číslo, Serienummer, Seriennummer, Número de serie, Sarjanumero, Numéro de série, Numero di serie, Serienummer, Serienummer, Numer seryjny, Número de série, Serienummer. Year
manufacture, Rok výroby, Produktionsår, Herstellungsjahr, Año de fabricación, Valmistusvuosi, Année de fabrication, Anno di produzione, Productiejaar, Produksjonsår, Rok produkcji, Ano de fabric, Tillverkningsår. Purchased from, Zakoupeno od, Købt af, Gekauft von, Comprado en (distribuidor), Ostopaikka, Acheté auprès de, Acquistato da, Gekocht bij, Kjøpt fra, Zakupione od, Adquirido de, Inköpt hos. Purchase date, Datum nákupu, Købsdato, Kaufdatum, Fecha de compra, Ostopäivä, Date d’achat, Data di acquisto, Aankoopdatum, Kjøpsdato, Data zakupu, Data da aquisição, Inköpsdatum. Name of Manufacturer, Výrobce, Producent, Hersteller, Fabricante, Valmistaja, Fabricant, Produttore, Fabrikant, Produsent, Producent, Fabricante, Tillverkare. Date of fjrst use, Datum prvního použití, Datoen for første anvendelse, Datum der ersten Benutzung, Fecha del primer uso, Ensimmäinen käyttöpäivä, Date de première utilisation, Data del primo utilizzo, Datum van ingebruikname, Dato for første gangs bruk, Data pierwszego użycia, Data da primeira utilização, Datum för första användning. Inspection date, Datum kontroly, Inspektionsdato, Prüfungsdatum, Fecha de inspección, Tarkistuspäivä, Date d’inspection, Data ispezione, Inspectiedatum, Kontrolldato, Data przeglądu, Data da inspeção, Inspektionsdatum. Reason (periodic examination (E) or repair (R)), Důvod (periodická prohlídka (E) nebo oprava (R)), Grund (periodisk undersøgelse (E) eller reparation (R)), Grund (regelmäßige Prüfung (E) oder Reparatur(R)), Motivo (examinación periódica (E)
périodique (E) ou réparation (R)), Motivo (esame periodico (E) o riparazione (R)), Reden (periodiek onderzoek (E) of reparatie (R)), Årsak (periodisk kontroll (E) eller reparasjon (R)), Powód (przegląd okresowy — E; naprawa — R), Motivo (inspeção periódica [E] ou reparação [R]), Orsak (periodiskt återkommande granskning (E) eller reparation (R)). Conform, Odpovídá, Overholdelse, Bedingungen erfüllt, Conformidad, Vaatimustenmukaisuus, Conformité, Conforme, Voldoet aan, Samsvar, Zgodność, Conformidade, Efterlevnad. Comments, Připomínky, Bemærkninger, Kommentare, Comentarios, Kommentit, Commentaires, Commenti, Opmerkingen, Kommentarer, Uwagi, Comentários, Kommentarer. Signature, Podpis, Underskrift, Unterschrift, Firma, Allekirjoitus, Signature, Firma, Handtekening, Signatur, Podpis, Assinatura, Underskrift. 1 2 3 4 5 6 7 8 9 10 11 12
54 55
RP88X series: Issue A - Oct 2015 RP88X series: Issue A - Oct 2015
Product Record 1 2 3 4 6 8 9 10 11 5 7 12
56
RP88X series: Issue A - Oct 2015
International Safety Components Ltd. Unit 1, Plot 2 Llandygai Industrial Estate Bangor Gwynedd LL57 4YH United Kingdom T> +44 (0) 1248 363 125 F> +44 (0) 1248 372 118 sales@iscwales.com www.iscwales.com
Solutions in Metal