a print image size e
play

A PRINT: IMAGE SIZE E 1/2 F C D 1/2 MATBOARD B Your mat - PDF document

GUIDELINES FOR MAT CUTTING 1/2 1/2 1- A PRINT: IMAGE SIZE E 1/2 F C D 1/2 MATBOARD B Your mat usually covers about 1/4" of image on all sides. Use stencils for guidelines or make ad- justments from class guides stencil. Use


  1. GUIDELINES FOR MAT CUTTING 1/2 1/2 1- A PRINT: IMAGE SIZE E 1/2 F C D 1/2 MATBOARD B Your mat usually covers about 1/4" of image on all sides. Use stencils for guidelines or make ad- justments from class guides stencil. Use outline for determining measurements for other images. See diagram. Larger images (i.e. 16" x 20") are usually matted with an even border all around, i.e. 3" wide. 2-Always orient the mat vertically for a smaller image such as an 8" x 10" print. This rule fol- lows if the image is a horizontal print or a vertical print. Larger mats usually do not follow these con- traints. 3-Mark intersections of cut lines on the back of the matboard. Cut into the mat border--not the image area--when cutting from the back.

  2. 4-Use scraps of board underneath the mat to create a necessary cutting guard. Move the cutting guard as you proceed, preventing the blade from catching previously cut grooves. Rotate board for each cut. Verify that each cut is complete before moving board. 5-Be sure to change the blade: 1) when you begin working and 2) after you have completed several mats. Use a rectangular blade for the bevel cut on the large black mat cutter. When replacing blade, note its position in the holder. Make sure the blade protrudes enough for a deep cut. The beveled side of the blade should face outward. Locking knobs on the knife allow you to easily replace the blade. Use the hex key to tighten or loosen the blade if necessary 6-Don't use pressure. Score the board gently for the first cut. Increase pressure slightly as you pass over the same cut . Generally four passes are required. 
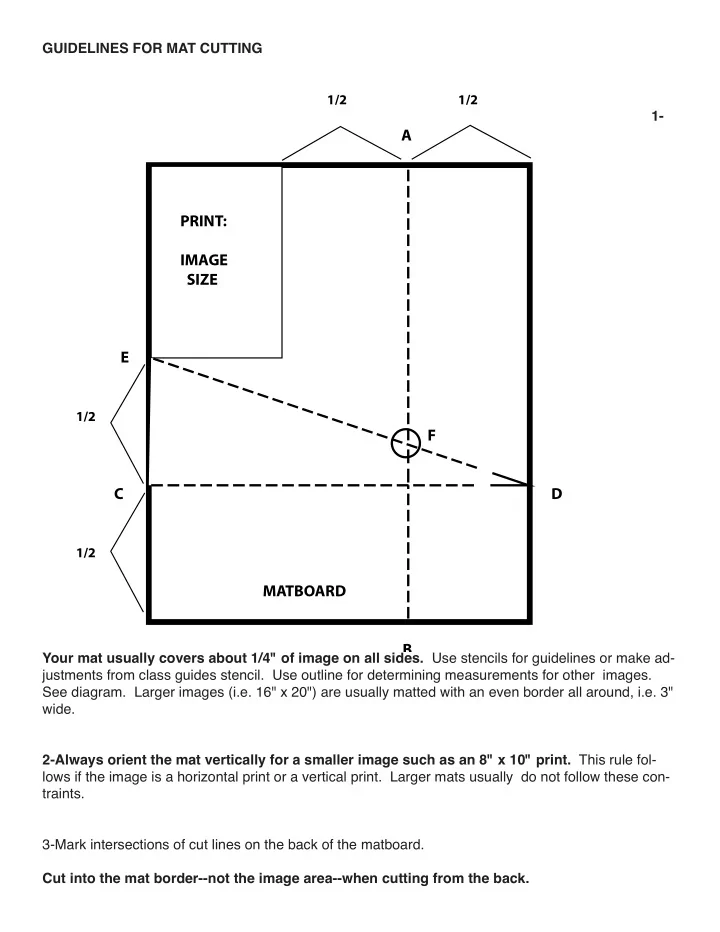
Overcut each intersection 1/8" to ensure that the mat corners will be clean. The inside area should pop out easily. 7- Clean up board with a white eraser (not pink) if necessary. Use available kraft paper to keep your work area and your board clean. Keep your hands clean too. Smooth edge of mat with folding bone. Sand rough edges with fine sandpaper. Dispose of blades in available canisters to avoid injury. 8- Place mounting board and mat boards flush at the vertical edge. Wet linen hinging tape spar- ingly with water (not saliva) and press along edge with clean hands. Allow the tape to dry. 9- Use paper tape for adhering the paper corners. Corners can be folded from the archival paper. Cut strips so they are less than 1/2” wide. Place a clean weight on top of image, which is positioned under mat. Mark the position of tabs and adhere tabs with tape after removing print.

  3. PAPER CORNERS CUT A STRIP OF PERMALIFE PAPER FOLD STRIP (90 DEGREE ANGLE) FOLD AGAIN TRIM (IF NEEDED) USE PAPER TAPE TO ATTACH CORNER TO MAT BOARD

  4. MAT CUTTER BEVEL BLADE REPLACEMENT 1 Turn knob counter clockwise to release bevel blade. 2 Remove old blade and place in USED BLADES container. 3 Insert new blade (from box labeled BEVEL) sharp side down. Be sure blade rests in the bottom groove. Knob on right controls the amount of exposed blade (1/8”). Turn knob clockwise to secure blade in place. 1 2 3

Download Presentation
Download Policy: The content available on the website is offered to you 'AS IS' for your personal information and use only. It cannot be commercialized, licensed, or distributed on other websites without prior consent from the author. To download a presentation, simply click this link. If you encounter any difficulties during the download process, it's possible that the publisher has removed the file from their server.

Recommend


More recommend