pr prepar eparat ation
play

Pr Prepar eparat ation 1. Install the free ZO ZOOM Cl Clien ent - PDF document

How to create a back-up recording of your presentation In this document you will learn how to record your presentation using the ZOOM application. This recording will be used as backup in case something goes wrong on the day of your online


  1. How to create a back-up recording of your presentation In this document you will learn how to record your presentation using the ZOOM application. This recording will be used as backup in case something goes wrong on the day of your online presentation. If you already have some experience with ZOOM and a ZOOM account, please skip the first section and proceed to RECORDING YOUR PRESENTATION on page 3. Pr Prepar eparat ation 1. Install the free ZO ZOOM Cl Clien ent for or Meet eetings on your desktop or laptop computer You can download it for free here: https://zoom.us/download . 
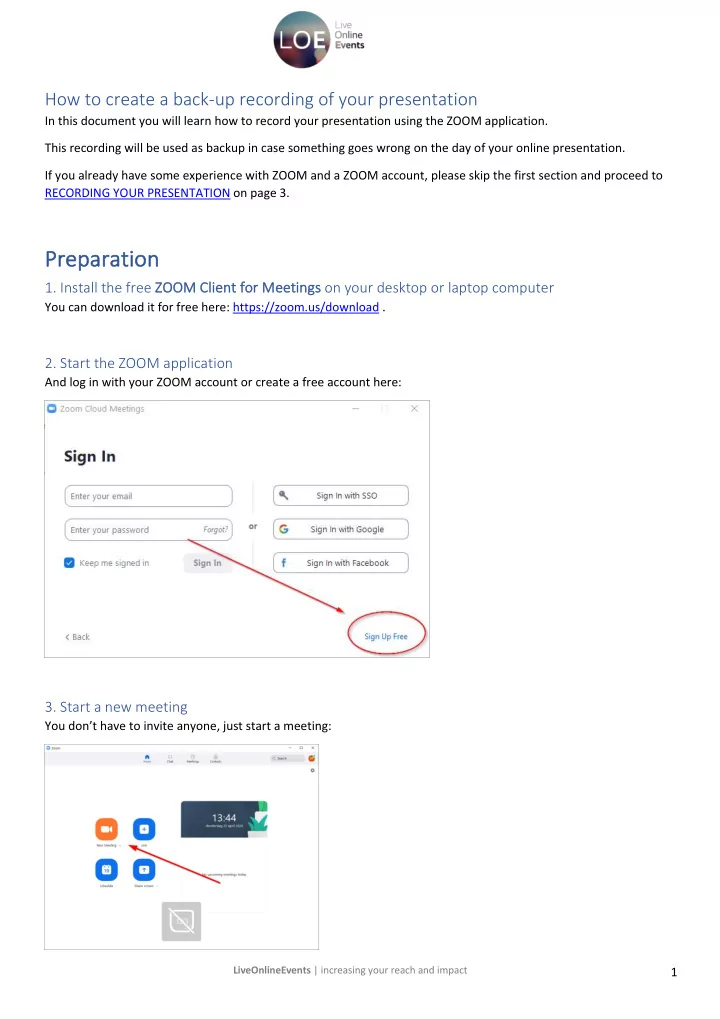
2. Start the ZOOM application And log in with your ZOOM account or create a free account here: 3. Start a new meeting You don’t have to invite anyone, just start a meeting: LiveOnlineEvents | increasing your reach and impact 1

  2. 4. Click ‘Join with computer audio’ 5. Does your Camera work? And does your microphone icon change to green when you talk? (you can find it in the left bottom of your screen) 6. Then you are good to go! Please proceed to the next page to read about how to record your presenation. LiveOnlineEvents | increasing your reach and impact 2

  3. How How to o reco ecord yo your pres esen entation Recording your presentation is as easy as presenting live in a videoconference. And, as with any presentation, it never hurts to do a practice run before doing it for real. 1. Start a ZOOM meeting As described in the pages above – you don’t have to invite anyone. 2. Start PowerPoint and start your presentation You can start your presentation by pressing F5 or by clicking on the slideshow icon in the left top of the screen: 3. Go back to your ZOOM meeting By pressing ALT+Tab (Windows) or COMMAND+Tab (Mac) 4. Start with sharing your presentation Before you start your talk, you first ‘share’ your presentation with the viewers. First: click on Share Screen in the bottom menu : Second: Select your presentation. In Windows it will be listed as PowerPoint Slideshow (or the equivalent of Slideshow in your own language) LiveOnlineEvents | increasing your reach and impact 3

  4. 5. Start your recording. You can find the record button in the menu at the bottom of the screen. On smaller screens you can find the record button under “MORE”. 6. Start talking to the camera! Take a deep breath, remember to think of a real audience-member, address them personally and enjoy the ride! 7. You can now click through your presentation Just like on stage. 8 When you’re done, click on stop the recording After you end the meeting, the video will be saved automatically to your computer in a folder. The video will be saved as Zoom_...[number].. .mp4 . How and when to submit your back-up presentation for ECRD When you are happy with the final video, please make sure you submit it to us no later than Wednesday 6th May. You can do that as follows: 1. Save your video as [Theme]-[Session]-[YourName].mp4 2. Email to Yuliya Gryniv at yuliya.gryniv@eurordis.org We really appreciate your efforts and cooperation to make sure everything runs smoothly for our audience during the online event dates! LiveOnlineEvents | increasing your reach and impact 4

Download Presentation
Download Policy: The content available on the website is offered to you 'AS IS' for your personal information and use only. It cannot be commercialized, licensed, or distributed on other websites without prior consent from the author. To download a presentation, simply click this link. If you encounter any difficulties during the download process, it's possible that the publisher has removed the file from their server.

Recommend


More recommend