SLIDE 1 ¡
How ¡To: ¡Run ¡the ¡ENCODE ¡histone ¡ChIP-‑seq ¡analysis ¡pipeline ¡on ¡ DNAnexus ¡
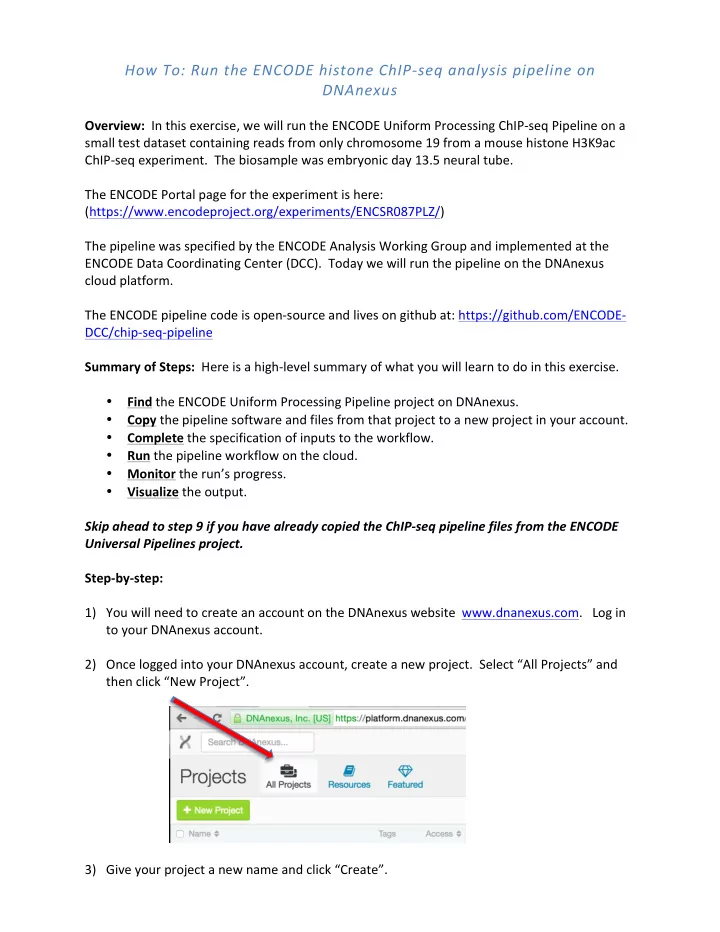
¡ Overview: ¡ ¡In ¡this ¡exercise, ¡we ¡will ¡run ¡the ¡ENCODE ¡Uniform ¡Processing ¡ChIP-‑seq ¡Pipeline ¡on ¡a ¡ small ¡test ¡dataset ¡containing ¡reads ¡from ¡only ¡chromosome ¡19 ¡from ¡a ¡mouse ¡histone ¡H3K9ac ¡ ChIP-‑seq ¡experiment. ¡ ¡The ¡biosample ¡was ¡embryonic ¡day ¡13.5 ¡neural ¡tube. ¡ ¡ The ¡ENCODE ¡Portal ¡page ¡for ¡the ¡experiment ¡is ¡here: ¡ ¡ (https://www.encodeproject.org/experiments/ENCSR087PLZ/) ¡ ¡ ¡ The ¡pipeline ¡was ¡specified ¡by ¡the ¡ENCODE ¡Analysis ¡Working ¡Group ¡and ¡implemented ¡at ¡the ¡ ENCODE ¡Data ¡Coordinating ¡Center ¡(DCC). ¡ ¡Today ¡we ¡will ¡run ¡the ¡pipeline ¡on ¡the ¡DNAnexus ¡ cloud ¡platform. ¡ ¡ The ¡ENCODE ¡pipeline ¡code ¡is ¡open-‑source ¡and ¡lives ¡on ¡github ¡at: ¡https://github.com/ENCODE-‑ DCC/chip-‑seq-‑pipeline ¡ ¡ Summary ¡of ¡Steps: ¡ ¡Here ¡is ¡a ¡high-‑level ¡summary ¡of ¡what ¡you ¡will ¡learn ¡to ¡do ¡in ¡this ¡exercise. ¡ ¡
- Find ¡the ¡ENCODE ¡Uniform ¡Processing ¡Pipeline ¡project ¡on ¡DNAnexus. ¡
- Copy ¡the ¡pipeline ¡software ¡and ¡files ¡from ¡that ¡project ¡to ¡a ¡new ¡project ¡in ¡your ¡account. ¡
- Complete ¡the ¡specification ¡of ¡inputs ¡to ¡the ¡workflow. ¡
- Run ¡the ¡pipeline ¡workflow ¡on ¡the ¡cloud. ¡
- Monitor ¡the ¡run’s ¡progress. ¡
- Visualize ¡the ¡output. ¡
¡ Skip ¡ahead ¡to ¡step ¡9 ¡if ¡you ¡have ¡already ¡copied ¡the ¡ChIP-‑seq ¡pipeline ¡files ¡from ¡the ¡ENCODE ¡ Universal ¡Pipelines ¡project. ¡ ¡ Step-‑by-‑step: ¡ ¡ 1) You ¡will ¡need ¡to ¡create ¡an ¡account ¡on ¡the ¡DNAnexus ¡website ¡ ¡www.dnanexus.com. ¡ ¡ ¡Log ¡in ¡ to ¡your ¡DNAnexus ¡account. ¡ ¡ 2) Once ¡logged ¡into ¡your ¡DNAnexus ¡account, ¡create ¡a ¡new ¡project. ¡ ¡Select ¡“All ¡Projects” ¡and ¡ then ¡click ¡“New ¡Project”. ¡ ¡ ¡ ¡ ¡ 3) Give ¡your ¡project ¡a ¡new ¡name ¡and ¡click ¡“Create”. ¡
SLIDE 2
¡ ¡ ¡ 4) Select ¡“Add ¡Data” ¡… ¡ ¡ ¡ ¡ ¡ ¡ 5) … ¡select ¡“From ¡another ¡project” ¡… ¡ ¡ ¡ ¡ 6) Type ¡“ENCODE” ¡in ¡the ¡search ¡box ¡and ¡select ¡“ENCODE ¡Uniform ¡Processing ¡Pipelines” ¡ ¡ ¡ ¡
SLIDE 3
7) Click ¡the ¡box ¡next ¡to ¡“ChIP-‑seq” ¡and ¡select ¡“Add ¡Data”. ¡ ¡ ¡ ¡ ¡ 8) When ¡finished, ¡the ¡following ¡pop-‑up ¡window ¡should ¡appear. ¡ ¡Click ¡“Close”. ¡ ¡ ¡ ¡ ¡ 9) ¡To ¡open ¡the ¡ChIP-‑seq ¡folder, ¡click ¡the ¡“ChIP-‑seq” ¡text. ¡ ¡You ¡should ¡see ¡the ¡files ¡copied ¡to ¡ your ¡project. ¡ ¡ ¡ ¡ ¡ 10) ¡The ¡example ¡data ¡in ¡this ¡exercise ¡is ¡from ¡a ¡mouse ¡histone ¡ChIP ¡experiment, ¡which ¡we ¡will ¡ map ¡to ¡the ¡mouse ¡mm10 ¡assembly. ¡ ¡Click ¡on ¡the ¡“ENCODE ¡Histone ¡ChIP-‑seq ¡(mm10)” ¡
SLIDE 4 workflow ¡to ¡open ¡it. ¡ ¡ ¡ ¡ ¡ 11) ¡This ¡window ¡represents ¡an ¡“Analysis”, ¡which ¡is ¡an ¡instantiation ¡of ¡the ¡histone ¡ChIP-‑seq ¡
- workflow. ¡Give ¡the ¡analysis ¡a ¡name, ¡like ¡“mouse ¡H3K9ac” ¡
¡ ¡ ¡ ¡ 12) Click ¡on ¡“Set ¡output ¡folder ¡…” ¡ ¡ ¡ 13) Click ¡on ¡the ¡new ¡folder ¡button ¡to ¡create ¡a ¡new ¡folder ¡and ¡name ¡it ¡something ¡like ¡“mouse ¡ H3K9ac ¡results”. ¡ ¡
SLIDE 5
¡ ¡ 14) Now ¡you ¡should ¡have ¡named ¡your ¡analysis ¡and ¡specified ¡an ¡output ¡folder ¡for ¡the ¡results. ¡ ¡ Your ¡workflow ¡window ¡should ¡look ¡like ¡this: ¡ ¡ ¡ ¡ 15) Select ¡the ¡“reads1” ¡input ¡box ¡for ¡the ¡“Map ¡Rep1” ¡stage ¡(the ¡first ¡step ¡in ¡the ¡workflow). ¡ ¡ Note ¡that ¡the ¡data ¡in ¡this ¡example ¡are ¡from ¡single-‑end ¡sequencing, ¡so ¡all ¡the ¡“reads2” ¡ inputs ¡will ¡be ¡left ¡blank. ¡ ¡In ¡a ¡paired-‑end ¡experiment ¡the ¡second ¡fastq ¡of ¡the ¡paired ¡reads ¡ for ¡each ¡replicate ¡would ¡go ¡in ¡“reads2”. ¡ ¡ ¡ ¡ ¡ ¡ 16) After ¡clicking ¡on ¡“reads1”, ¡a ¡new ¡window ¡opens ¡where ¡you ¡will ¡navigate ¡to ¡the ¡input ¡files. ¡ ¡ Expand ¡the ¡“Chip-‑seq” ¡and ¡then ¡the ¡“test_data” ¡and ¡then ¡the ¡“ENCSR087PLZ-‑mH3K9ac” ¡ folders ¡to ¡see ¡the ¡list ¡of ¡data ¡files. ¡ ¡Make ¡sure ¡to ¡select ¡the ¡subfolder ¡ENCSR087PLZ-‑ mH3K9ac ¡to ¡limit ¡the ¡display ¡to ¡just ¡the ¡data ¡for ¡this ¡experiment. ¡ ¡ The ¡ENCSR087PLZ-‑mH3K9ac ¡folder ¡contains ¡only ¡reads ¡for ¡chromosome ¡19 ¡from ¡this ¡ experiment, ¡for ¡faster ¡processing. ¡ ¡
SLIDE 6
¡ ¡ 17) ¡Select ¡“R1-‑ENCFF560GLI.chr19.fq.gz”. ¡ ¡ ¡You ¡have ¡now ¡specified ¡the ¡input ¡fastq ¡for ¡replicate ¡ 1 ¡of ¡this ¡experiment. ¡ ¡ ¡ ¡ ¡ 18) ¡Repeat ¡the ¡process, ¡choosing ¡files ¡from ¡the ¡ENCSR087PLZ-‑mH3K9ac ¡subfolder ¡to ¡populate ¡ the ¡reads1 ¡inputs ¡for ¡the ¡“Map ¡Rep2” ¡step, ¡the ¡“Map ¡Ctl1” ¡step, ¡and ¡the ¡“Map ¡Ctl2” ¡step. ¡ ¡ The ¡Rep2 ¡input ¡starts ¡with ¡“R2”. ¡ ¡The ¡control ¡inputs ¡start ¡with ¡“C1” ¡and ¡“C2”, ¡respectively. ¡ ¡ Since ¡the ¡data ¡for ¡this ¡experiment ¡are ¡produced ¡by ¡single-‑end ¡sequencing, ¡there ¡are ¡no ¡ inputs ¡for ¡“reads2”. ¡ ¡Note: ¡ ¡Make ¡sure ¡you ¡choose ¡the ¡inputs ¡that ¡go ¡with ¡this ¡experiment. ¡ ¡ They ¡are ¡all ¡in ¡the ¡subfolder ¡ENCSR087PLZ-‑mH3K9ac. ¡ ¡ Here ¡is ¡a ¡summary ¡of ¡the ¡input ¡files ¡for ¡this ¡experiment: ¡ ¡ Map ¡Rep1: ¡R1-‑ENCFF560GLI.chr19.fq.gz ¡ Map ¡Rep2: ¡R2-‑ENCFF891NNX.chr19.fq.gz ¡ Map ¡Ctl1: ¡C1-‑ENCFF069WCH.chr19.fq.gz ¡ Map ¡Ctl2: ¡C2-‑ENCFF101KOM.chr19.fq.gz ¡ ¡ After ¡you ¡have ¡populated ¡all ¡the ¡“reads1” ¡inputs, ¡your ¡workflow ¡should ¡look ¡like ¡this: ¡ ¡ ¡
SLIDE 7 ¡ ¡ ¡ 19) All ¡of ¡the ¡other ¡inputs, ¡including ¡the ¡indexed ¡mm10 ¡genome ¡reference, ¡have ¡been ¡pre-‑filled ¡ in ¡this ¡workflow. ¡ ¡All ¡input ¡requirements ¡are ¡satisfied, ¡so ¡click ¡“Run ¡as ¡Analysis” ¡to ¡start ¡the ¡
¡ ¡ 20) ¡Starting ¡the ¡analysis ¡will ¡bring ¡up ¡the ¡“Monitor” ¡tab ¡which ¡will ¡display ¡the ¡details ¡of ¡the ¡ pipeline ¡steps ¡as ¡they ¡run. ¡ ¡Click ¡on ¡the ¡“+” ¡box ¡to ¡see ¡all ¡the ¡analysis ¡subjobs. ¡ ¡If ¡necessary, ¡ the ¡“Terminate” ¡button ¡can ¡be ¡used ¡to ¡cancel ¡the ¡analysis. ¡ ¡ ¡
SLIDE 8
¡ 21) ¡Click ¡on ¡the ¡analysis ¡name ¡(here ¡we’ve ¡named ¡it ¡“mouse ¡H3K9ac”) ¡to ¡watch ¡the ¡progress ¡of ¡ each ¡stage. ¡ ¡ ¡ ¡ 22) ¡Within ¡the ¡output ¡folder ¡you ¡specified ¡above, ¡the ¡results ¡of ¡the ¡mapping ¡stages ¡can ¡be ¡ found ¡in ¡the ¡“encode_bwa” ¡subfolder ¡and ¡the ¡output ¡of ¡the ¡signal-‑generation ¡and ¡peak-‑ calling ¡stages ¡can ¡be ¡found ¡in ¡the ¡“encode_macs2” ¡subfolder. ¡ ¡
SLIDE 9
¡ ¡ 23) In ¡a ¡production ¡environment, ¡you ¡will ¡develop ¡procedures ¡or ¡scripts ¡to ¡visualize ¡and ¡archive ¡ the ¡results ¡of ¡multiple ¡pipeline ¡runs. ¡ ¡But ¡temporary ¡URL’s ¡can ¡be ¡generated ¡for ¡all ¡outputs ¡ and ¡used ¡to ¡quickly ¡visualize ¡some ¡of ¡the ¡pipeline ¡results. ¡ ¡For ¡this ¡example, ¡let’s ¡look ¡at ¡the ¡ pooled ¡signal ¡track ¡and ¡the ¡final, ¡replicated ¡peak ¡set. ¡ ¡In ¡the ¡“encode_macs2” ¡folder, ¡select ¡ the ¡following ¡output ¡files: ¡ ¡ Replicated ¡peak ¡set: ¡ final.replicated.narrowPeak.bb ¡ Pooled ¡fold-‑over-‑control ¡signal: ¡ pool.fc_signal.bw ¡ ¡ After ¡selecting ¡these ¡two ¡files, ¡click ¡the ¡“Download” ¡button. ¡ ¡
SLIDE 10
¡ ¡ ¡ 24) A ¡new ¡window ¡will ¡pop ¡up. ¡Select ¡“Get ¡bulk ¡URLs” ¡and ¡copy ¡the ¡list ¡of ¡URLs. ¡ ¡These ¡URL’s ¡ will ¡link ¡to ¡your ¡output ¡files ¡and ¡will ¡remain ¡active ¡for ¡24 ¡hours. ¡ ¡ ¡ ¡ 25) In ¡this ¡example ¡you ¡will ¡use ¡the ¡UCSC ¡Genome ¡browser ¡to ¡visualize ¡the ¡results ¡you ¡just ¡ calculated ¡as ¡“custom ¡tracks”. ¡ ¡In ¡a ¡new ¡web ¡browser ¡window ¡or ¡tab, ¡go ¡to ¡ http://genome.ucsc.edu/ ¡and ¡select ¡“My ¡Data” ¡from ¡the ¡top ¡options ¡bar. ¡ ¡ ¡ ¡
SLIDE 11 26) Select ¡“Custom ¡Tracks” ¡from ¡the ¡options ¡menu. ¡ ¡ ¡ ¡ 27) ¡Paste ¡the ¡URLs ¡you ¡copied ¡above ¡into ¡the ¡text ¡window. ¡ ¡Be ¡sure ¡the ¡reference ¡genome ¡is ¡ correct ¡for ¡this ¡file ¡(mouse ¡mm10 ¡for ¡this ¡demo). ¡ ¡Tip: ¡ ¡The ¡UCSC ¡Genome ¡Browser ¡is ¡ sensitive ¡to ¡white-‑space ¡at ¡the ¡end ¡of ¡URL’s. ¡ ¡If ¡there ¡are ¡spaces ¡after ¡the ¡URL’s ¡you’ve ¡ pasted, ¡delete ¡them ¡and ¡make ¡sure ¡each ¡URL ¡is ¡on ¡its ¡own ¡line. ¡ Hit ¡“Submit” ¡when ¡finished. ¡ ¡ ¡ ¡ ¡ ¡ 28) ¡This ¡will ¡bring ¡up ¡the ¡“Manage ¡Custom ¡Tracks” ¡page. ¡ ¡Select ¡“go” ¡to ¡visualize ¡the ¡tracks. ¡ ¡ ¡ ¡ ¡ 29) ¡Because ¡the ¡raw ¡data ¡were ¡subsampled ¡to ¡only ¡chromosome ¡19, ¡enter ¡a ¡position ¡on ¡that ¡
- chromosome. ¡ ¡For ¡example, ¡chr19:4,769,592-‑4,909,161 ¡
¡ Set ¡the ¡signal ¡track ¡to ¡display ¡in ¡“full” ¡mode. ¡ ¡Do ¡you ¡see ¡strong ¡signal ¡for ¡H3K9ac ¡(the ¡ target ¡for ¡this ¡experiment)? ¡ ¡The ¡black ¡blocks ¡in ¡the ¡replicated ¡peaks ¡track ¡are ¡the ¡peaks ¡ that ¡passed ¡a ¡stringent ¡thresholding ¡requiring ¡the ¡peaks ¡to ¡be ¡observed ¡in ¡both ¡replicates. ¡ ¡ H3K9ac ¡is ¡a ¡mark ¡associated ¡with ¡active ¡promoters. ¡ ¡Can ¡you ¡see ¡that ¡the ¡peaks ¡are ¡called ¡ around ¡the ¡transcription ¡start ¡sites ¡of ¡several ¡genes ¡in ¡this ¡region? ¡ ¡
SLIDE 12
¡ ¡ ¡ ¡ Congratulations! ¡ ¡You ¡have ¡replicated ¡an ¡ENCODE ¡analysis ¡starting ¡with ¡primary ¡data. ¡ ¡You ¡ can ¡repeat ¡this ¡process ¡on ¡your ¡own ¡data, ¡and ¡be ¡assured ¡that ¡your ¡results ¡will ¡be ¡directly ¡ comparable ¡to ¡all ¡the ¡experiments ¡the ¡ENCODE ¡DCC ¡has ¡analyzed. ¡ ¡ ¡ ¡ ¡ ¡ ¡ ¡ ¡ ¡ ¡ ¡ ¡
SLIDE 13 ¡
Other ¡DNAnexus ¡Tools: ¡
¡ To ¡load ¡data ¡once ¡you ¡are ¡in ¡your ¡own ¡project ¡ 1) Start ¡a ¡“New ¡Project” ¡or ¡find ¡your ¡own ¡project ¡in ¡the ¡DNAnexus ¡homepage. ¡ ¡ ¡ ¡ 2) If ¡new, ¡name ¡project ¡in ¡the ¡upper ¡left ¡corner. ¡ ¡ ¡ ¡ 3) Select ¡“Add ¡Data” ¡to ¡select ¡the ¡files ¡you ¡want ¡to ¡use ¡for ¡analysis ¡to ¡your ¡project. ¡ ¡ ¡ ¡ 4) When ¡the ¡“Add ¡Data ¡to ¡Project” ¡window ¡pops ¡up, ¡select ¡“From ¡another ¡DNAnexus ¡ project.” ¡ ¡ ¡ ¡ 5) Scroll ¡down ¡and ¡select ¡“ENCODE ¡Universal ¡Processing ¡Pipeline” ¡project ¡to ¡access ¡the ¡
¡ ¡ ¡ 6) Choose ¡“Add ¡Data” ¡to ¡select ¡these ¡files. ¡ ¡
SLIDE 14
¡ ¡ 7) When ¡these ¡files ¡are ¡uploaded, ¡the ¡following ¡window ¡will ¡pop ¡up. ¡ ¡ ¡ 8) These ¡files ¡and ¡associated ¡applets ¡will ¡now ¡appear ¡in ¡the ¡Manage ¡tab ¡of ¡your ¡browser. ¡ ¡ ¡ ¡ ¡ ¡ To ¡import ¡a ¡fastq ¡file ¡directly ¡from ¡the ¡ENCODE ¡portal ¡to ¡DNAnexus ¡ 1) Go ¡to ¡the ¡ENCODE ¡portal ¡(encodeproject.org) ¡and ¡find ¡the ¡fastq ¡file ¡you ¡are ¡ interested ¡in ¡using. ¡ ¡Right ¡click ¡on ¡this ¡file ¡and ¡select ¡“Copy ¡Link ¡Address.” ¡ ¡ ¡ ¡ ¡ 2) In ¡the ¡manage ¡tab, ¡under ¡“Add ¡Data” ¡select ¡the ¡“From ¡a ¡Server” ¡option ¡and ¡paste ¡ the ¡URL ¡into ¡the ¡box. ¡ ¡Select ¡“Add ¡Data” ¡and ¡the ¡file ¡will ¡upload. ¡ ¡
SLIDE 15 ¡ ¡ ¡ ¡ To ¡share ¡project ¡with ¡another ¡user ¡ ¡ 1) In ¡order ¡to ¡share ¡your ¡project, ¡select ¡the ¡blue ¡“Share” ¡button ¡at ¡the ¡upper ¡right ¡corner ¡
- f ¡the ¡browser ¡page. ¡ ¡
¡ ¡ ¡ 2) This ¡will ¡bring ¡up ¡a ¡pop-‑up ¡window ¡where ¡you ¡can ¡add ¡user ¡names ¡and ¡select ¡ permissions ¡to ¡allow ¡collaborators ¡access ¡to ¡view, ¡edit, ¡or ¡contribute ¡to ¡your ¡projects. ¡ ¡ ¡ ¡ ¡ ¡ ¡