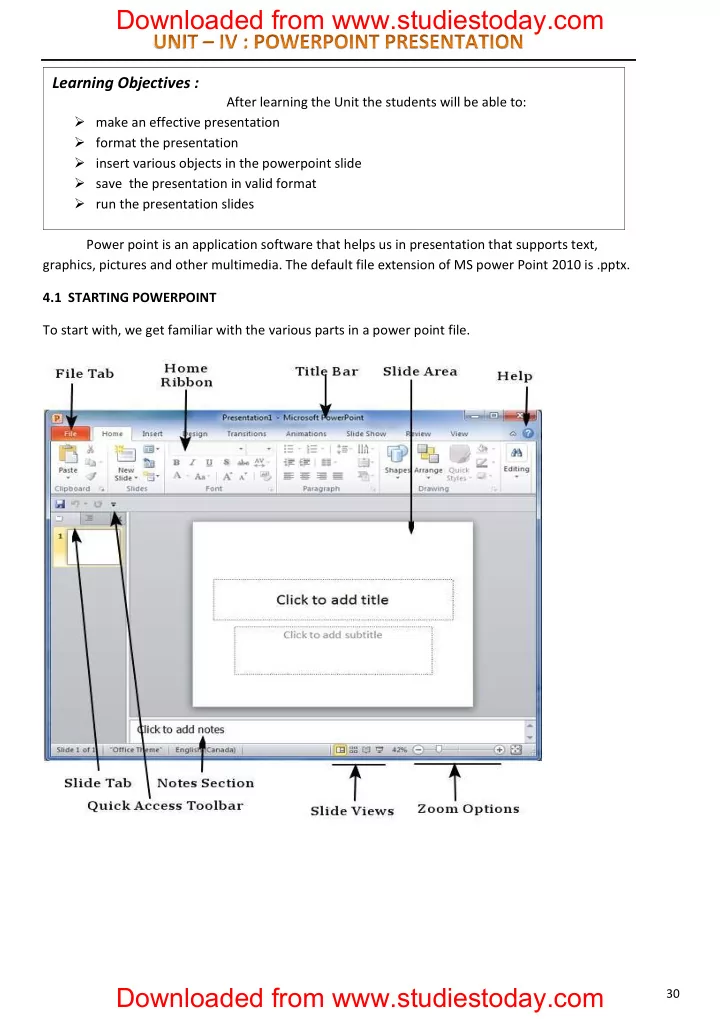
SLIDE 1 Power point is an application software that helps us in presentation that supports text, graphics, pictures and other multimedia. The default file extension of MS power Point 2010 is .pptx. 4.1 STARTING POWERPOINT To start with, we get familiar with the various parts in a power point file.
Learning Objectives :
After learning the Unit the students will be able to:
- make an effective presentation
- format the presentation
- insert various objects in the powerpoint slide
- save the presentation in valid format
- run the presentation slides
30
Downloaded from www.studiestoday.com Downloaded from www.studiestoday.com
SLIDE 2 File Tab: The file tab helps us to manage our power point file. Ribbon: The Ribbon is composed of three components:
- Tabs: They form the top part of the ribbon. Home, Insert etc. are some tabs.
- Groups: The group organizes related commands. Eg. Commands related to fonts, size,
alignment etc.
- Commands: Each group has commands in it.
Slide area: The Slide area helps us to add, edit texts and other multimedia in the slide. Title bar: It appears at the top of the window where the file name can be found. Slide view: The Slide view helps us to switch between PowerPoint views:
- Normal Layout view: In this, the page is displayed in normal view. This view lets us to edit
individual slides and re-arrange them.
- Slide Sorter View: In this, the slides are displayed as matrix. This view lets us to re-arrange
slides but not edit them.
- Reading view: This view is similar to a slide show view.
4.1.1 CREATE A NEW FILE To create a new slide, go to file>New or right click on the navigation pane and select New Slide or press CTRL + N.
31
Downloaded from www.studiestoday.com Downloaded from www.studiestoday.com
SLIDE 3
4.2 FORMATTING A PRESENTATION
PowerPoint lets us to format the presentation according to our needs and thereby enable us to create customized and impressive presentations. 4.2.1 CHANGING THE FONT The font management is shown below: We can choose from the menu or right click on any text to format it.
32
Downloaded from www.studiestoday.com Downloaded from www.studiestoday.com
SLIDE 4
4.2.2 CHANGING THE FONT SIZE, STYLE , COLOR The above image shows the Font dialog that helps us in formatting font size, style and colour.
33
Downloaded from www.studiestoday.com Downloaded from www.studiestoday.com
SLIDE 5
4.2.3 FORMATTING PARAGRAPHS Font face and its formatting is shown in the image below. We need to select our desired font face and choose the font size and also view the preview of the selected type.
34
Downloaded from www.studiestoday.com Downloaded from www.studiestoday.com
SLIDE 6
4.2.4 CHANGING TEXT ALIGNMENT PowerPoint allows various text alignments to organize our content. For example the text in the above example is aligned right.
35
Downloaded from www.studiestoday.com Downloaded from www.studiestoday.com
SLIDE 7
Paragraph Indentation: Paragraph Indentation helps us to present our data in a visually appealing manner.
36
Downloaded from www.studiestoday.com Downloaded from www.studiestoday.com
SLIDE 8
4.2.5 MODIFYING LINE SPACING PowerPoint offers line spacing option to help us change the space between lines of text.
37
Downloaded from www.studiestoday.com Downloaded from www.studiestoday.com
SLIDE 9
4.2.6 CREATING BULLETED AND NUMBERED LISTS To create Bullet and Numbering, we need to right click on the area where we need to insert the bullets or numbering and then choose the desired bullet or number. 4.2.7 COPYING FORMATTING One of the most power and useful feature of the PowerPoint is the Format Painter tool. Once we have selected a particular format which fits our need, it helps us to copy the format to a series of presentations.
38
Downloaded from www.studiestoday.com Downloaded from www.studiestoday.com
SLIDE 10 4.3 INSERT MENU AND OTHER MULTIMEDIA CONTENTS
PowerPoint allows us to insert multimedia in our slide. It allows us to insert two types of pictures: Clipart – the ones that are online picture collections and can be searched from the clipart and the
- ther is Picture: the ones that are available in our computer.
4.3.1 IMAGES : In order to insert or add images in your powerpoint slide select Picture option under Insert menu and browse and select the desired image to be inserted from your computer 4.3.2 TABLES : To insert or add a Table in your slide select Table option under Insert menu. You can either directly define the number of rows and number columns required in your table or you can draw the table directly on the slide on your own. You can also insert excel sheet table in your slide using Insert menu as shown below
39
Downloaded from www.studiestoday.com Downloaded from www.studiestoday.com
SLIDE 11 4.3.3 CLIP ART : Microsoft Powerpoint provides some pre-defined category wise basic images that can be used by the user directly by choosing Clip Art option under Insert menu as shown below on the right side 4.3.4 SCREEN SHOT : This option under Insert menu can be used to insert the recently taken Screen
- Shots. You just need to click on the drop down arrow and select the desired screen shot to be
inserted in your slide.
40
Downloaded from www.studiestoday.com Downloaded from www.studiestoday.com
SLIDE 12
4.3.5 SHAPES AND SMART ART : Microsoft Powerpoint provides some important mathematical and geometrical shapes to be used in powerpoint slides. Shapes option under Insert menu : used to insert basic geometrical and other shapes Smart Art option under Insert menu : used to insert Mathematical 2-D and 3-D shapes
41
Downloaded from www.studiestoday.com Downloaded from www.studiestoday.com
SLIDE 13
4.3.6 CHART : You can also insert various types of mathematical charts in your presentation 4.3.7 TEXT BOX , WORDART, DATE & TIME , SLIDE NUMBER, SYMBOLS : We can also make use of Textbox, Header & Footer, WordArt, Date & Time, Slide Number and various symbols in our powerpoint presentation by selecting the desired option from the below select options under Insert menu.
42
Downloaded from www.studiestoday.com Downloaded from www.studiestoday.com
SLIDE 14
We can also insert video and audio in our slide. 4.3.8 MOVING & RESIZING AN IMAGE: To resize an image it is advisable to drag from its corners as it will uniformly increase or decrease the length and breadth of the image. An in order to move an Image just selects the image and drags and moves the image while pressing the left mouse button.
43
Downloaded from www.studiestoday.com Downloaded from www.studiestoday.com
SLIDE 15
4.4 SLIDE SHOW MENU
To start a slideshow, we can go to the menu and select Start Slideshow or we can press F5 to do so. Some of the important shortcuts are mentioned below: Go to a particular slide - <number> + ENTER Start slideshow from beginning – F5 Start slideshow from current slide – SHIFT + F5 To get out from the slide show – ESC 4.4.1 FROM BEGINNING : To show the presentation from the beginning of the presentation or from the very first slide select FROM BEGINNING under SLIDE SHOW MENU 4.4.2 FROM CURRENT SLIDE: To show the presentation from the current position of the presentation or from the current slide select FROM CURRENT SLIDE under SLIDE SHOW MENU
44
Downloaded from www.studiestoday.com Downloaded from www.studiestoday.com
SLIDE 16
4.4.3 CUSTOM SLIDE SHOW PowerPoint lets us present custom slide show. For that we need to select from the menu Slide Show > Custom Slide Show and then select the type. 4.4.4 SETUP SLIDE SHOW : After creating the presentation and in order to present the slides in effective ways MS Powerpoint provides us the features to Setup our slide slow as per our requirement. To access the option select Set up Slide Show under Slide Show menu as indicated below
45
Downloaded from www.studiestoday.com Downloaded from www.studiestoday.com
SLIDE 17 Q 1. MS PowerPoint is a/an............................. software. Q 2. The default file extension of MS PowerPoint 2007/2010/2013 is .................... . Q 3. Write about the uses of PowerPoint. Q 4. PowerPoint allows various text alignments to organise our data. (True/False) Q 5. How can we insert pictures and audio in PowerPoint? Q 6. What is the function of the format painter tool? Q 7. The shortcut to start slideshow from beginning is ......................... . Q 8. The shortcut to get out from the slide show is ............................... . Q 9. What are the two types of pictures we can insert in PowerPoint? Q 10. An individual page in a PowerPoint presentation is called a .................. .
- 1. Open MS Powerpoint and write Five sentences about yourself in five different slides and save the
file with your name on the Desktop.
- 2. Open the file that you have just created add two more slides having one-one sentence about
your parents and save the file with the name My Family in D: drive.
- 3. Open the file that you have just created and increase the font size of normal text to 16 ,and heading
to 24 , font style for heading is Times New Roman and for normal text it is Calibri and save the file with the name MyFile in a folder.
- 4. Create a powerpoint presentation having two sildes , write Five points (1 to 5) about your best friend on
- ne slide and five points (bulleted) about your brother/sister.
- 5. Create a presentation to display Ten basic facts about your country. All the slides must have name of the
place and at least one image of that place. Note : Name of the place must be written using WordArt. All the slides must have slide number and should also display date and time during the Slid Show. Next slide will come after 3 seconds only. 46
Downloaded from www.studiestoday.com Downloaded from www.studiestoday.com