
SLIDE 1
Air-Layering Tools & Supplies 1. Hand pruners 2. - - PowerPoint PPT Presentation
Air-Layering Tools & Supplies 1. Hand pruners 2. Girdling scissors (optional) 3. A knife (A linoleum hook knife is preferred, but any knife will work.) 4. Pliers, Channel locks, or Vise grips 5.
the application of 6" by 10" air-layering bags. This bag size has been useful in developing air-layers 3 to 6 feet tall with a branch caliper
maintained, larger or smaller bags may be used when air-layering larger or smaller branches. MATERIALS
by 10 inches long.
moistened peat moss or a mixture of 80% peat moss and 20% perlite.
that it is moist but not soggy.
into the bag so that it is firm but not overly packed.
Leave a 6" “tail” at the short end of the
application and may be stored for several weeks or months. It is best to store these bags in a cool, dark location to prevent the growth of algae or mold and the deterioration of the plastic by sunlight.
I.B.A. solution achieved excellent root formation when rooting hard-wood branches.) An alternate rooting hormone that I have had good results with is liquid Dip N Grow.
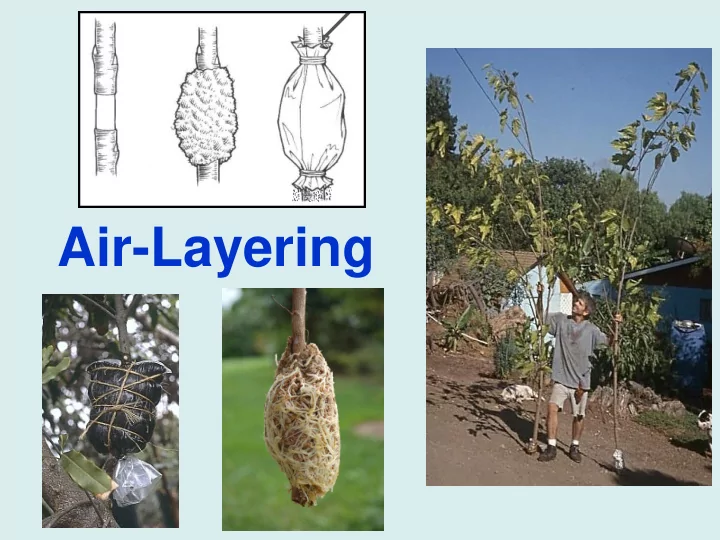
1. Select the branch to be air-layered. An upward growing branch in good sunlight will have the best chance of developing good root formation. For the application of a 6" by 10" air- layering bag, select a branch which is 3' to 6' in length and is 3/4" to 2" in caliper. 2. Prepare the region of the branch where the air-layer bag is to be applied by removing all leaves and side branches for a length of approximately one foot.
girdling scissors or knife. Girdling cuts should be approximately 1 ½" to 2" apart.
is contacted (at the cambium).
Bark Wood
Remove the bark from the branch in the area between the two girdling cuts by using the pliers and stripping away the bark with a twisting motion. This results in the removal of the phloem tissue while the xylem remains intact.
layer of bark. Phloem is the living tissue that transports sugars and other photosynthates (products from photosynthesis) from the leaves to all parts of the plant.
that transport water and dissolved minerals throughout the plant from the roots.
receive water and nutrients through the xylem. Photosynthates accumulate above the girdled area and this stimulates the development
Water and nutrients UP Photo- synthates DOWN
been removed.
to prevent bridging of the girdled area.
the branch, for a length of approximately 3"-5“ above the girdled area.
cambium and increases the development of the callus tissue and roots.
length of 4" to 6“ above the girdled area.
into the rooting medium ½ the depth of the bag.
the length of the cut.
bag around the girdled branch.
begin at the bottom of the girdled area and extend completely over the area of the branch where the rooting hormone was applied.
wrapping the twine tightly around the bag in a spiral fashion. Tie the bag closed using the end of the twine and the “tail” of twine at the top of the bag.
layering bag so that the cut side faces downward toward the
helps to reduce moisture loss from the bag.
sunlight, keeps the media from overheating and helps to prevent moisture loss from the rooting media.
temperatures and the dull side should be facing outwards during seasons of cool temperatures.
date on the air-layered branch.
many branches so that the result is starvation of the root system.
photosynthates and the plant may die!
callus tissue develops above the girdled region.
girdled area. When this occurs, roots will not develop.
the girdled area. Some species of plants may have strong tendencies to bridge girdled areas with new phloem tissue.
Bark and phloem has reconnected the tissue above and below the girdled area.
layering bags have been permeated by developing roots.
Inspect for root development by opening the aluminum foil. If more time is needed for root development, simply reclose the foil around the air-layer.
MATERIALS
sprayer
and a starter fertilizer which includes mycorrhizae.)
when sufficient roots are present to hold the root ball intact but before excessive rooting has caused the root ball to become root-bound. Roots will be most visible on the downward side of the bag.
from the parent plant by cutting the branch 2" to 4" below the bottom of the bag.
plastic bag which will allow water to enter into the root ball.
soaking it in the container
to 8 hours or overnight.
establishment of the air-layer into the container, both shortening the establishment time and the improving the root development.
abbreviated NAA. NAA is a plant hormone in the auxin family and is an ingredient in many commercial plant rooting horticultural products.
planting hole of the appropriate size for the air-layer’s root ball.
roots can grow downward into the container from the air-layer.
inoculants, to the potting soil or into the area around the planting hole can be very beneficial.
the roots of a plant to form a symbiotic relationship.
development once the phosphorous is absorbed into the plant. Phosphorous does not readily leach into the soil and is best mixed into the root area.
cut the twine away from the air- layer bag and carefully remove the plastic bag.
apart the root ball which may be very fragile.
beneficial to lightly score the root ball so that new root development can grow into the potting soil more easily.
into the container.
ball should be just below the surface of the potting soil. The bottom of the root ball should be at least 3" to 4" above the bottom of the container.
layer in the container.
bottom of the root ball and working up.
air-layered branch as you pack the soil around the root ball.
by using 2 or 3
stakes in
directions to stabilize the air- layer.
at the outer parameter of the container so that the root ball is not damaged or disturbed.
layer.
a shaded staging area until the roots have spread into the container and begin to actively absorb water and nutrients.
reduce transpiration from the leaves in order to prevent excessive desiccation and dehydration that can result in the death of the air-layer.
1. Remove some or all of the leaves from the air-layer.
Since the leaves function in photosynthesis and make food for the air-layer, removal of all leaves can starve the new plant and result in the slower development of roots or the death of the plant. It is generally better to remove only some of the leaves or to cut large leaves in half in order to reduce transpiration while maintaining the production of food for the plant. It is important to retain the tips of the branches as these apical meristems produce hormones that stimulate new root
meristems.
2. Spray the foliage of the air-layer with an anti-transpirant. (Wilt-Proof and Cloud Cover are two trade names for anti- transpirants that are available in California.)
house, or shaded spray bed.
translucent plastic bag can act like an individual high humidity greenhouse for each air-layer.
not touch the foliage. (You can support the bag with stakes or a tomato cage to prevent it from touching the plant.)
the bottom to provide some air exchange and ventilation.
degrees can greatly speed up the development of roots on a newly potted air-layer.
the air-layer so should only be used when the air-layer is in an environment with very high humidity.
weeks for the new air-layer to root into the container.
container, slowly acclimatize the air-layer into normal growing conditions.
replant into the ground or into a larger container.