1
play

1 Error Sources: Systematic Biases Linear Scanner & - PDF document

Introduction Quality Assurance and Quality Control of LiDAR Systems and Derived Data A Ayman F. Habib F H bib Digital Photogrammetry Research Group http://dprg.geomatics.ucalgary.ca Department of Geomatics Engineering University of Calgary,


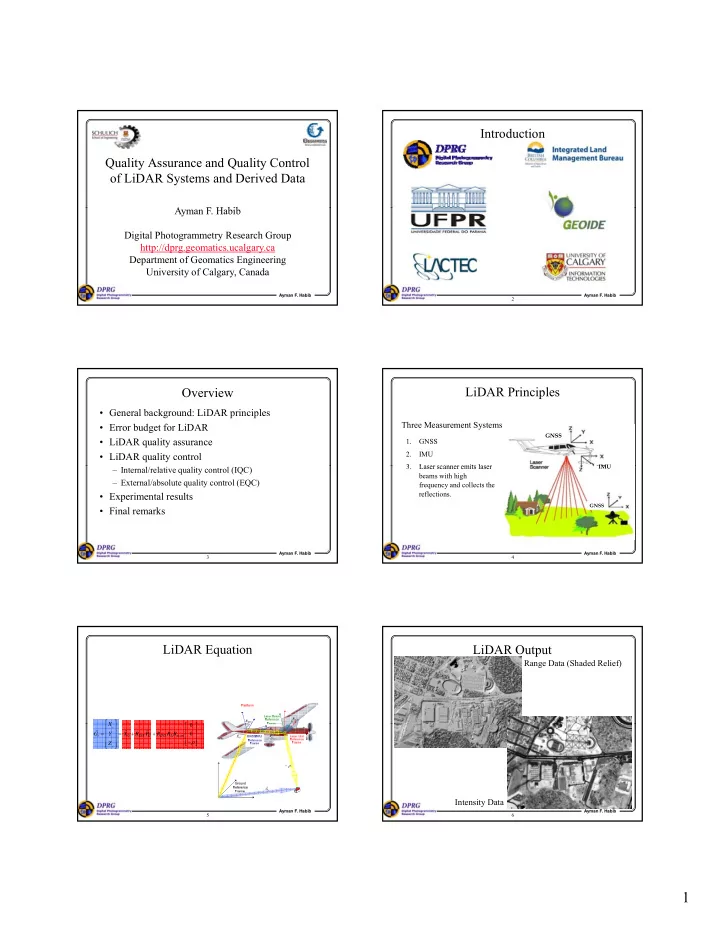
  1. Introduction Quality Assurance and Quality Control of LiDAR Systems and Derived Data A Ayman F. Habib F H bib Digital Photogrammetry Research Group http://dprg.geomatics.ucalgary.ca Department of Geomatics Engineering University of Calgary, Canada Ayman F. Habib Ayman F. Habib 2 LiDAR Principles Overview • General background: LiDAR principles Three Measurement Systems • Error budget for LiDAR GNSS • LiDAR quality assurance 1. GNSS 2. IMU • LiDAR quality control 3. 3 Laser scanner emits laser Laser scanner emits laser IMU IMU INS IN INS IN – Internal/relative quality control (IQC) beams with high – External/absolute quality control (EQC) frequency and collects the reflections. • Experimental results GNSS • Final remarks Ayman F. Habib Ayman F. Habib 3 4 LiDAR Equation LiDAR Output Range Data (Shaded Relief) R ⎡ ⎡ ⎤ ⎤ R scan INS X X ⎡ ⎡ 0 0 ⎤ ⎤ r ⎢ ⎥ i r r ⎢ ⎥ R Δ = ⎢ ⎥ = + + 0 r G Y X R P R R R r Δ ⎢ ⎥ 0 i INS G INS scan X P ⎢ i ⎥ 0 ⎢ ⎥ G − ρ ⎣ ⎦ ⎢ Z ⎥ ⎣ ⎦ i − ρ r G i Intensity Data Ayman F. Habib Ayman F. Habib 5 6 1

  2. Error Sources: Systematic Biases Linear Scanner & Boresighting Angular Bias • We would like to show the effect of biases in the Ground Truth & Biased Surface LiDAR measurements on the reconstructed object Ground Truth space. 50.15 Biased Surface Trajectory 50.1 • The effects will be derived through a simulation z-axis 50.05 process: 50 – Simulated surface & Trajectory � LiDAR Si l d f & T j � LiDAR measurements � Add biases � Reconstructed surface. 49.95 • The effects will be shown through the difference 3000 between the reconstructed footprints and the 2000 simulated surface (i.e., ground truth). 1000 • These effects will be shown for linear LiDAR 400 300 200 0 100 -200 -100 -300 systems. -400 0 y-axis x-axis Ayman F. Habib Ayman F. Habib 7 8 Linear Scanner & Boresighting Angular Bias Error Sources: Systematic Biases X,Y,Delta XYZ X,Y, Delta X 1 X,Y, Delta Y Flying Height Flying Direction Look Angle X,Y, Delta Z 0.8 Boresighting Effect is independent of Effect is dependent on the Effect is independent of Offset Bias the Flying Height Flying Direction the Look Angle 0.6 (Except Δ Z) 0.4 erence (m) Boresighting Effect Increases with the Effect Changes with the Effect Changes with the 0.2 Angular Bias Flying Height Flying Direction Look Angle z-axis (Except Δ X) 0 Diffe Laser Beam Effect is independent of Effect is independent of Effect Depends on the -0.2 Range Bias the Flying Height the Flying Direction Look Angle (Except Δ Y) -0.4 Laser Beam Effect Increases with the Effect Changes with the Effect Changes with the -0.6 Angular Bias Flying Height Flying Direction Look Angle -0.8 (Except Δ Y) (Except Δ X) • Assumption: -1 -600 -400 -200 0 200 400 600 � Linear Scanner Profile x-axis • Opposite Flight Directions & 30% Overlap � Constant Attitude & Straight Line Trajectory � Flying Direction Parallel to the Y axis • Overlap area can be used to check the presence of biases � Flat horizontal terrain Ayman F. Habib Ayman F. Habib 9 10 Error Sources: Random Errors Linear Scanner & Orientation Noise (I) Ground Truth & Noisy Surface • The effect of random errors can be analyzed in Ground Truth Noisy Surface Trajectory one of two different ways: 50.5 – Approach # I: • Simulated surface & Trajectory � LiDAR measurements � z-axis Add noise � Reconstructed surface. 50 • Evaluate the difference between the reconstructed footprints and the simulated surface (i.e., ground truth). – Approach # II: 49.5 1000 • Use the law of error propagation to evaluate the accuracy 500 (noise level) of the derived point cloud as it is determined by 400 300 200 the accuracy (noise level) in the LiDAR measurements. 0 100 0 -100 -200 -300 -400 -500 y-axis x-axis • Propagates with the flying height • Dependent on the look angle Ayman F. Habib Ayman F. Habib 11 12 2

  3. Linear Scanner & Orientation Noise (II) Linear Scanner & Orientation Noise (II) Flying Height = 500m Flying Height = 1000m 1.4 2.5 Accuracy of X Coordinates uted Coordinates (m) uted Coordinates (m) Accuracy of Y Coordinates Nadir Directions 1.2 Accuracy of Z Coordinates 2 1 1.5 0.8 Accuracy of X Coordinates Nadir Directions Nadir Directions Accuracy of Y Coordinates y Accuracy of Compu Accuracy of Compu Accuracy of Z Coordinates 0.6 1 0.4 0.5 One Scan One Scan 0.2 0 0 0 20 40 60 80 100 120 140 160 180 200 0 20 40 60 80 100 120 140 160 180 200 Point Number (1 cycle) Point Number (1 cycle) • Propagates with the flying height • Propagates with the flying height • Dependent on the look angle • Dependent on the look angle Ayman F. Habib Ayman F. Habib 13 14 Quality Assurance & Control LiDAR Error Propagation Calculator • Quality assurance (before mission): – Management activities to ensure that a process, item, or service is of the quality needed by the user. – It deals with creating management controls that cover planning, implementation, and review of data collection activities. – Key activity in the quality assurance is the calibration calibration procedure procedure. • Quality control (after mission): – Provide routines and consistent checks to ensure data integrity, correctness, and completeness. – Check whether the desired quality has been achieved. http://ilmbwww.gov.bc.ca/bmgs/pba/trim/specs Ayman F. Habib Ayman F. Habib 15 16 Photogrammetric Quality Assurance Photogrammetric Quality Assurance • One of the key issues in quality assurance of data acquisition systems is the calibration process. • Camera Calibration. – Laboratory calibration. – Indoor calibration. – In-situ calibration. • Total system calibration. – Spatial and rotational offsets between various system components (e.g., camera, GPS, and IMU). • Other QA measures include: – Number & configuration of GCP, side lap percentage, distance to GPS base station. Laboratory Calibration: Multi-Collimators Ayman F. Habib Ayman F. Habib 17 18 3

  4. Photogrammetric Quality Control Photogrammetric Quality Control • Photogrammetric reconstruction is based on redundant measurements . • Results from the photogrammetric triangulation gives quantitative measures of the precision of the reconstruction outcome. – Variance component (overall measure of the quality of fit between the observed quantities and the used model). – Variance-covariance matrix for the derived object coordinates. – These values can be compared with expected nominal values. • Independent measure for accuracy verification can be established using check point analysis. – Photogrammetric coordinates are compared with independently measured coordinates (e.g., GPS survey) � RMSE analysis. Check Point Analysis Ayman F. Habib Ayman F. Habib 19 20 LiDAR QA: System Calibration LiDAR QA: System Calibration • Target Function: Target Function: minimize the normal distance between • Possible systematic errors: firing point the laser point footprint and a known (control) surface. – Spatial and rotational offsets between the various Most appropriate system components. • Use the LiDAR equation to primitives – Range bias. estimate the error parameters p that minimize the cost of the – Angular mirror bias. laser point target function. • Calibration requires some control information. d • Caution: flight and control – What are the most appropriate primitives? surface configurations should • The appropriate configuration of the control be carefully established. information and the flight mission. Only possible if we are dealing with a transparent system parameters (LAS ?) Ayman F. Habib Ayman F. Habib 21 22 LiDAR Quality Control EQC: LiDAR Control Targets • External/absolute quality control measures (EQC): • Quality control is a post-mission procedure to – Similar to photogrammetric quality control, the derived ensure/verify the quality of collected data. LiDAR coordinates can be compared with • Quality control procedures can be divided into two independently surveyed targets. main categories: • Check point analysis. p y – External/absolute QC measures: the LiDAR point cloud – Problem: How to correlate the non-selective LiDAR is compared with independently collected surface. footprints to the utilized check points. • Check point analysis. – Solution: Use specially designed targets. – Internal/relative QC measures: the LiDAR point cloud • The target design depends on the involved LiDAR system. from different flight lines is compared with each other to ensure data coherence, integrity, and correctness. Ayman F. Habib Ayman F. Habib 23 24 4

Download Presentation
Download Policy: The content available on the website is offered to you 'AS IS' for your personal information and use only. It cannot be commercialized, licensed, or distributed on other websites without prior consent from the author. To download a presentation, simply click this link. If you encounter any difficulties during the download process, it's possible that the publisher has removed the file from their server.

Recommend


More recommend