tut utorial al for ser erver er
play

Tut utorial al for Ser erver er 1. Activate Account Activate - PDF document

Tut utorial al for Ser erver er 1. Activate Account Activate your account by login this link https://www.math.ust.hk/sys/linux_account, then your account will be activated after around 15mins. Your need to make sure thet you have connected to


  1. Tut utorial al for Ser erver er 1. Activate Account Activate your account by login this link https://www.math.ust.hk/sys/linux_account, then your account will be activated after around 15mins. Your need to make sure thet you have connected to hkust WIFI to do all of the following steps. If you can not connect to the hkust wifi, then you can install hkust VPN with this instruction https://itsc.ust.hk/services/cyber-security/vpn. 2. Login the Server 
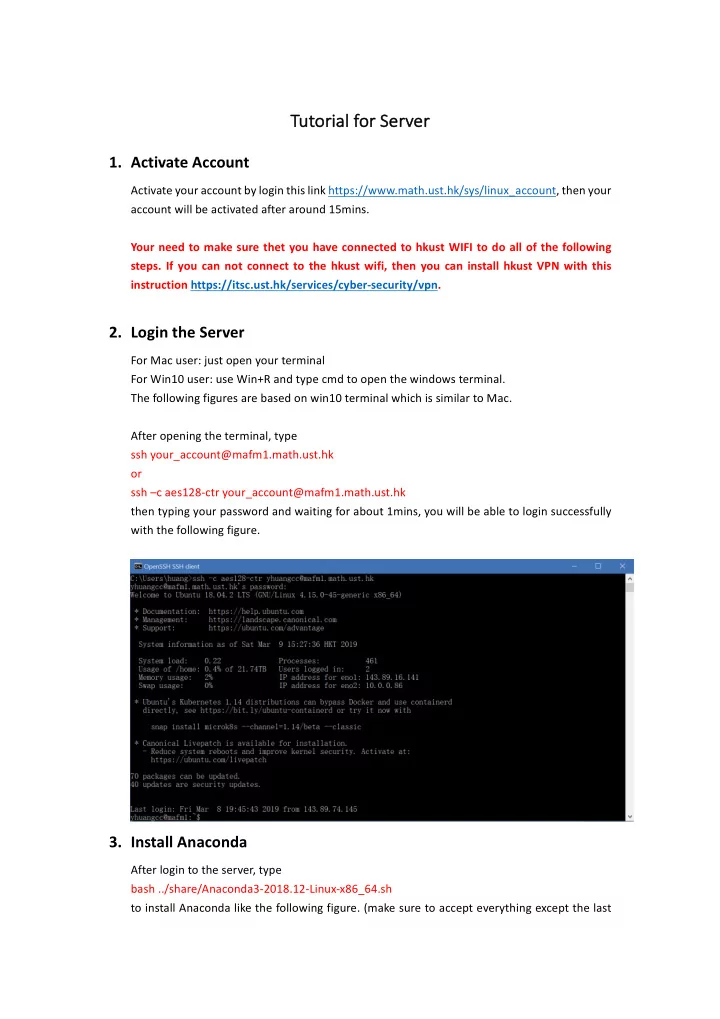
For Mac user: just open your terminal For Win10 user: use Win+R and type cmd to open the windows terminal. The following figures are based on win10 terminal which is similar to Mac. After opening the terminal, type ssh your_account@mafm1.math.ust.hk or ssh –c aes128-ctr your_account@mafm1.math.ust.hk then typing your password and waiting for about 1mins, you will be able to login successfully with the following figure. 3. Install Anaconda After login to the server, type bash ../share/Anaconda3-2018.12-Linux-x86_64.sh to install Anaconda like the following figure. (make sure to accept everything except the last

  2. one which will ask you whether to install VScode) Then after about 2mins, anaconda will be installed in your server. After installing the anaconda, type mv .bashrc .profile to tell the server anaconda’s path Finally, type exit to close the server and login the server again to activate the anaconda. 4. Create your own Anaconda Environment When using anaconda, usually we need to create different python environment for our different experiments. So we shall know how to create the environment within anaconda. Type conda create –n your_env_name python=3.7 anaconda9 to create your anaconda environment with python version 3.7 and its name your_env_name (any name you like). After accepting everything, this environment will be installed in your server. Whenever you want to use this environment, make sure to type source activate your_env_name to activate this environment.

  3. Also you can see all environments within your anaconda by typing conda env list 5. Open your jupyter notebook in server In order to use this server conveniently, we will teach you how to use jupyter notebook in your local computer. If you are not familiar with jupyter notebook, you can refer to this tutorial http://cs231n.github.io/ipython-tutorial/. (jupyter notebook is the one of the best way to share your program and figures) Typing jupyter notebook –no-browser to start jupyter notebook in server. Finally you start jupyter notebook in the server, but now you are not able to use it in your local computer, so next we will tell you how to connect your local computer to the server. And remember this

  4. 6. Connect your local computer to the server Open another terminal and just type the following command ( here 8888 should all be changed to the return of your jupyter notebook in the following picture because different people will have different localhost ip address ) ssh -c aes128-ctr -N -f -L localhost: 8888 :localhost: 8888 yhuangcc@mafm1.math.ust.hk or ssh -N -f -L localhost: 8888 :localhost: 8888 yhuangcc@mafm1.math.ust.hk with your password, if it returns nothing, it means your are successful. 7. Open jupyter notebook in your local computer After starting the jupyter notebook in the server and connecting to the server with your local computer, then finally you can use the jupyter notebook in your own computer. (your all experiments will be run in the server) Just copy this line got in the step 5 in to your own computer’s browser Then you will get this

  5. If you want to upload the file in your local computer to the server, just click upload. If you want to new a jupyter notebook, just click New—Python 3 If you want to download the file from server to your local computer, just click File—Download as

  6. If you are familiar with jupyter notebook, you can do whatever python programs you like.

Download Presentation
Download Policy: The content available on the website is offered to you 'AS IS' for your personal information and use only. It cannot be commercialized, licensed, or distributed on other websites without prior consent from the author. To download a presentation, simply click this link. If you encounter any difficulties during the download process, it's possible that the publisher has removed the file from their server.

Recommend


More recommend