the octopus antenna
play

The Octopus Antenna A 4-B AND 8-E LEMENT D IPOLE A RRAY C ONSTRUCTED - PowerPoint PPT Presentation

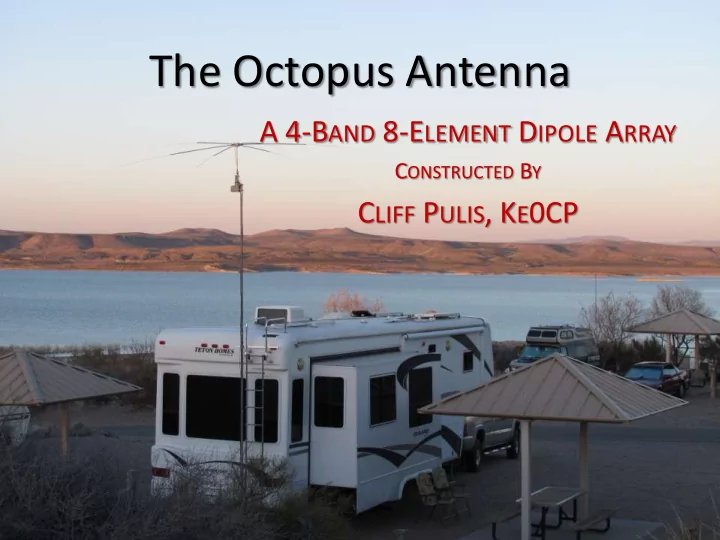
The Octopus Antenna A 4-B AND 8-E LEMENT D IPOLE A RRAY C ONSTRUCTED B Y C LIFF P ULIS , K E 0CP W HAT I S I T ? Multi-Band somewhat directional antenna Basic design uses 4-rigid dipoles (8 elements) arranged in a circular pattern


  1. The Octopus Antenna A 4-B AND 8-E LEMENT D IPOLE A RRAY C ONSTRUCTED B Y C LIFF P ULIS , K E 0CP

  2. W HAT I S I T ? • Multi-Band — somewhat — directional antenna • Basic design uses 4-rigid dipoles (8 elements) arranged in a circular pattern ==> Octopus • Antenna has small footprint but delivers impressive performance (about 15’ in diameter) • Original design featured in December 2007 QST Magazine , pp 36-38; Geoff Haines, N1GY.

  3. My antenna is 18 feet above ground and is turned by a rotator at the bottom of the sleeved pipe mast. I have had good results with the antenna 18 to 20 feet high. I have not been able to raise it any higher.

  4. The rotator is from Radio Shack and is mounted on a stake in the ground. The inner pipe is mounted to the rotator. The outer (sleeved) pipe overlaps several feet and is attached to the antenna hub.

  5. The inner and outer pipes are connected via a 10-24 bolt. The position of the outer pipe can be adjusted for height.

  6. The mast assembly is supported by a clamp attached to the roof peak. The lateral support “sleeve bearing” is a piece of 1 -1/2 inch SCH 40 PVC pipe held by the clamp (painted gray in this picture.) The main wind vector is against the roof peak.

  7. H OW IS THE A NTENNA C ONSTRUCTED ? • Uses 8 HamStick ™ antenna elements  1 matched pair (dipole) for each amateur band  Arranged in a circular pattern around a central hub (pot-metal outdoor electrical junction box) • Fed with 50-Ohm coaxial line  Center lead connected to 4-adjacent elements (1 of each dipole)  Shield connected to the 4 remaining elements

  8. The gray 20m element is a visual direction indicator.

  9. Single box hub design is shown. Elements are for 40, 20, 15 & 10 meters.

  10. H OW IT W ORKS • One element of each dipole is connected to the coaxial center lead and one to the shield (180 degrees apart). • No band switching required! Only the dipole tuned for the band in use radiates. The others are in the reactive near field but seem to have little effect. • Dipoles can be tuned to nearly 1:1 SWR. Easily done with an antenna analyzer (MFJ-259B, or equivalent). • Diploes exhibit between 1 and 2 S-units of directivity.

  11. S OME “F ACTS ” TO C ONSIDER • Actual performance can deviate greatly from theoretical (modeled) predictions. • Higher up is not always better. There may be multiple low elevation-angle lobes good for DX work. • Larger antennas perform better than small ones – so don’t expect miracles, even so... • The Octopus is small, light-weight and easy to build. And it works well!

  12. T HE R OTATOR C ONTROL How do you show the direction of 4 dipoles on one rotator dial? Each dipole is bi- directional so only one direction is shown. 20m, 10m, 40 m, 15m

  13. OK, B UT D OES IT W ORK ? A few contacts logged from Western U.S. with this antenna. Contacts in red were made from Belen. 49 Countries worked so far from Belen QTH. Call Location R/ST Band Date Short Path ZL1BD Hamilton, New Zealand 5/4 20m 9/19/2010 7,329 mi DU1IVT Paranaque, Philippines 5/9 15m 3/19/2011 7,858 YL2BJ Riga, Latvia 5/8 20m 8/22/2010 5,486 OE3DIA Vienna, Austria 5/5 15m 8/21/2010 5,700 RA1AOB St. Petersburg, Russia 5/9 15m 3/16/2011 5,481 F4GBU Paris, France 5/5 15m 10/21/1010 5,196 IZ5LDD Carmignano Prato, Italy 5/5 15m 3/16/2011 5,792 EI2HQ S.E. Ireland 5/3 15m 3/17/2011 4,754 CX2DK Montevideo, Uruguay 5/9 15m 3/19/2011 5,783 TI8II Puntarenas, Costa Rica 579 15m 10/27/2010 2,225

  14. Stacked Hub Construction One of two hubs showing assembled antenna mounting hardware (for 2 dipoles) before wiring. Note: the 2 grounded elements are near the junction box ground lug.

  15. Stacked Hub Construction Stacked hub configuration (4 dipoles) before wiring. Note: the 4 floating elements are in the same sector as are the 4 grounded elements.

  16. Stacked Hub Construction Explosion of antenna mounting hardware; grounded element on top, floating element on bottom. Note: outer diameter of shoulder washers is snug fit inside of conduit holes on junction box.

  17. Stacked Hub Construction Close-up of floating element mounting. Note: the shoulder washer fits inside the conduit hole and centers the 3/8” bolt so it does not ground to the junction box.

  18. Completing the Hub Assembly Some drilling is necessary to bolt both junction boxes together and make a hole for the coax center lead to pass from one box to the other. The grounded elements will be wired directly to the junction boxes.

  19. Wiring the Hub Boxes Upper box wired & ready for cover. Lower box wired showing inside of bottom cover. Mast will screw into center conduit hole in cover.

  20. Completed Hub Stacked boxes ready for elements, coax and mast.

  21. M ATERIALS & C OST Item Approx. Cost Source 4-pair HamSticks ™ 8 x $30 per element = $240 Lakeview Company Rotator $60 RadioShack Electrical Junction $18 Home Depot, etc. Boxes & Covers 8 Coupling Nuts & $12 Home Depot, etc. Bolts (3/8-24) Washers (SS & Nylon) $7 hardware store Insulating Shoulder $5 internet Washers (3/8 x ¾) SO-239 connector $5 ham supply store Mast Pipes & Fittings $25 hardware store Misc. hardware $10 hardware store Approx total cost $382 Note: A single-box hub costs a little less but requires more drilling.

  22. V ARIATIONS ON D ESIGN • You can use elements for any band covered by HamSticks ™ • With some creativity a vertical antenna can be added above the hub. • The elements could be remotely shorted together forming a ground plane for the vertical. • With a larger hub you might be able to add a 5 th dipole. • Some sort of quick-connect arrangement for the elements would make assembly/disassembly easier. • With different mounting hardware and the rotator at the top of the mast this worked great on my RV.

  23. Or you can always use the antenna for a bird rest! 73…

  24. Plans Available If you would like some rough plans for this project send an email to me at: ke0cp@frii.com with the Subject line: Octopus Plans

Download Presentation
Download Policy: The content available on the website is offered to you 'AS IS' for your personal information and use only. It cannot be commercialized, licensed, or distributed on other websites without prior consent from the author. To download a presentation, simply click this link. If you encounter any difficulties during the download process, it's possible that the publisher has removed the file from their server.

Recommend


More recommend