name of material
play

Name of material: Tools Image(s): Photo(s) courtesy of Montessori - PDF document

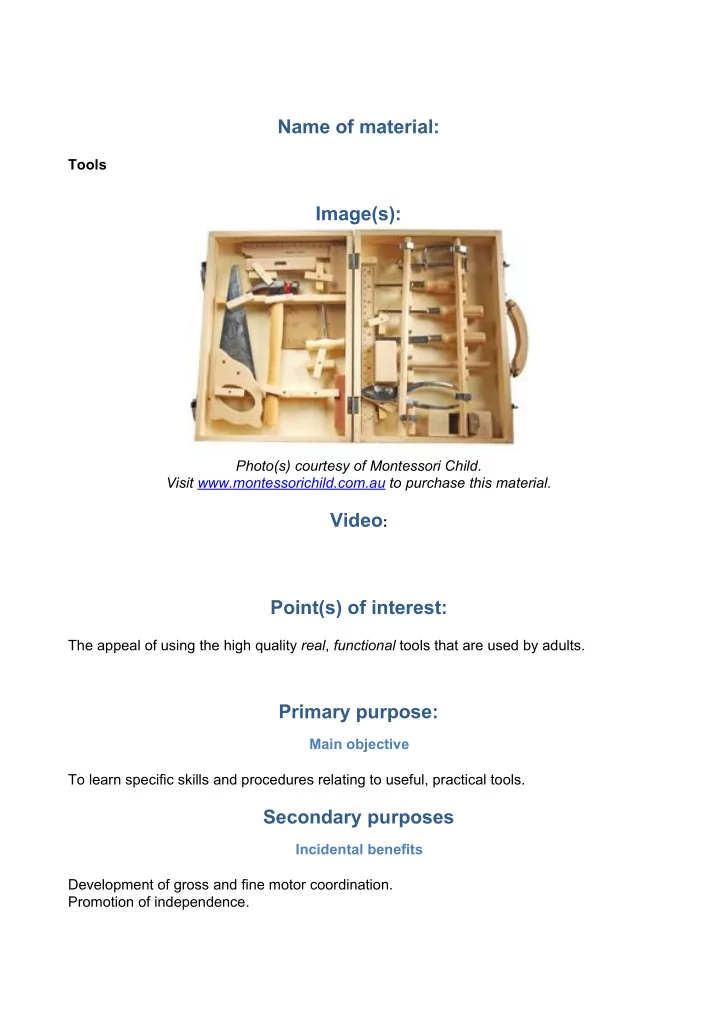
Name of material: Tools Image(s): Photo(s) courtesy of Montessori Child. Visit www.montessorichild.com.au to purchase this material. Video : Point(s) of interest: The appeal of using the high quality real ,


  1. Name of material: Tools Image(s): Photo(s) courtesy of Montessori Child. ​ Visit www.montessorichild.com.au ​ to purchase this material. Video ​ : Point(s) of interest: The appeal of using the high quality ​ real ​ ​ , ​ functional tools that are used by adults. Primary purpose: Main objective To learn specific skills and procedures relating to useful, practical tools. Secondary purposes Incidental benefits Development of gross and fine motor coordination. Promotion of independence.

  2. Control of error: Each activity provides the control of error that the real outcome either will or will not be achieved using the real tool. That is, if the child is using a screwdriver then it will either tighten the screw if the child uses the correct techniques or leave them loose if the child does not (unlike a ‘toy’ rake which might be ineffective even if a child’s movements are appropriate or might be designed to always succeed regardless of the child’s input). ​ ​ Therefore when using ​ real tools ​ ​ for their ​ true ​ purpose the ​ potential for error is the ​ control of error. EYLF Outcome 1.2: Children develop their emerging autonomy, inter-dependence, resilience and sense of agency ​ by engaging in self-correction to notice a mistake and seek a solution (rather than relying on an adult to identify the error and suggest the answer). Presentation ​ : Please note: Montessori presentations will vary slightly according to the specific training institute, Album or educator’s experience. The following outline is intended as a guide and highlights important points/procedures. Educators should build on this from their own experience and their understanding of the children in their care, so that all presentations will have some universal similarities but no two will be completely identical because of the unique needs of the child, cultural context of the school and interactions between educator and student. Preparation ​ : ● The lessons with tools should, ideally, be related to a practical and necessary purpose. For instance, a child uses a screwdriver to tighten the screws on a hinge to fix a cupboard door or the child uses a key to unlock a cupboard to retrieve a particular material. In these cases the lessons can be presented spontaneously when the need arises. ● In some cases the tools may be arranged with specific exercises in mind. For instance, some classrooms will offer a wooden board with holes for screws specifically to isolate the skill for practise even though it does not lead to a practical/necessary outcome. In these cases the lessons can be presented more intentionally, with the educator inviting the child to participate or responding to an observation of the child independently choosing the exercise. ​ ● The teacher sits to ​ the right of the child if the adult is right-handed and to the ​ left of ​ the child if the adult is left-handed (this avoids the issue of having the adult’s hand/arm block the field of vision of the child). Lesson 1: Screwdriver Tightening a screw ● The educator starts by naming the tool and its purpose, “This is a screwdriver. It is used to turn a screw to the right to make it tighter.” The educator can also elaborate

  3. ​ as needed, such as “This is a ​ Phillips head screwdriver because it has a cross shaped head”. ● The educator puts down the screwdriver and collects a screw. He/she shows that one end of the screw is pointed (or completely flat/smooth) while the other end has a groove. The educator shows how to place the head of the screwdriver into the groove of the screw. ● The educator uses the non-dominant hand to align the tip of the screw with the hole (in the hinge/wood etc). The educator uses the thumb and forefinger to pinch the screw and hold it in place. ● The educator uses the dominant hand to lift the screwdriver and align the head with the groove of the screw. ​ ● The educator shows how to turn the screwdriver handle to the ​ right to turn the screw so that it becomes increasingly tight. ● The educator invites the child to continue the process with the other screws. Loosening/removing a screw ● The educator starts by naming the tool and its purpose, “This is a screwdriver. It is used to turn a screw to the left to loosen and remove it.” The educator can also ​ elaborate as needed, such as “This is a ​ Phillips head screwdriver because it has a cross shaped head”. ● The educator highlights the head of the screw, pointing to the flat line, or cross, that forms the groove. ● The educator uses the dominant hand to lift the screwdriver and align the head with the groove of the screw. ​ ● The educator shows how to turn the screwdriver handle to the ​ left to turn the screw so that it becomes increasingly loose. This continues until the screw can be removed completely. ● The educator invites the child to continue the process with the other screws. Lesson 2: Hammer ● The educator starts by naming the tool and its purpose, “This is a hammer. It is used to drive nails in.” ● The educator collects a nail and identifies the pointed tip and the flat top. The educator explains, “We put the point into the wood and hammer the flat top.” ● The educator uses the pincer grip of the non-dominant hand to pinch the sides of the nail and hold it in place. ● The educator uses the dominant hand to lift the hammer by the handle. He/she starts by gently placing the hammer head on top of the flat top of the nail. The educator then draws back the hammer slightly and knocks it down firmly. ● This is repeated until the nail is driven into the wood and the top of the nail sits flat against the surface. ● The educator invites the child to continue the process with the other nails. Lesson 3: Tape measure ● The educator starts by naming the tool and its purpose, “This is a tape measure. It is used to measure the length and width of objects or the distance between things.” ● The educator says, “First I will show you how to handle the tape safely.” He/she demonstrates how to hold the metal clip at the end of the tape in the non-dominant

  4. hand and hold the case in the dominant hand. The educator moves the hands apart to draw out a few centimetres of the tape. ● The educator lets go of the metal clip to demonstrate how the tape automatically retracts into the case. ● The educator draws the tape out again but this time he/she uses the index finger on the dominant hand to slide the ‘lock’ mechanism into place on the case. He/she lets go of the metal clip again but this time it remains in place. ● The educator grasps the clip again and slides the mechanism into the ‘unlock’ position. This time he/she keeps hold of the clip while sliding it back into the case. ● The educator offers the child the opportunity to practise with the locking mechanism. ● When the child has mastered the locking mechanism the educator explains, “Now I’ll show you how we can measure.” ● The educator withdraws some tape and locks it in place. He/she directs the child’s attention to the small numbers on the tape, identifying the measurements (usually centimetres) and modelling the counting process, “one centimetre…two centimetres…three centimetres” and so on. ● The educator replaces the tape into the case and offers it to the child so he/she can examine the numbers on the tape. ● When the child has counted some of the numbers the educator asks for the tape measure back and chooses an object in the environment, “Now we will measure (object)”. ● The educator places the metal clip at one end of the object and holds it in place with the non-dominant hand while pulling the case across to the other side of the object. He/she then slides the locking mechanism into place and withdraws the tape from the object, placing it flat across a table. ● The educator counts the measurements to identify the dimension of the object. ● The educator replaces the tape to the case and invites the child to choose an object to measure. ● The child continues measuring objects for as long as he/she likes. ● The child may record some of the measurements by drawing an illustration of the object and recording the numerals, or by writing the name of the object and recording the numerals. Lesson 4: Latches ● The educator starts by naming the tool and its purpose, “This is a latch. It is used to hold doors in place.” ● The educator demonstrates how to manipulate the latch (the exact presentation will vary according to the specific type of latch). Lesson 5: Padlocks ● The educator starts by naming the tool and its purpose, “This is a padlock. It is used to hold the two pieces of a latch together securely so that only the person with the key can open it.” ​ ● The educator holds the ​ locked padlock and attempts to pull the shackle from the body. When it does not move he/she announces, “It is locked.” ● The educator lifts the key in the dominant hand and uses the non-dominant hand to hold the padlock body steady. He/she inserts the key into the keyhole on the base (or front) of the padlock. He/she turns the key until the shackle clicks open.

Download Presentation
Download Policy: The content available on the website is offered to you 'AS IS' for your personal information and use only. It cannot be commercialized, licensed, or distributed on other websites without prior consent from the author. To download a presentation, simply click this link. If you encounter any difficulties during the download process, it's possible that the publisher has removed the file from their server.

Recommend


More recommend