id2223 lab preparation jupyter notebooks on docker
play

ID2223 - Lab Preparation Jupyter Notebooks on Docker Containers In - PDF document

ID2223 - Lab Preparation Jupyter Notebooks on Docker Containers In the lab assignments, we will use the Jupyter Notebook as the development environment. Since installing the required software packages in the lab assignments is a time consuming


  1. ID2223 - Lab Preparation Jupyter Notebooks on Docker Containers In the lab assignments, we will use the Jupyter Notebook as the development environment. Since installing the required software packages in the lab assignments is a time consuming task, we will use a Linux Virtual Container supported by Docker . However, although we highly recom- mend to use Docker, you are free to choose any other development environments, if you prefer. In the following sections, first we introduce the Jupyter Notebook and Docker briefly, and then, we go through the steps to launch the programming environment. 1 Overview 1.1 Jupyter Notebook 
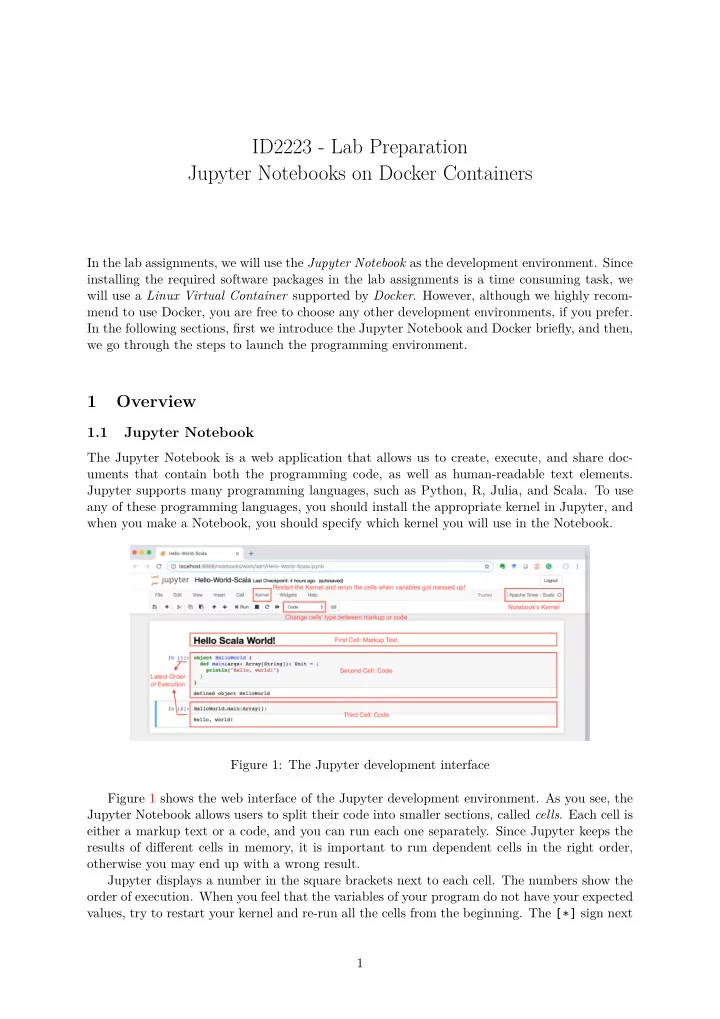
The Jupyter Notebook is a web application that allows us to create, execute, and share doc- uments that contain both the programming code, as well as human-readable text elements. Jupyter supports many programming languages, such as Python, R, Julia, and Scala. To use any of these programming languages, you should install the appropriate kernel in Jupyter, and when you make a Notebook, you should specify which kernel you will use in the Notebook. Figure 1: The Jupyter development interface Figure 1 shows the web interface of the Jupyter development environment. As you see, the Jupyter Notebook allows users to split their code into smaller sections, called cells . Each cell is either a markup text or a code, and you can run each one separately. Since Jupyter keeps the results of different cells in memory, it is important to run dependent cells in the right order, otherwise you may end up with a wrong result. Jupyter displays a number in the square brackets next to each cell. The numbers show the order of execution. When you feel that the variables of your program do not have your expected values, try to restart your kernel and re-run all the cells from the beginning. The [*] sign next 1

  2. to a cell indicates that the cell is running now, and you should wait until it is done before you run another cell. 1.2 Docker Figure 2 shows the components of Docker. The main component is the docker-host (docker- engine) that manages other components of the system. Users can pull pre-built docker-images (or image for short) from public repositories (e.g., DockerHub and Github) via the docker- engine. An image is a series of Linux commands together with the required binary and data files. The docker-engine caches the downloaded images in its local repository. To run an image, the docker-engine allocates an isolated container of the Linux kernel to the image. An instance of a running image is called docker-container (or container) . Figure 2: The Docker architecture Figure 3 shows the lifecycle of a container. It starts when a container is created from an im- age, until the container is killed . A container can also be paused/unpaused or stopped/restarted . You can manage a container lifecycle via the Docker command line interface (CLI). Figure 3: The lifecycle of a docker-container Although a docker-container is launched from an image, images and containers are different entities inside Docker. An image is an artifact related to the development phase, whereas a docker-container is an object related to the run-time. Commands such as pull , push , and 2

  3. commit are image-specific commands, while exec , run , and pause are container-specific com- mands. 2 Selected Images Jupyter offers several images with different configurations for various purposes. Figure 4 shows the dependencies between different images developed by Jupyter. For the lab assignments, you can use the Spark and TensorFlow images, called jupyter/all-spark-notebook and jupyter/tensorflow-notebook , respectively. You can find further information about the images at Jupyter’s User Guide. Figure 4: The relation among images provided by Jupyter 3 Running The Environment Please go through the following steps to launch a Jupyter development environment on Docker. • Install Docker-Engine: first you should install the docker-engine on your machine. Please follow the docker instruction and install the community edition of the engine (Docker CE) based on your machine operating system (Windows, Mac OS X, or Linux). • Start Docker Daemon: run the docker daemon. You can enable, start, and stop docker daemon using the following commands. systemctl enable docker service docker start service docker stop • Use CLI Help: to get information about a command, append the --help option at the end of the command. The first command in the following list prints out all the manage- ment commands , which are the commands you can use to manage different types of objects 3

  4. in Docker. For instance, docker image manages images, docker container manages docker-containers, and docker network manages virtual networks. You can further in- vestigate the usage of each management command by issuing the second command in the following list. docker --help docker image --help • Pull Docker-Images: as we mentioned earlier, to use an image, you need to pull it to your local repository. You should use the full name of an image to pull it. You can see the list of available images in the local image repository by calling the docker image ls . docker pull jupyter/all-spark-notebook docker pull jupyter/tensorflow-notebook docker image ls • Run a Docker-Container : you can run a new container from a given image by running the following command. The option -it gives an interactive pseudo terminal to the container. You can use the option --name to assign a name to your container, otherwise Docker gives a random name to it. You can use the -p option to map a network port on the container to a port on the host machine. For example, Jupyter uses the port 8888 to run its web interface. However, you can map that port to the same port on the host machine to access to the web interface through your browser. docker run -it --name jupyter-spark -p 8888:8888 jupyter/all-spark-notebook After launching a Jupyter container, the container will return a unique URL that has to be used to access the Jupyter Notebook (Figure 5). Figure 5: Running an images You can use the exec to run commands in a container. For example, with the following command you can login into a docker container. docker exec -it jupyter-spark /bin/bash • Sharing Files: the file-systems of containers are isolated from the file-system of the host machine. There are two ways to share the files between them: 1. Copy files by using the cp command of Docker. docker cp <SRC_PATH> <CONTAINER_NAME>:<DEST_PATH> 4

  5. 2. Mount a folder of the container to a folder of the host machine. docker run -it --name jupyter-spark -p 8888:8888 --mount src="<SRC_PATH>",target="<DEST_PATH>",type=bind jupyter/all-spark-notebook • Container Management: via the following commands you can fetch the list of available containers, kill a container and restart it. # fetch the list of available containers docker ps # kill a container docker kill jupyter-spark # restart a container docker start jupyter-spark You can find more information about the Docker CLI in the Docker documention. 5

Download Presentation
Download Policy: The content available on the website is offered to you 'AS IS' for your personal information and use only. It cannot be commercialized, licensed, or distributed on other websites without prior consent from the author. To download a presentation, simply click this link. If you encounter any difficulties during the download process, it's possible that the publisher has removed the file from their server.

Recommend


More recommend