Gyn Office Procedures Part 1: 1. Cervical Polyp Removal 2. IUD - - PDF document

gyn office procedures
SMART_READER_LITE
LIVE PREVIEW

Gyn Office Procedures Part 1: 1. Cervical Polyp Removal 2. IUD - - PDF document

Gyn Office Procedures Part 1: 1. Cervical Polyp Removal 2. IUD Removal 3. Vulvar Biopsy (and vulvar lesions) 4. Endometrial Biopsy with interpretation 5. I+D of abscess Part 2: 1. Pessary Placement 2. IUD Insertion Copper T and


slide-1
SLIDE 1

Gyn Office Procedures

Part 1: 1. Cervical Polyp Removal 2. IUD Removal 3. Vulvar Biopsy (and vulvar lesions) 4. Endometrial Biopsy – with interpretation 5. I+D of abscess Part 2: 1. Pessary Placement 2. IUD Insertion – Copper T and Mirena Part 3: 1. Manual uterine aspiration with cervical dilation

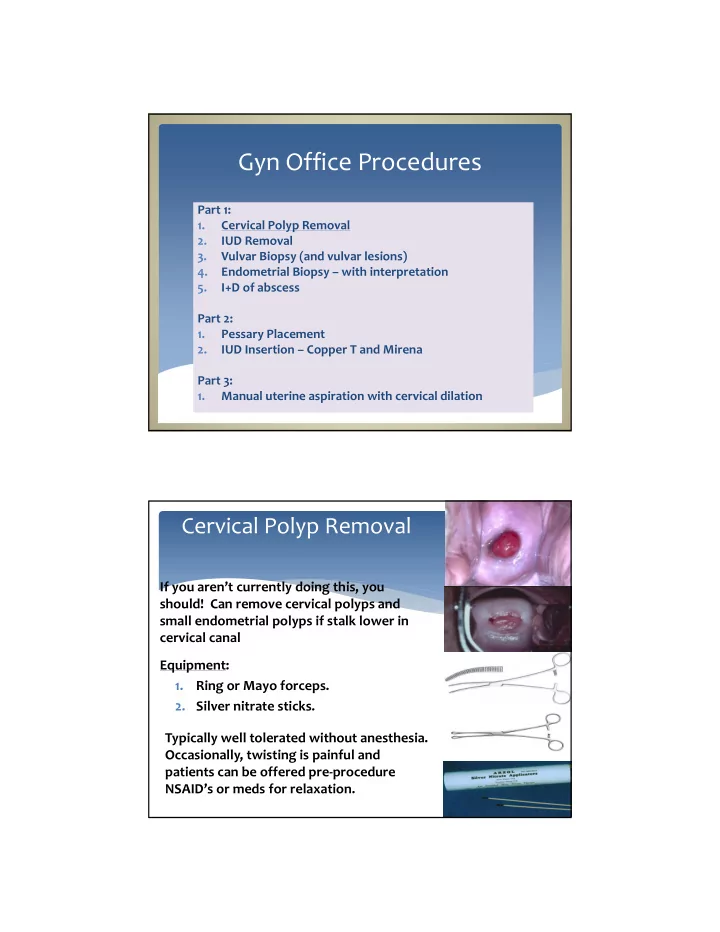
If you aren’t currently doing this, you should! Can remove cervical polyps and small endometrial polyps if stalk lower in cervical canal Equipment: 1. Ring or Mayo forceps.

  • 2. Silver nitrate sticks.

Typically well tolerated without anesthesia. Occasionally, twisting is painful and patients can be offered pre‐procedure NSAID’s or meds for relaxation.

Cervical Polyp Removal

slide-2
SLIDE 2

 Clean with betadine or hibiclens  If clear stalk, grasp as high as possible with ring or

Mayo forceps and begin to twist in one direction. When meet resistance in that direction, twist other

  • way. Apply gentle traction but do not pull hard.

Continue twisting process until polyp has been

  • removed. Cauterize base with silver nitrate (helps kill

remaining cells)  If no stalk (could be fibroid) and large may need

  • utpatient surgical procedure/hysteroscopy

 Send to pathology

Polyp removal

Return

 If you aren’t currently doing this, you should.  No training necessary!  Most important: offer other form of reliable contraception, if desired.  Equipment:

Ring or Mayo forceps. Cytology brush or Iris hook.

IUD removal

slide-3
SLIDE 3

 If strings visible, apply gentle traction, can ask pt to cough and pull on strings as she does (this helps with the visceral feeling that some patients will have when you remove it).  If strings not visible: try to tease them out by twisting cytology brush (or Iris hook) within the endocervix  Complications:  Pain – typically minimal such that don’t need premedication  String can break off or if IUD embedded you won’t be able to remove it and requires hysteroscopy for removal  Bleeding – typically minimal

IUD removal

Return

IUD removal: no strings

slide-4
SLIDE 4

Supplies: 1. Punch biopsy (size depends on size of lesion) 2. 1% lidocaine 3. Insulin or 3 cc syringe 4. Suture removal kit (pick‐ups and scissors) 5. Gauze/silver nitrate for hemostasis

Vulvar Biopsy

1. Clean with betadine or alcohol 2. 1% lidocaine in insulin or 3 cc syringe. Recommend a 27 gauge needle for injecting but prepare patient that uncomfortable 3. Twist punch on skin as pushing. Check intermittently to see if through skin. Easy to go deep once you penetrate skin so be cautious. 4. Once circumferentially cut, use pick‐ups to lift plug of tissue and cut off with scissors 5. Use pressure to stop bleeding. Silver nitrate if necessary

Vulvar Biopsy

slide-5
SLIDE 5

Lichen sclerosis et atrophicus

Note loss of normal archietecture and white, thin skin

Potential biopsy site

Lichen simplex chronicus

Note thickened skin due to chronic scratching

Potential biopsy site

slide-6
SLIDE 6

Condyloma Acuminata

Squamous cell cancer (within background of lichen sclerosis)

Potential biopsy site

slide-7
SLIDE 7

VIN: Vulvar intraepithelial neoplasia

Note Red

macular lesion

Potential biopsy site

VIN: Vulvar intraepithelial neoplasia

Note raised white plaques

Potential biopsy site

slide-8
SLIDE 8

VIN: Vulvar intraepithelial neoplasia

Note brown

macular lesion

Potential biopsy site Potential biopsy site

Vulvar melanoma: biopsy all irreg

shaped hyper‐pigmented lesions

Return

slide-9
SLIDE 9

Supplies: 1. Ibuprofen (Pre‐procedure) 2. 22 guage 3.5 inch spinal needle –recommend removing

  • uter safety sheath as can inhibit injection or

paracervical block 3. 1% lidocaine 4. Tenaculum 5. EMB pipelle or explora 6. Fox swabs/ silver nitrate for hemostasis

Endometrial Biopsy

 BME to check size, position of uterus  Clean cervix with betadine or hibiclens  place paracervical block if desired – 5:00 and 7:00 positions  Initially try to pass without a tenaculum by passing EMB just inside os as patient bears down while you push. If it “pops” through the internal os, get your sample as noted below. If it doesn’t pass, you’ll need a tenaculum.  Always give lidocaine at tenaculum site. Good evidence that it decreases pain of the procedure. 2‐3 cc 1% lidocaine to 12:00 anterior cervix to get a 1 cm white bleb. Have patient “cough” while you clamp down down slowly.  Pull firmly back on tenaculum as you push pipelle through

  • s.

Endometrial Biopsy

slide-10
SLIDE 10

 Once pipelle passes through the internal os, push it gently up to fundus and then back it away from fundus by about 1 cm. Do not push hard against the fundus as painful  Obtain suction by pulling the stylette all the way back. If using Explora turn syringe to lock in place to create suction.  Move the pipelle up and down within the uterus while twisting and pull back sheath. For explora use curette to explore all parts

  • f the cavity will moving back and forth.

 Place specimen into specimen cup without touching the pipelle to the formalin or sides of cup.  Check specimen adequacy by shaking formalin and looking for tissue pieces.  If adequate and uterus gritty ‐ done. If not gritty or inadequate specimen do another pass.

Endometrial Biopsy Block for tenaculum placement

slide-11
SLIDE 11

 Ibuprofen when hits the door.  Help her with breathing. No breath holding.  Count to 10? Gives her control and a time frame. Tell her you’ll count to 10 during the biopsy and will stop at 10 (and do so!). If need to do another pass, ask permission – rarely does someone decline as they don’t want to go through process again!  If she can’t tolerate, STOP. Offer another visit with ativan,

  • r procedure under sedation, or ultrasound if post‐

menopausal (no evidence that intrauterine lidocaine is helpful)

EMB Tricks

 If trouble passing pipelle, use different vectors of traction on the tenaculum (up, down, right, left).  If still can’t pass it make sure good paracervical block  Can also try lacrimal probes or small dilators to find os, or ultrasound guidance.

 If known to be anxious or if attempt and fail, give ativan for next attempt ‐ works wonders.  If known to be atrophic or if fail to place, try again (if patient willing) after giving misoprostol 400 mcg buccal

  • r vaginal, 30‐60 min prior

EMB Tricks

slide-12
SLIDE 12

“Secretory endometrium”?  Ovulation has occurred. Rules out anovulation. Likely anatomic lesion. “ Proliferative endometrium”?  Unopposed estrogen effect. Either anovulatory bleeding or first half of cycle.  If premenopause: treat as for anovulation (hormonal methods).  If post‐menopause, consider progestin to prevent endometrial hyperplasia. “Plasma cells”?  Chronic endometritis: treat with antibiotics‐ typically Doxycycline or Clindamycin for 1‐14 days

EMB Interpretation & next steps

“Proliferative with stromal breakdown and karyorrhexis” ‐‐‐> Classic for anovulation. Prolonged unopposed estrogen

  • effect. Treat as above for proliferative.

“Benign endocervical cells, no endometrium.” ‐‐> Non‐diagnostic. Could be atrophy but without endometrium, can’t r/o neoplasia. If post‐menopausal: Ultrasound to check endometrial

  • thickness. If >=5 mm, needs repeat attempt at sampling

(EMB vs D&C). If pre‐menopausal: Repeat EMB. Consider misoprostol pre‐ treatment (400mcg buccal or vaginal)

EMB Interpretation & next steps

slide-13
SLIDE 13

“Benign superficial fragmented endometrium. No intact glands or stroma. No hyperplasia or carcinoma. Suboptimal for evaluation”

Either atrophy or insufficient sample.  If atrophy suspected clinically: do not re‐sample. Observe

  • r add vaginal estrogen if clinical atrophy. If bleeding

persists/recurs‐‐> Ultrasound (if post‐menopausal). D&C if continued bleeding  If atrophy NOT suspected clinically: Post‐menopausal – do U/S for endometrial thickness. Pre‐menopausal ‐ resample

EMB Interpretation & next steps

“Simple Hyperplasia”

 1% chance of progression to carcinoma.  Treat with progestin ( consider Mirena). Rebiopsy 3‐6

  • months. Follow closely

“Simple Hyperplasia with atypia”

 Atypia is most important risk indicator for cancer progression.  8% chance of progression to endometrial cancer  Progestin (prefer Mirena) or hysterectomy (especially if difficult to follow or biopsies difficult or not tolerated.) Biopsy q3‐6 mos until 2 normal.

EMB Interpretation & next steps

slide-14
SLIDE 14

Complex, atypical hyperplasia  27% chance of progression to Ca.  And, 30‐50% already have co‐existing carcinoma.  Recommend hysterectomy. If refuse, do D&C to rule‐

  • ut coexisting carcinoma. High dose progestin

(Megace) or Mirena IUD. Biopsy q3‐6 months until 3

  • normal. Failure to revert to normal by 9 mos is

associated with progression.

EMB Interpretation & next steps

Return

 Hair follicles and sweat and sebaceous glands of the vulva are most common sites of infection and abscess formation  Bartholin’s Gland Abscess‐ very common, cysts/abscess account for 2% of gyn visits each year

Vulvar Abscess

slide-15
SLIDE 15

 Supplies:  Betadine or Hibiclens  Lidocaine with small guage needle‐ prefer 27  3‐5 cc syringe  Protective eye wear  Scalpel‐ generally 11 blade  Bulb syringe and sterile water or saline  Q – tips or small forcepts to probe abscess cavity  Nu‐guaze to pack cavity if non‐Bartholins, Word’s catheter if Bartholin’s with syringe to inflate balloon

I +D of Vulvar Abscess

 Procedure:  Clean area with betadine or hibiclens  Infiltrate overlying skin with 1% lidocaine  Incise sharply with scalpel  Drain abscess  Use bulb syringe clean out cavity  Break up any loculations with a Q‐tip or small forceps  Consider cultures for GC/Chlaymdia

I +D of Vulvar Abscess

slide-16
SLIDE 16

 Pack with Nu‐guaze to keep cyst cavity open  If Bartholin’s place Word’s catheter, check balloon first then instill at least 3 cc saline into the injection port to inflate and secure into cyst cavity, tuck end into vaginal  Only consider antibiotics if surrounding cellulitis but most times not needed  The longer the cavity kept open the less likely it will reform!

I +D of Vulvar Abscess

Video Clip: I+D of Bartholin’s Abscess

slide-17
SLIDE 17

Pessary Placement

Ring with support For prolapse plus incontinence: Incontinence dish with support Incontinence Ring with knob

Start with these 3 types. Get multiple sizes and keep in

  • ffice. If these don’t work, refer

Test correct size: 1. Have her valsalva—shouldn’t come out 2. Walk around—shouldn’t feel it 3. Urinate—should be able to F/u in 2 wks and 4 wks for careful vaginal exam to ensure no vaginal ulcerations

Pessary Insertion

Fold it like taco and slide it in vagina. When you feel it reach top of vagina, use your index finger to tilt it up behind the pubic symphysis

slide-18
SLIDE 18

 If post‐menopausal atrophy, start local estrogen cream twice weekly one month prior to placement and continue while uses pessary (to prevent abrasion and ulceration)  Placement is trial and error. Guess a size and try it

Incontinence Ring:

Note the knob presses on the urethra

Tilting it up behind the symphysis

Can be tough to remove: Hook finger under ring, change angle to dislodge it from under symphysis, then pull out Teach self removal and insertion at subsequent visit. If unable to do, see her q 6‐8 wks for removal, wash, reinsert

Removal

Return

slide-19
SLIDE 19

 Both require tenaculum  Sounding recommended before insertion  Levonorgestrel can be placed without sterile gloves  Copper has to be loaded sterilely

IUD insertion: Copper vs Mirena

 Ibuprofen pre‐procedure, heating pad

 IUD  Sterile gloves to load IUD

 Speculum

 Betadine swabs  1% lidocaine for 12:00 tenaculum site and paracervical block if desired (not usually needed)  Endometrial sound  Tenaculum

 Long, sharp scissors to cut

strings

Copper T IUD Insertion Supplies

TCu 380A

slide-20
SLIDE 20

 Get all supplies set up (don’t forget scissors, don’t open the IUD yet)  Prepare the patient:  BME to check uterine position and size  Betadine to cervix  2‐3 cc 1% lidocaine to 12:00 anterior cervix to get a 1 cm white bleb (I like 22 gauge spinal needle). Have her “cough it in”.  Tenaculum: 1 cm wide bite, slowly close. YES, you must use a tenaculum! Teneculum straightens out the endometrial canal. Without it, increased chance of perforation or of placing IUD below the fundus.

  • 1. Prepare

 Consider EMB pipelle to metal sound (disposable, less likely to perforate with it)  Why sound?

  • 1. Measure depth of the uterus (use this to set

the blue “depth gauge” on the device

  • 2. Check its position (retro, mid, anteflexed)
  • 3. Most important: to ensure that the IUD will

pass through the cervix (so you don’t waste an IUD).

  • 2. Sound the uterus
slide-21
SLIDE 21
  • 1. Fully peel back package so

IUD is sitting on top.

  • 2. Put on sterile gloves.
  • 3. Place the white plunger rod

in the clear insertion tube—

use care not to plunge the IUD

  • ut the top of the tube!
  • 3. Load the Copper T
  • 4. Push ends of the arms of the T

downward into the insertion tube. Hold the white plunger in place while you do this.

  • 4. Advance IUD into Uterus

 Gently advance the loaded IUD into the uterine cavity.  STOP when the blue depth‐gauge comes in contact with the cervix or when you reach fundus (light resistance is felt)

slide-22
SLIDE 22
  • 5. Release Arms of Copper T

Hold the tenaculum and white plunger rod stationary, while partially withdrawing the insertion tube. This releases the arms

  • f the Copper T

Arms are down when inside inserter. Withdrawing tube while holding inserter still allows arms to pop up and out. Unlike Mirena, this is done at fundus b/c arms swing lateral and up.

  • 6. Gently push insertion tube to position

IUD at fundus

 Gently push the insertion tube up until you feel a slight resistance.

 Hold the white plunger rod stationary

 This step ensures placement high in the uterus

slide-23
SLIDE 23
  • 7. Withdraw Inserter

 Gently and slowly withdraw the inserter tube and

white insertion rod

from the cervical canal until strings can be seen protruding from the cervical opening.

 Carefully trim strings to 3 cm using long scissors (short scissors can get caught on strings and pull out IUD)

Return

CopperT insertion

slide-24
SLIDE 24

 Ibuprofen pre‐procedure  IUD  Sterile gloves to load IUD  Speculum  Betadine swabs  1% lidocaine for 12:00 tenaculum site  EMB pipelle (to sound)  Tenaculum  Long, sharp scissors to cut strings

Mirena IUS Insertion Supplies

  • 1. Measure the uterus with EMB

pipelle

sound IUD Insertion tube Use EMB pipelle instead

slide-25
SLIDE 25
  • 2. Pull on the nylon strings until the arms
  • f the IUD are inside the insertion tube

Position blue flange at the sounded length

  • 3. Position the flange to the

length as measured by the sound

slide-26
SLIDE 26
  • 4. Insert the IUD and tube until the

flange is 1‐2 cm from cervical os

Alternatively: Push IUD up to fundus then withdraw 1.5 cm

  • 5. Release IUD arms by pulling back on

the blue tab to the white marker Count to 10 to allow arms to fully extend

Arms are up while inside inserter. Pulling back blue tab releases the arms so they are initially straight up and then open laterally. Need space for this to occur which is why you need to be 1- 2 cm below the fundus.

slide-27
SLIDE 27
  • 6. Push the IUD to the fundus

(flange at the os).

The device has “memory” and if it has been inside the inserter too long, the arms tend to stay upright instead of bending laterally. Counting to 10 gives time for them to bend laterally and stay that way (prevents inadvertent removal of device as you withdraw inserter)

  • 7. Release the IUD by pulling the blue

tab all the way back

slide-28
SLIDE 28
  • 8. Withdraw inserter and cut strings

to 3cm with long scissors

Return

Video Clip of Mirena Insertion

slide-29
SLIDE 29

 Safe way of removing uterine contents  Can be used for endometrial biopsy, early pregnancy loss, abortion, and management

  • f septic abortion

 Highly effective  Can be done in outpatient / ED setting  There is generally no need to do sharp curettage after

Uterine Aspiration

First‐Trimester Uterine Aspiration

slide-30
SLIDE 30

Dilation and aspiration

return

Easy and simple to do many office gyn procedures!