flc course registration process 2010 2012
play

FLC Course Registration Process (2010 2012) Once students have - PDF document

FLC Course Registration Process (2010 2012) Once students have indicated which FLCs they are interested in joining, the following process should be completed in order for them to be registered in the actual FLC courses. Please note: The


  1. FLC Course Registration Process (2010 ‐ 2012) Once students have indicated which FLCs they are interested in joining, the following process should be completed in order for them to be registered in the actual FLC courses. Please note: The following processes must be completed before the FLC process can begin.  
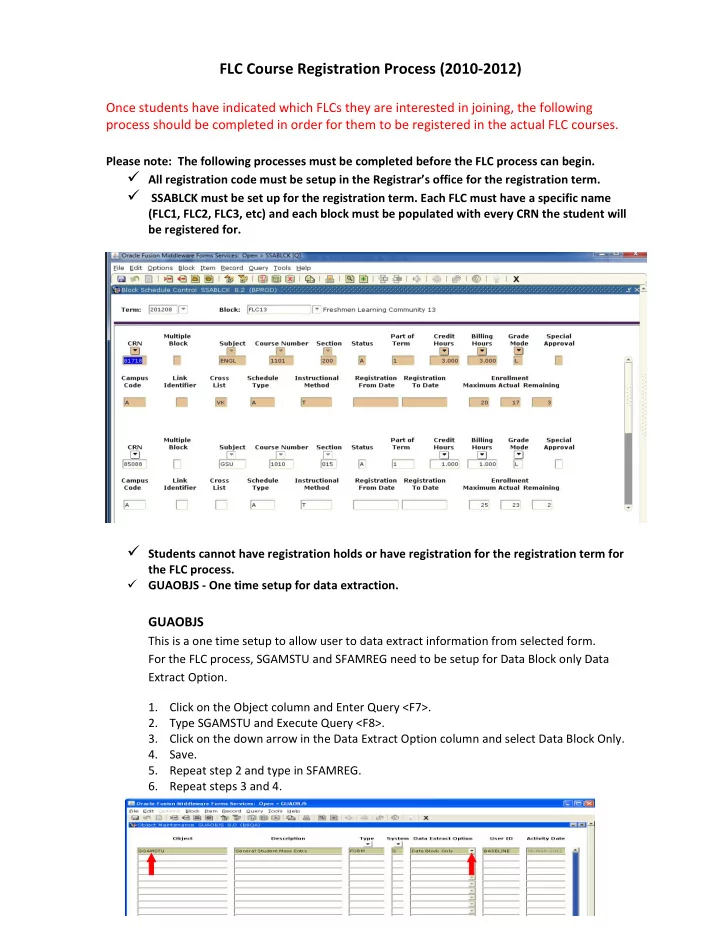
All registration code must be setup in the Registrar’s office for the registration term.  SSABLCK must be set up for the registration term. Each FLC must have a specific name (FLC1, FLC2, FLC3, etc) and each block must be populated with every CRN the student will be registered for.  Students cannot have registration holds or have registration for the registration term for the FLC process.  GUAOBJS ‐ One time setup for data extraction. GUAOBJS This is a one time setup to allow user to data extract information from selected form. For the FLC process, SGAMSTU and SFAMREG need to be setup for Data Block only Data Extract Option. 1. Click on the Object column and Enter Query <F7>. 2. Type SGAMSTU and Execute Query <F8>. 3. Click on the down arrow in the Data Extract Option column and select Data Block Only. 4. Save. 5. Repeat step 2 and type in SFAMREG. 6. Repeat steps 3 and 4. 1

  2. Overview Steps for the FLC Process I. Format CSV file for the Panther Numbers to upload correctly. II. Access Tape Load to upload file. III. WPOPLOAD – Run job to import Panther Numbers from uploaded file. IV. Access Job Output to make sure there was no error. V. GLAEXTR – Check to ensure Panthers Numbers from uploaded file has been imported correctly. VI. SGAMSTU – Use this form to mass enter FLC block code and FLC cohort code for the uploaded Panther Numbers in the file. Data Extract results from SGAMSTU. VII. SFAMREG – Use this form to mass add FLC block registration for the FLC block code assigned for the Panther Numbers in the file. Data Extract results from SFAMREG. VIII. Repeat Steps I through VII for each FLC block. Step I ‐ Format CSV file for the Panther Numbers to upload correctly. The CSV file should contain Panther Numbers ONLY. Format the Panther Numbers such that all 9 digits display in the column. 1. Save the file as .CSV (there are several .CSV, select the one with (Comma delimited) (*.csv)) with a short simple file name and note the file location. One suggestion is to name the file FLC1, FLC2, etc. corresponding with the FLC blocks. When saving the Excel file as .CSV file, several messages will be prompt. Click OK, Yes, Save, respectively. The Save As box will pop up with CVS (Comma delimited) (*.csv) in the Save as Type field , select Save. To check, right click on the .csv file and Select Open With Notepad. Step II ‐ Access Tape Load to upload file. 1. Go to http://www.gosolar.gsu.edu and select Tape Load Data Import. 2. Type in your Campus ID and password to logon to Tape Load. 3. Click on the Browse button to populate the Local filename field with the formatted .CSV file. 4. Click ASCII for the Transfer mode. 5. Enter a file name ending the name with .dat for the Filename to use on server field. One suggestion is to name the file same as the .CSV file with FLC1.dat, FLC2.dat, etc. corresponding with the FLC blocks. 6. Click Submit. 7. Copy the “complete path to your file” in order to paste it in the WPOPLOAD job in Banner. You will want to leave this window open until after you submitted the WPOPLOAD job so the complete path to your file can be referenced. 2

  3. Step III ‐ WPOPLOAD This job is for importing Panther Numbers from the uploaded .dat file into Banner. 1. Logon to INB and type WPOPLOAD in the “Go To” box from the Banner General Menu. 2. Paste the “complete path to your file” obtained from the Tape Load submission in the Values field for the Full Directory Filename paraterm. 3. Enter STUDENT (all caps) as the Application Code. 8. Enter FLC1, corresponding with the FLC block code, as the Selection Identifier. 4. Enter your own Campus ID as the Creator ID. 5. Enter your own Campus ID as the User ID. 6. Click Submit in the Submission block. 7. Save. 8. Make note of the Sequence number. Step IV ‐ Access Job Output to make sure there was no error 1. To ensure the job run successfully, go to http://www.gosolar.gsu.edu and select “View Job Output”. 2. Type in your Campus ID and password to logon to View Job Output. 3. Open the job output by clicking on the link with the name “load popsel ids xxxxxxxx” where xxxxxxxx is the appropriate sequence number. 3

  4. 4. The job output should be opened in WordPad and should state Procedure successfully completed. If it is not successful and/or showed errors, contact bantrain@gsu.edu and attached the job output. Step V ‐ GLAEXTR Use this form to check to ensure Panthers Numbers from uploaded file has been imported correctly. 1. Logon to INB and type GLAEXTR in the “Go To” box from the Banner General Menu. 2. Enter STUDENT as the Application Code. 3. Enter the appropriate FLC block code for the uploaded file as the Selection Identifier. 4. Enter your own Campus ID as the Creator ID. 5. Enter your own Campus ID as the User ID. 6. Next block to view the uploaded Panther Numbers for the FLC block code. 4

  5. Step VI ‐ SGAMSTU Use this form to mass enter FLC block code for the uploaded Panther Numbers in the file. 1. Enter SGAMSTU in the “Go To” box from the Banner General Menu. 2. When you enter the form, it is defaulted to the Search tab. 3. Enter the registration term code you are working with in the Search Criteria block Effective Term field. 4. Click in the Application field and enter STUDENT as the Application Code. 5. Click in the Selection ID field and enter the appropriate FLC block code for the uploaded file as the Selection Identifier. 6. Click in the Creator ID field and enter your own Campus ID as the Creator ID. 7. Click in the User ID field and enter your own Campus ID as the User ID. 5

  6. 8. Click on the Update tab. 9. Enter the registration term you are working with in the Learner Effective Term in the Student Update Values block. 10. Enter the FLC Cohort code AND appropriate FLC Block code for the uploaded file. 11. Click on the Results tab to view the list of Panther Numbers uploaded for the appropriate FLC block. a. The Term Code displayed the student’s latest SGASTDN term. b. You can view which students have registration hold and have students take care of the hold before performing the mass registration step. 12. Click the “Select All” radio button to check all the checkboxes next to the ID column for the mass student entry of the FLC block code. a. You can manually check or uncheck selected IDs for the mass entry process by clicking in the checkbox. 6

  7. b. You can manually insert additional IDs to the group. i. Insert a record <F6>, enter the ID number and the SGATSDN term code, Save. ii. Any manually added IDs will be indicated with the Manually Added checkbox checked. 13. Click the Submit checkbox in the Submission box. 14. Save. 15. The message column will be populated. 16. Clcik on the Help Drop Down menu and select “Extract Data No Key” to view the message. 17. Click “Open” in the File Download box to open the file. a. Make sure popup blocker is not on. If popup blocker is on, hold down the CTRL key and click on the Open button to by pass the blocker. 18. Review messages and save document as a reference record in order to resolve any records that were not updated. a. For the records that were not updated, the FLC block code must be manually entered. 7

  8. b. Once all desired records have the FLC block code, proceed to the next step, SFAMREG. 19. Randomly check to ensure cohort code and block code was entered on the student’s record in SGASADD and SGASTDN, respectively. Step VII ‐ SFAMREG Use this form to mass register students with the FLC block code for the uploaded Panther Numbers in the file. 1. Enter SFAMERG in the “Go To” box from the Banner General Menu. 2. When you enter the form, it is defaulted to the Search tab. 3. Enter the registration term code you are working with in the Registration Term field. 4. Enter the same registration term code in the Search Term field. 5. Click in the Application field and enter STUDENT as the Application Code. 6. Click in the Selection ID field and enter the appropriate FLC block code for the uploaded file as the Selection Identifier. 7. Click in the Creator ID field and enter your own Campus ID as the Creator ID. 8. Click in the User ID field and enter your own Campus ID as the User ID. 8

  9. 9. Click on the Update tab. 10. Enter the registration term code you are working with in the Registration Term field. 11. Enter RE for the Registration Status code and check the Mass Process Block checkbox in the Block Processing block. 12. Click on the Results tab to view the list of Panther Numbers uploaded for the appropriate FLC block. a. Make sure the Registration Term displayed is the term you want to register students. b. You can view which students have registration hold and have students take care of the hold before performing the mass registration step. 13. Click the “Select All” radio button to check all the checkboxes next to the ID column for the mass student entry of the FLC block code. a. You can manually check or uncheck selected IDs for the mass entry process by clicking in the checkbox. b. You can manually insert additional IDs to the group. i. Insert a record <F6>, enter the ID number and the SGATSDN term code, Save. ii. Any manually added IDs will be indicated with the Manually Added checkbox checked. 14. Click the Submit checkbox in the Submission box. 15. Save. 9

Download Presentation
Download Policy: The content available on the website is offered to you 'AS IS' for your personal information and use only. It cannot be commercialized, licensed, or distributed on other websites without prior consent from the author. To download a presentation, simply click this link. If you encounter any difficulties during the download process, it's possible that the publisher has removed the file from their server.

Recommend


More recommend