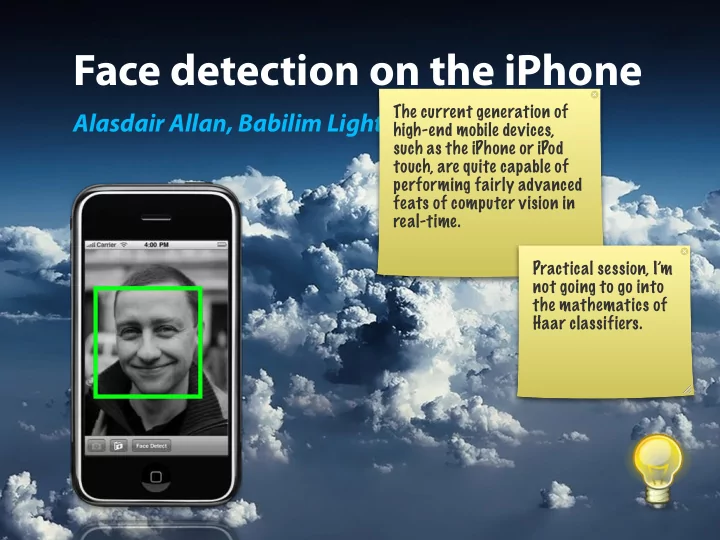
face detection on the iphone
play

Face detection on the iPhone The current generation of Alasdair - PowerPoint PPT Presentation

Face detection on the iPhone The current generation of Alasdair Allan, Babilim Light Industries high-end mobile devices, such as the iPhone or iPod touch, are quite capable of performing fairly advanced feats of computer vision in real-time.


  1. Face detection on the iPhone The current generation of Alasdair Allan, Babilim Light Industries high-end mobile devices, such as the iPhone or iPod touch, are quite capable of performing fairly advanced feats of computer vision in real-time. Practical session, I’m not going to go into the mathematics of Haar classifiers.

  2. The Open Source Computer Vision (OpenCV) Library is a collection of routines intended for real-time computer vision, released under the BSD License, free for both private and commercial use. The Open CV Library

  3. The library has a number of different possible applications including object recognition and OpenCV tracking. • General image processing • Image segmentation • Geometric descriptions • Object tracking • Object detection • Object recognition

  4. Building the OpenCV library for Building the Library the iPhone isn’t entirely straightforward, as we need different versions of the library compiled to run in the iPhone Simulator, and on the iPhone or iPod touch device itself. We therefore have to go ahead • Create symbolic links and compile both a statically linked x86 version of the library, and a cross-compile a version for • Build the library for x86 the ARMv6 (and optionally v7) processors. • Build the library for the ARM Building under Snow Leopard, for the 3.1.x and 3.2 SDKs although not for the 4.x SDK, • Create a single “fat” static library you need to create a symlink between the Mac OS X SDK version of crt1.10.6.o and the iPhone SDK. It isn’t present...

  5. Downloads http://programmingiphonesensors.com/pages/samplecode.html

  6. Building for x86 OPENCV_VERSION=2.0.0 GCC_VERSION=4.2 SDK_VERSION=4.0 SDK_NAME=Simulator ARCH=i686 HOST=i686 PLATFORM=/Developer/Platforms/iPhone${SDK_NAME}.platform BIN=${PLATFORM}/Developer/usr/bin SDK=${PLATFORM}/Developer/SDKs/iPhone${SDK_NAME}${SDK_VERSION}.sdk PREFIX=`pwd`/`dirname $0`/${ARCH} PATH=/bin:/sbin:/usr/bin:/usr/sbin:${BIN} ${CONFIGURE} \ --prefix=${PREFIX} --build=i686-apple-darwin9 --host=${HOST}-apple-darwin9 --target=${HOST}-apple-darwin9 \ --enable-static --disable-shared --disable-sse --disable-apps --without-python --without-ffmpeg \ --without-1394libs --without-v4l --without-imageio --without-quicktime --without-carbon --without-gtk \ --without-gthread --without-swig --disable-dependency-tracking $* \ CC=${BIN}/gcc-${GCC_VERSION} \ CXX=${BIN}/g++-${GCC_VERSION} \ CFLAGS="-arch ${ARCH} -isysroot ${SDK}" \ CXXFLAGS="-arch ${ARCH} -isysroot ${SDK}" \ CPP=${BIN}/cpp \ CXXCPP=${BIN}/cpp \ AR=${BIN}/ar make || exit 1

  7. Building for ARM OPENCV_VERSION=2.0.0 GCC_VERSION=4.2 SDK_VERSION=4.0 SDK_NAME=OS ARCH=armv6 HOST=arm PLATFORM=/Developer/Platforms/iPhone${SDK_NAME}.platform BIN=${PLATFORM}/Developer/usr/bin SDK=${PLATFORM}/Developer/SDKs/iPhone${SDK_NAME}${SDK_VERSION}.sdk PREFIX=`pwd`/`dirname $0`/${ARCH} PATH=/bin:/sbin:/usr/bin:/usr/sbin:${BIN} ${CONFIGURE} \ --prefix=${PREFIX} --build=i686-apple-darwin9 --host=${HOST}-apple-darwin9 --target=${HOST}-apple-darwin9 \ --enable-static --disable-shared --disable-sse --disable-apps --without-python --without-ffmpeg \ --without-1394libs --without-v4l --without-imageio --without-quicktime --without-carbon --without-gtk \ --without-gthread --without-swig --disable-dependency-tracking $* \ CC=${BIN}/gcc-${GCC_VERSION} \ CXX=${BIN}/g++-${GCC_VERSION} \ CFLAGS="-arch ${ARCH} -isysroot ${SDK}" \ CXXFLAGS="-arch ${ARCH} -isysroot ${SDK}" \ CPP=${BIN}/cpp \ CXXCPP=${BIN}/cpp \ AR=${BIN}/ar make || exit 1

  8. Fat Library lipo -create ${I686DIR}/src/.libs/libcv.a ${ARMDIR}/src/.libs/libcv.a -output libcv.a lipo -create ${I686DIR}/src/.libs/libcxcore.a ${ARMDIR}/src/.libs/libcxcore.a -output libcxcore.a lipo -create ${I686DIR}/src/.libs/libcvaux.a ${ARMDIR}/src/.libs/libcvaux.a -output libcvaux.a lipo -create ${I686DIR}/src/.libs/libml.a ${ARMDIR}/src/.libs/libml.a -output libml.a lipo -create ${I686DIR}/src/.libs/libhighgui.a ${ARMDIR}/src/.libs/libhighgui.a -output libhighgui.a

  9. Adding to Xcode • Drag-and-drop the static libraries • Drag-and-drop the include fi les 1) In the Groups & Files panel in Xcode, first double-click on the “Targets” group. • Linker Flags 2) Double-click on your main application target inside that - lstdc++ group (for most Xcode projects this will be the entry in the group) to open the Target Info - lz window. 3) Click on the Build tab and • #import "opencv/cv.h" scroll down to “Other Linker Flags” , and add –lstdc++ and –lz to this setting.

  10. Face Detection

  11. FaceDetect.app

  12. Haar Cascades • Haar-like features encode the existence of oriented contrasts between regions in the image. • A set of these features can be used to encode the contrasts exhibited by a human face. • Detect face using features in a cascade.

  13. OpenCV Face Detection: Visualized from Adam Harvey. Haar-like Features

  14. Building the Application Open Xcode and choose Create a new Xcode project in the startup window, and then choose the View-based Application template from the New Project popup window. Go ahead and add the OpenCV static libraries and include files to this project. • Build the User Interface The first thing we want to do is build out the user interface. In the Groups & • Write utility and face detection methods Files dialog panel in Xcode double-click on the FaceDetectViewController.xib file to open it in Interface Builder.

  15. Since we’re going to make use of the FaceDetectViewController.h UIImagePickerController class we need to declare our view controller to be both an Image Picker Controller Delegate and a Navigation Controller Delegate. The image view will hold the image returned by the image picker controller, #import <UIKit/UIKit.h> either from the camera or from the photo album depending on whether a camera is @interface FaceDetectViewController : UIViewController available. <UIImagePickerControllerDelegate, UINavigationControllerDelegate> { We will enable or disable the button IBOutlet UIImageView *imageView; allowing the application user to take an IBOutlet UIBarButtonItem *cameraButton; image with the camera depending on UIImagePickerController *pickerController; whether the device has a camera present from our viewDidLoad: method. } - (IBAction)getImageFromCamera:(id) sender; - (IBAction)getImageFromPhotoAlbum:(id) sender; @end

  16. viewDidLoad - (void)viewDidLoad { [super viewDidLoad]; pickerController = [[UIImagePickerController alloc] init]; pickerController.allowsEditing = NO; pickerController.delegate = self; if ( [UIImagePickerController isSourceTypeAvailable:UIImagePickerControllerSourceTypeCamera]) { cameraButton.enabled = YES; } else { cameraButton.enabled = NO; } }

  17. getImageFromCamera: and getImageFromPhotoAlbum - (IBAction)getImageFromCamera:(id) sender { pickerController.sourceType = UIImagePickerControllerSourceTypeCamera; NSArray* mediaTypes = [UIImagePickerController availableMediaTypesForSourceType:UIImagePickerControllerSourceTypeCamera]; pickerController.mediaTypes = mediaTypes; [self presentModalViewController:pickerController animated:YES]; } - (IBAction)getImageFromPhotoAlbum:(id) sender { pickerController.sourceType = UIImagePickerControllerSourceTypeSavedPhotosAlbum; [self presentModalViewController:pickerController animated:YES]; }

  18. UIImagePickerControllerDelegate - (void)imagePickerController:(UIImagePickerController *)picker didFinishPickingMediaWithInfo:(NSDictionary *)info { [self dismissModalViewControllerAnimated:YES]; UIImage *image = [info objectForKey:@"UIImagePickerControllerOriginalImage"]; imageView.image = image; } - (void)imagePickerControllerDidCancel:(UIImagePickerController *)picker { [self dismissModalViewControllerAnimated:YES]; }

  19. If you test the application in the iPhone Simulator you’ll notice that there aren’t any images in the Saved Photos folder. There is a way around this problem. In the Simulator, tap on the Safari Icon and drag and drop a picture from your computer (you can drag it from the Finder or iPhoto) into the browser. You’ll notice that the URL bar displays the file: path to the image. Click and hold down the cursor over the image and a dialog will appear allowing you to save the image to the Saved Photos folder.

  20. Let’s go ahead and implement the actual face Utilities.h detection functionality. As the OpenCV library uses the To support this we’re going IplImage class to hold image data to go ahead and implement we’re going to need methods to a Utility class that you can convert to and from the IplImage reuse in your own code to class and the iPhone’s own UIImage encapsulate our dealings #import <Foundation/Foundation.h> class. with the OpenCV library. #import “opencv/cv.h” You can see from the method names @interface Utilities : NSObject { The utility code shown we’re going to implement methods to below is based on previous create an IplImage from a UIImage, } work by Yoshimasa Niwa, and a UIImage from an IplImage. and is released under the + (IplImage *)CreateIplImageFromUIImage:(UIImage *)image; terms of the MIT license. We’re also going to go ahead and + (UIImage *)CreateUIImageFromIplImage:(IplImage *)image; tackle the meat of the problem and + (UIImage *)opencvFaceDetect:(UIImage *)originalImage; The original code can be implement a method that will take a obtained from Github. UIImage and carry out face @end detection using the OpenCV library.

Download Presentation
Download Policy: The content available on the website is offered to you 'AS IS' for your personal information and use only. It cannot be commercialized, licensed, or distributed on other websites without prior consent from the author. To download a presentation, simply click this link. If you encounter any difficulties during the download process, it's possible that the publisher has removed the file from their server.

Recommend


More recommend