directions for presentation controllers in heritage a
play

Directions for Presentation Controllers in Heritage A, Heritage B and - PDF document

Directions for Presentation Controllers in Heritage A, Heritage B and Distance Rooms A FEW NOTES (changes for those new to the system) Each learning space (Heritage A, Heritage B, and Distance) has its own Controller (little black box) This


  1. Directions for Presentation Controllers in Heritage A, Heritage B and Distance Rooms A FEW NOTES (changes for those new to the system) ● Each learning space (Heritage A, Heritage B, and Distance) has its own Controller (little black box) This little black box will do everything for you, except present for you! ○ ● Be certain the Controller is docked before you leave your workshop; it charges when cradled in the dock. ● The Controllers are currently being customized and will look a bit different in the weeks to come, but they will do the same things. ● There will be Apple TVs located in both rooms for AirPlay options for Macs 
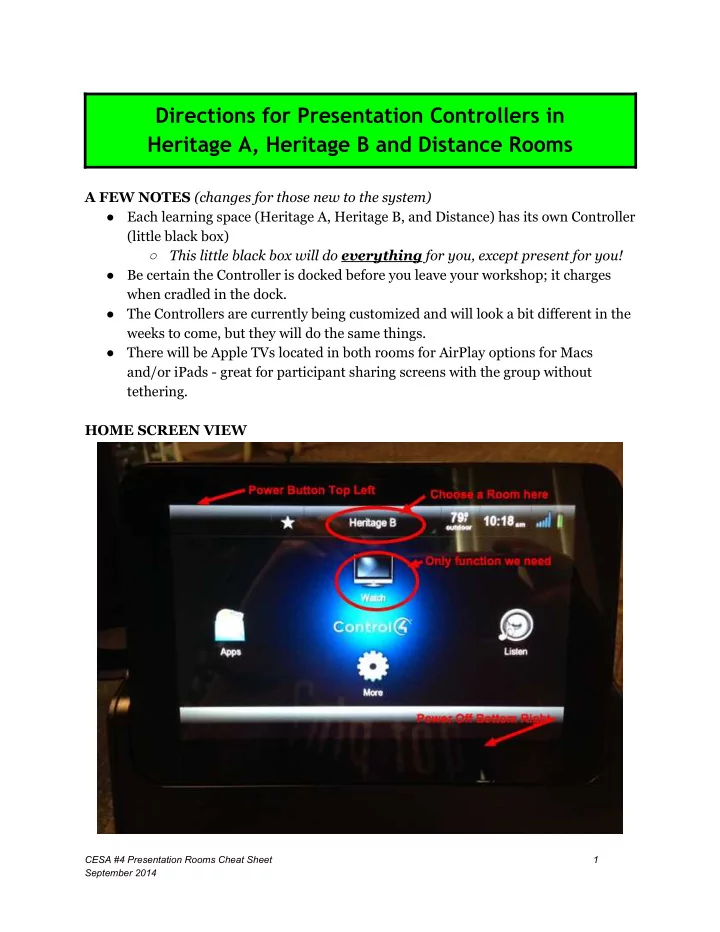
and/or iPads - great for participant sharing screens with the group without tethering. HOME SCREEN VIEW CESA #4 Presentation Rooms Cheat Sheet 1 September 2014

  2. TO POWER UP A ROOM: 1. Turn the Controller on with POWER button on top left. 2. Select ROOM from the top of the Controller ● Choosing MAIN from the menu will give you all three room options 3. Select WATCH 4. In the WATCH menu on the Controller, choose your input source: ● Computer (on the presentation station) ● Wall Input B (near presentation station) This is used if presenter uses own laptop or device ○ ● Wall Input A (back of Heritage) This is used if presenter uses Airplay (Mac/iPad) or Heritage is split ○ into two learning spaces) 5. The screen comes down and the projector turns on. It will search for an input source. CESA #4 Presentation Rooms Cheat Sheet 2 September 2014

  3. TO PRESENT FROM THE PRESENTATION STATION COMPUTER or PC laptop: 1. Turn PC on as before on the tower in the station 2. Use remote to turn on monitor 3. All sounds from the computer will go through the speakers. 4. Connect a laptop from the HDMI Wall Input to the HDMI port on the laptop. 5. If a PC laptop is connected through the Wall Input, the sound will be recognized and go through the speakers. TO PRESENT FROM A Mac (a bit different than PC) : 1. There are Mac cables (one HDMI and one for sound) in each presentation station. 2. HDMI cable is for audio and video; VGA cable is for video only 3. Connect the Mac laptop from the HDMI Wall Input to the Thunderbolt port on the laptop. 4. On the Mac, follow these steps to get sound from the device to the speakers: ● Launchpad > Systems Preferences > Sound > Output > HDMI CESA #4 Presentation Rooms Cheat Sheet 3 September 2014

  4. 5. On the Mac, follow these steps to get video and display to work properly on the projector and screen: ● Launchpad > Systems Preferences > Display > Mirroring ON TO POWER DOWN A ROOM: 1. Press the POWER button on the lower RH side of the Controller 2. You will be prompted with this question. Select YES when you’re ready to power down. 3. The screen will rise; the projector fan will come on to cool down. NOTE: When powering down, it is important to allow two (2) minutes to start back up again to allow allow cool down time and save bulb life on the projector. 4. The Controller will go to sleep after a few minutes of inactivity; be sure you turn it OFF with the POWER button on the top left of the Controller. 5. Be certain the Controller is docked and charging before leaving the room. CESA #4 Presentation Rooms Cheat Sheet 4 September 2014

  5. A FEW DISTANCE QUIRKS ● Projector needs to be on for two (2) minutes to warm up ● If you hear “clicks,” that means audio is being picked up, and it’s okay. ● When adjusting resolutions of differing PCs and Macs presenters bring in, going with “auto” is recommended. ● When POWERING OFF, the screen goes up after the projector cools down. ● The presentation PC will be located in the black AV rack in the corner and should remain there. The mouse is wireless and can be used on top of the AV rack, if needed As always, we have several Agency staff who can assist. Please don’t hesitate to ask! CESA #4 Presentation Rooms Cheat Sheet 5 September 2014

Download Presentation
Download Policy: The content available on the website is offered to you 'AS IS' for your personal information and use only. It cannot be commercialized, licensed, or distributed on other websites without prior consent from the author. To download a presentation, simply click this link. If you encounter any difficulties during the download process, it's possible that the publisher has removed the file from their server.

Recommend


More recommend