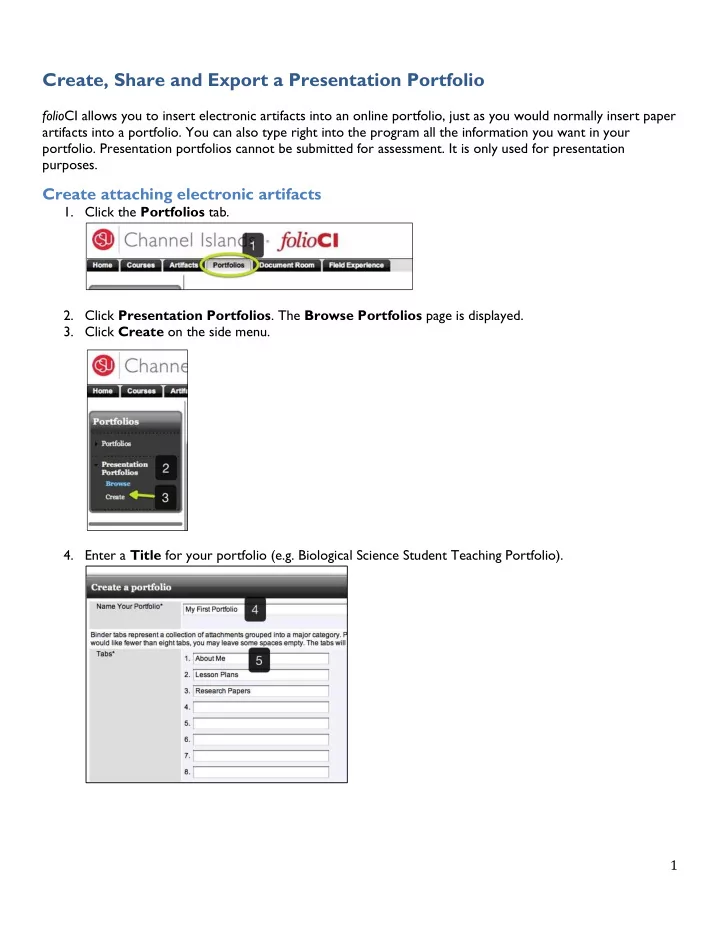

Create, Share and Export a Presentation Portfolio folio CI allows you to insert electronic artifacts into an online portfolio, just as you would normally insert paper artifacts into a portfolio. You can also type right into the program all the information you want in your portfolio. Presentation portfolios cannot be submitted for assessment. It is only used for presentation purposes. Create attaching electronic artifacts 1. Click the Portfolios tab. 2. Click Presentation Portfolios . The Browse Portfolios page is displayed. 3. Click Create on the side menu. 4. Enter a Title for your portfolio (e.g. Biological Science Student Teaching Portfolio). 1
5. Enter the Names for each portfolio tab. Portfolio tabs represent a collection of attachments grouped into a major category. You can name up to eight tabs. Tabs will appear in the order presented here (e.g. Lesson Plans, etc.). 6. After defining the tabs, click Update . 7. Click, add new to define the type of attachment placeholder for the portfolio tab. 8. Select the desired type of attachment placeholder from the drop down list, in this case File and provide a Title . (When you share your portfolio, the title will not show) . 9. Click Add . 2
10. A list of your saved file types as artifacts will come up for you to select from . (You have to upload your file as an artifact before being able to attach it). Select the artifact and click Add . 11. You can add more attachments by repeating steps 7-10. 12. You can delete an attachment by selecting the check box and clicking remove . Then click save. 13. If you do not wish to delete the attachment, click Save . 14. The created Presentation Portfolio is displayed in the Browse list. 3
Attaching Assessed Course Work Not only can you attach files that you have uploaded, but you can also attach assessed work that you may have turned in for a course. 1. To begin just like in step 7 above click on add new . 2. This time instead of selecting “file” for type you can select assignment, project, course binder or filed experience. It all depends on how you turned in that artifact. 3. Select a title and click add (when you share your portfolio, the title will not show ). 4
4. A list of artifacts that are assignments will appear for you to select. 5. Select your artifact then click add . That will take you back to your portfolio tab, you must click save for the artifact attachment to add. 6. When you share your portfolio the receiver will be able to see all of the tabs below your assignment. Create using text 1. Repeat steps 1-6 from create attaching electronic artifacts ( above steps ). 2. Click, add new to define the type of attachment placeholder for the portfolio tab. 5
3. Select Text/Image placeholder from the drop down list, provide a Title and click Add . (When you share the title will not show) . 4. A text box will show up. If you start typing into the text box it will not check your spelling, you want to expand the toolbar . 6
5. In the toolbar you will find a variety of different options that allow your text to stand out and be easy to read. If you can’t think of a particular way you want to set up your text you can always use on of the 3 standardized templates . 6. In the toolbar you can click on the virtual keyboard and begin your typing there. It will function like any word document, underlining the misspelled word in red. (Note: to resize the textbox expand by clicking over the dashed lines / on the bottom right corner.) 7
7. When you are done typing, click on Append to Editor, this will transfer your text into the text box. Once transferred click on the red X to exit. 8. Use the toolbar to format as you please. Then click Add . 9. If you wish to return to make changes click on edit . Remember to click Save . 8
10. To add more content to a specific Tab, repeat process 2-8 . 11. The created Presentation Portfolio is displayed in the Browse list. Share Portfolio 1. To share this portfolio, click on the name of the newly created portfolio. 2. Click Share . 3. Specify email addresses of the recipients with whom you wish to share the portfolio. The recipients will receive an email containing the portfolio's URL. 9
4. You may edit the default Subject line. 5. Enter an End Date to set an expiration date for the recipient to access your portfolio through the URL if needed. 6. You can also send a copy of the link to yourself. 7. Edit your Message. 8. You may preview your portfolio before sharing by clicking on the URL link. 9. To complete, click Share . Export 1. You can export this portfolio by clicking on its name. 2. Click export right above the share button to export the portfolio as a .zip file. 3. It will be downloaded and saved to your hard drive. If you have any problems using this how-to guide, we appreciate any feedback at islas.uea@csuci.edu, subject: “folioCI Guide”. 10
Recommend
More recommend