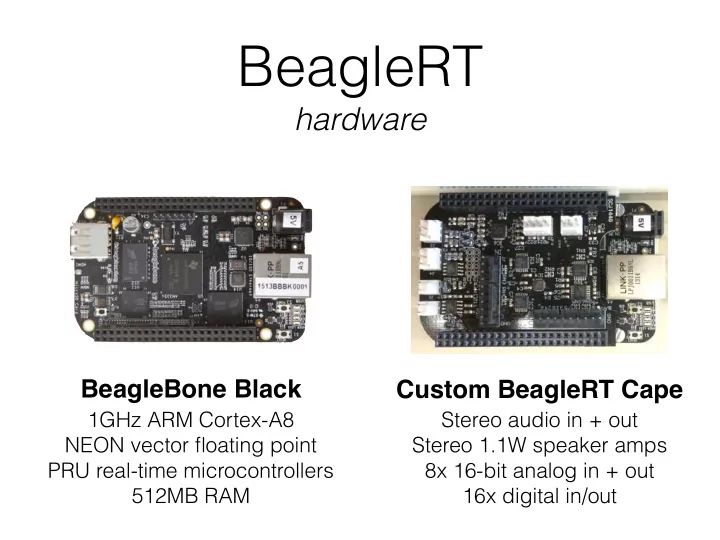
beaglert
play

BeagleRT hardware BeagleBone Black Custom BeagleRT Cape 1GHz ARM - PowerPoint PPT Presentation

BeagleRT hardware BeagleBone Black Custom BeagleRT Cape 1GHz ARM Cortex-A8 Stereo audio in + out NEON vector floating point Stereo 1.1W speaker amps PRU real-time microcontrollers 8x 16-bit analog in + out 512MB RAM 16x digital in/out


  1. BeagleRT hardware BeagleBone Black Custom BeagleRT Cape 1GHz ARM Cortex-A8 Stereo audio in + out NEON vector floating point Stereo 1.1W speaker amps PRU real-time microcontrollers 8x 16-bit analog in + out 512MB RAM 16x digital in/out

  2. BeagleRT software Xenomai Linux kernel C++ programming API Debian distribution Uses PRU for audio/sensors Xenomai hard real-time 
 Runs at higher priority extensions than kernel = no dropouts Buffer sizes as small as 2

  3. BeagleRT features 1ms round-trip audio latency without underruns High sensor bandwidth: digital I/Os sampled at 44.1kHz; analog I/Os sampled at 22.05kHz Jitter-free alignment between audio and sensors Hard real-time audio+sensor performance , but full Linux APIs still available Programmable using C/C++ or Pd Designed for musical instruments and live audio

  4. Materials what you need to get started... • BeagleBone Black (BBB) • BeagleRT Cape • SD card with BeagleRT image 
 (image can be downloaded from wiki at beaglert.cc) • 3.5mm headphone jack adapter cable • The D-Box already contains all of the above... • Mini-USB cable (to attach BBB to computer) • Also useful for hardware hacking: breadboard , jumper wires , etc.

  5. Step 1 install BBB drivers and BeagleRT software BeagleBone Black drivers: http://beagleboard.org BeagleRT code: http://beaglert.cc --> Repository instructions: http://beaglert.cc --> Wiki --> Getting Started

  6. Step 2 build a project 1. Web interface : http://192.168.7.2:3000 
 Edit and compile code on the board 2. Build scripts (within repository) 
 Edit code on your computer; build on the board 
 No special tools needed except a text editor 3. Eclipse and cross-compiler (http://eclipse.org) 
 Edit and compile on your computer; copy to board 4. Heavy Pd-to-C compiler ( https://enzienaudio.com ) 
 Make audio patches in Pd-vanilla, translate to C and compile on board

  7. BeagleRT/D-Box Cape I2C and GPIO Audio In Audio Out (headphone) Speakers 8-ch. 16-bit ADC 8-ch. 16-bit DAC

  8. BeagleRT software • Hard real-time environment using Xenomai 
 Linux kernel extensions • Use BeagleBone Programmable Realtime Unit (PRU) to write straight to hardware BeagleRT PRU I2S Audio Audio Task BeagleRT SPI ADC/DAC Linux System Calls Kernel Network, Other OS Network, Other OS Other OS (slow!) Processes USB, etc. Processes USB, etc. Processes • Sample all matrix ADCs and DACs at 
 half audio rate (22.05kHz) • Bu ff er sizes as small as 2 samples (90µs latency)

  9. API introduction • In render.cpp .... • Three main functions: • setup() 
 runs once at the beginning, before audio starts 
 gives channel and sample rate info • render() 
 called repeatedly by BeagleRT system ("callback") 
 passes input and output buffers for audio and sensors • cleanup() 
 runs once at end 
 release any resources you have used

  10. Real-time audio • Suppose we have code that runs offline ‣ (non-real time) • Our goal is to re-implement it online (real time) ‣ Generate audio as we need it! ‣ Why couldn’t we just generate it all in advance, and then play it when we need it? • Digital audio is composed of samples ‣ 44100 samples per second in our example ‣ That means we need a new sample every 1/44100 seconds (about every 23 µ s) ‣ So option #1 is to run a short bit of code every sample whenever we want to know what to play next ‣ What might be some drawbacks of this approach? - Can we guarantee we’ll be ready for each new sample?

  11. Block-based processing • Option #2: Process in blocks of several samples ‣ Basic idea: generate enough samples to get through the next few milliseconds ‣ Typical block sizes: 32 to 1024 samples - Usually a power of 2 for reasons having to do with hardware ‣ While the audio hardware is busy playing one block, we can start calculating the next one so it’s ready on time: Playing (audio hardware) Block 0 Block 1 Block 2 Block 3 ... Calculating (processor)

  12. Block-based processing • Option #2: Process in blocks of several samples ‣ Basic idea: generate enough samples to get through the next few milliseconds ‣ Typical block sizes: 32 to 1024 samples - Usually a power of 2 for reasons having to do with hardware ‣ While the audio hardware is busy playing one block, we can start calculating the next one so it’s ready on time: Playing (audio hardware) Block 0 Block 1 Block 2 Block 3 ... Calculating (processor)

  13. Block-based processing • Advantages of blocks over individual samples ‣ We need to run our function less often ‣ We always generate one block ahead of what is actually playing ‣ Suppose one block of samples lasts 5ms, and running our code takes 1ms ‣ Now, we can tolerate a delay of up to 4ms if the OS is busy with other tasks ‣ Larger block size = can tolerate more variation in timing • What is the disadvantage? ‣ Latency (delay)

  14. Buffering illustration Input H(z) Output At any given time, we are reading from ADC, 1. First we fill up 2. We process this buffer 3. Next cycle, we send this processing a block, and writing to DAC a buffer of samples while the next one fills up buffer to the output Total latency is 2x buffer length

  15. API introduction void render(BeagleRTContext *context, void *userData) • Sensor ("matrix" = ADC+DAC) data is gathered automatically alongside audio • Audio runs at 44.1kHz; sensor data at 22.05kHz • context holds buffers plus information on number of frames and other info • Your job as programmer: render one buffer of audio and sensors and finish as soon as possible! • API documentation: http://beaglert.cc

  16. Interleaving • Two ways for multichannel audio to be stored ‣ Way 1: Separate memory buffers per channel L L L L L L L L R R R R R R R R - This is known as non-interleaved format - Typically presented in C as a two-dimensional array: 
 float **sampleBuffers ‣ Way 2: One memory buffer for all channels - Alternating data between channels L R L R L R L R - This is known as interleaved format - Typically presented in C as a one-dimensional array: 
 float *sampleBuffer

  17. Interleaving • We accessed non-interleaved data like this: ‣ float in = sampleBuffers[channel][n]; • How do we do the same thing with interleaving? ‣ float in = sampleBuffers[***what goes here?***]; ‣ What else do we need to know? - Number of channels 1 ch: L L L L L L L L 2 ch: L R L R L R L R 4 ch: 1 2 3 4 1 2 3 4 ‣ float in = sampleBuffers[numChannels*n + channel]; ‣ Each sample advances numChannels in the buffer ‣ The offset tells us which channel we’re reading

Download Presentation
Download Policy: The content available on the website is offered to you 'AS IS' for your personal information and use only. It cannot be commercialized, licensed, or distributed on other websites without prior consent from the author. To download a presentation, simply click this link. If you encounter any difficulties during the download process, it's possible that the publisher has removed the file from their server.

Recommend


More recommend