
SLIDE 1
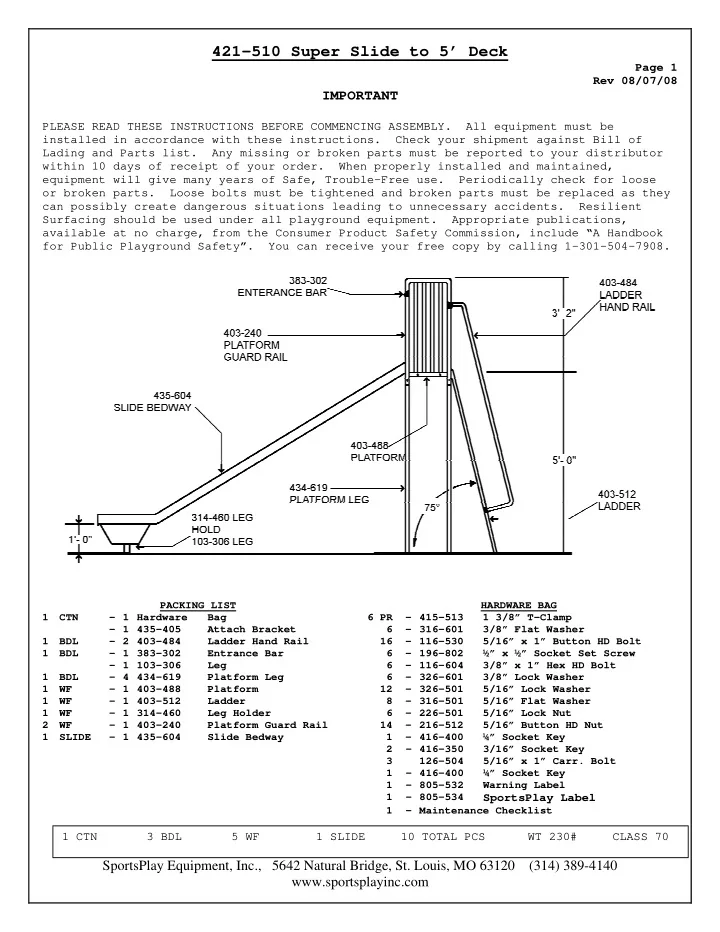
421-510 Super Slide to 5’ Deck
Page 1 Rev 08/07/08
SportsPlay Equipment, Inc., 5642 Natural Bridge, St. Louis, MO 63120 (314) 389-4140 www.sportsplayinc.com IMPORTANT
PLEASE READ THESE INSTRUCTIONS BEFORE COMMENCING ASSEMBLY. All equipment must be installed in accordance with these instructions. Check your shipment against Bill of Lading and Parts list. Any missing or broken parts must be reported to your distributor within 10 days of receipt of your order. When properly installed and maintained, equipment will give many years of Safe, Trouble-Free use. Periodically check for loose
- r broken parts. Loose bolts must be tightened and broken parts must be replaced as they
can possibly create dangerous situations leading to unnecessary accidents. Resilient Surfacing should be used under all playground equipment. Appropriate publications, available at no charge, from the Consumer Product Safety Commission, include “A Handbook for Public Playground Safety”. You can receive your free copy by calling 1-301-504-7908.
PACKING LIST HARDWARE BAG 1 CTN
- 1 Hardware
Bag 6 PR
- 415-513
1 3/8” T-Clamp
- 1 435-405
Attach Bracket 6
- 316-601
3/8” Flat Washer 1 BDL
- 2 403-484
Ladder Hand Rail 16
- 116-530
5/16” x 1” Button HD Bolt 1 BDL
- 1 383-302
Entrance Bar 6
- 196-802
½” x ½” Socket Set Screw
- 1 103-306
Leg 6
- 116-604
3/8” x 1” Hex HD Bolt 1 BDL
- 4 434-619
Platform Leg 6
- 326-601
3/8” Lock Washer 1 WF
- 1 403-488
Platform 12
- 326-501
5/16” Lock Washer 1 WF
- 1 403-512
Ladder 8
- 316-501
5/16” Flat Washer 1 WF
- 1 314-460
Leg Holder 6
- 226-501
5/16” Lock Nut 2 WF
- 1 403-240
Platform Guard Rail 14
- 216-512
5/16” Button HD Nut 1 SLIDE
- 1 435-604
Slide Bedway 1
- 416-400
¼” Socket Key 2
- 416-350
3/16” Socket Key 3 126-504 5/16” x 1” Carr. Bolt 1
- 416-400
¼” Socket Key 1
- 805-532
Warning Label 1
- 805-534
SportsPlay Label
1
- Maintenance Checklist