Understanding the XP XP Mail Merge Process To insert - - PDF document

understanding the
SMART_READER_LITE
LIVE PREVIEW

Understanding the XP XP Mail Merge Process To insert - - PDF document

3/29/2012 MS Word Using Mail Merge Understanding the XP XP Mail Merge Process To insert individualized information into a form letter, you combine, or merge , a form letter with a separate file containing specific information Engineering


slide-1
SLIDE 1

3/29/2012 1

MS Word Using Mail Merge

XP XP

Understanding the Mail Merge Process

  • To insert individualized information into a form

letter, you combine, or merge, a form letter with a separate file containing specific information

Engineering Staff College of India

slide-2
SLIDE 2

3/29/2012 2

XP XP

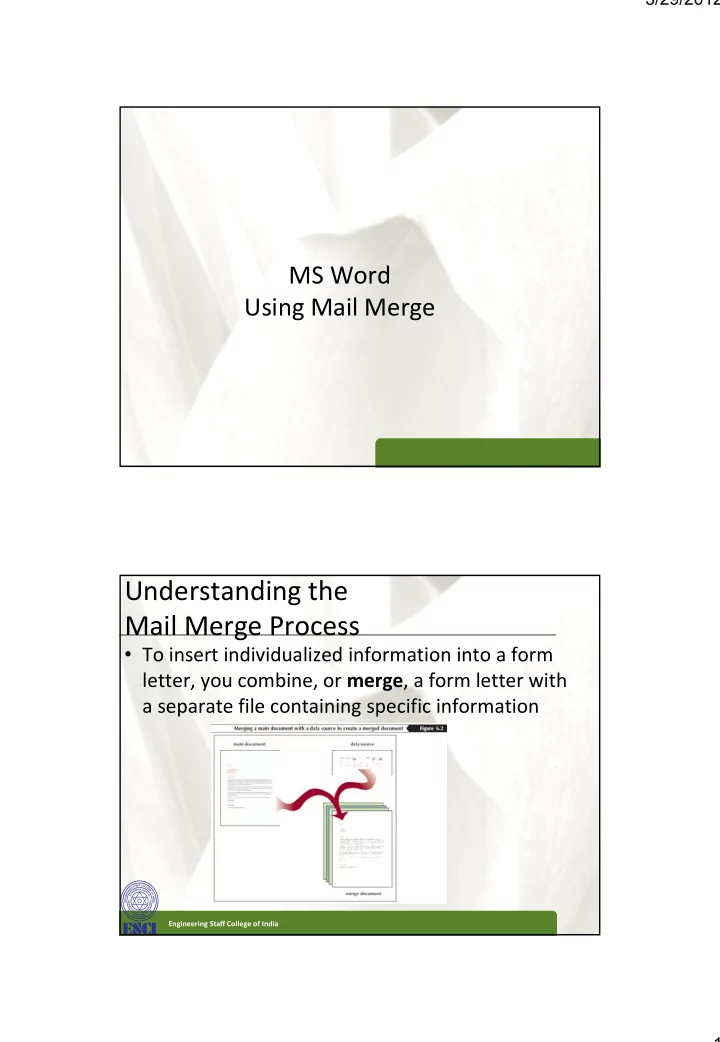
Using the Mail Merge Task Pane

  • The Mail Merge task pane walks you through the following six steps for

merging documents: – Select the type of document you want to use as the main document. Possible types of main documents include letters, envelopes, e‐mails, labels, and directories – Select the document you want to use as the main document. You can create a new document or edit an existing one – Select the list of recipients (that is, the data source) you want to use for the merge or create a new list of recipients – Complete the main document by adding merge fields – Preview the merged document – Complete the mail merge

  • Click the Mailings tab, then in the Start Mail Merge group, click the Start Mail

Merge button, and then click Step by Step Mail Merge Wizard

Engineering Staff College of India

XP XP

Selecting a Main Document

  • Verify that the Letters option button is selected

in the Mail Merge task pane

  • At the bottom of the task pane, click Next:

Starting document

  • Navigate and select the file

Engineering Staff College of India

slide-3
SLIDE 3

3/29/2012 3

XP XP

Creating a Data Source for a Mail Merge

  • In Step 3 of the Mail Merge task pane, select the Type a new list
  • ption button, and then click Create; or, in the Start Mail Merge

group on the Mailings tab, click the Select Recipients button, and g p g , p , then click Type New List

  • In the New Address List dialog box, click the Customize Columns

button

  • To delete unnecessary fields, in the Customize Address List dialog

box, click a field you want to delete, click the Delete button, and then click the Yes button Continue to delete any other then click the Yes button. Continue to delete any other unnecessary fields

  • To add a new field, click the Add button, type the name of the

field in the Add Field dialog box, then click OK

Engineering Staff College of India

XP XP

Creating a Data Source for a Mail Merge

  • To rearrange the order of the field names, click a field name, then

click the Move Up or Move Down button

  • Click the OK button to close the Customize Address List dialog box

Click the OK button to close the Customize Address List dialog box

  • In the New Address List dialog box, enter information for the first

record, click the New Entry button, and type another record. Continue until you are finished entering information into the data source, and then click the OK button to open the Save Address List dialog box

  • Type a name for the data source in the File name text box and
  • Type a name for the data source in the File name text box, and

then click the Save button. The file is saved with the .mdb file extension

Engineering Staff College of India

slide-4
SLIDE 4

3/29/2012 4

XP XP

Inserting Merge Fields

  • Click the Mailings tab
  • In the Mail Merge task pane, click More Items

g p ,

  • Select the field you wish to insert, and then click

the Insert button

Engineering Staff College of India

XP XP

Previewing the Merged Document

  • In the Mail Merge task pane, click the Next:

Preview your letters

Engineering Staff College of India

slide-5
SLIDE 5

3/29/2012 5

XP XP

Merging the Main Document and Data Source

  • In the Mail Merge task pane, click Next:

Complete the merge

Engineering Staff College of India

XP XP

Editing a Data Source in Word

  • Open the main document for the data source you want to edit
  • In the Start Mail Merge group on the Mailings tab, click the Edit

Recipient List button p

  • In the Data Source list box in the Mail Merge Recipients dialog box,

select the data source you want to edit, then click the Edit button

  • To add a record, click the New Entry button, then type a new record
  • To delete a record, click any field in the record, then click the Delete

Entry button

  • To add or remove fields from the data source, click the Customize

, Columns button, make any changes, and then click the OK button. Remember that if you remove a field, you will delete any data entered into that field

Engineering Staff College of India

slide-6
SLIDE 6

3/29/2012 6

XP XP

Sorting Records

  • In the Start Mail Merge group on the Mailings

tab, click the Edit Recipient List button to display the Mail Merge Recipients dialog box

  • To sort data in ascending order, click the heading

for the column you want to sort. For example, if you want to arrange the records alphabetically according to the contents of the First Name according to the contents of the First Name column, click the First Name column heading

  • To sort data in descending order, click the

column heading a second time

Engineering Staff College of India

XP XP

Sorting Records

Engineering Staff College of India

slide-7
SLIDE 7

3/29/2012 7

XP XP

Selecting Records to Merge

  • Click the Edit Recipient List button in the Start

Mail Merge group

  • Click the check boxes next to the records you

wish to merge

  • Click the OK button
  • In the Finish group, click the Finish & Merge

button

Engineering Staff College of India

XP XP

Creating Mailing Labels

  • Creating mailing labels is similar to creating form

letters, and the Mail Merge task pane walks you through all six steps

Engineering Staff College of India

slide-8
SLIDE 8

3/29/2012 8

XP XP

Creating a Telephone Directory

  • In the Mail Merge task pane under “Select

document type,” click the Directory option button, click Next: Starting document, verify that the Use the current document option button is selected, click Next: Select recipients, verify that the Use an existing list option button is selected, and then click Browse is selected, and then click rowse

  • Navigate to and open your file, and then click

Next: Arrange your directory

Engineering Staff College of India

XP XP

Creating a Telephone Directory

Engineering Staff College of India

slide-9
SLIDE 9

3/29/2012 9

XP XP

Converting Text to Tables and Tables to Text

  • Click the Insert tab, click the Table button, and

then, at the bottom of the Table menu, click Convert Text to Table

  • Click the OK button

Engineering Staff College of India

XP XP

Converting Text to Tables and Tables to Text

  • Select the entire table, verify that the Table Tools

Layout tab is displayed, and then in the Data group, click Convert to Text

Engineering Staff College of India

slide-10
SLIDE 10

3/29/2012 10

XP XP

Working with Lists

  • Select the bulleted list, and then, in the

Paragraph group, click the Sort button

  • Verify that Paragraphs appears in the Sort by

text box and that the Ascending option button is selected, then click the OK button

Engineering Staff College of India