
SLIDE 1
The Craft of Tree Felling
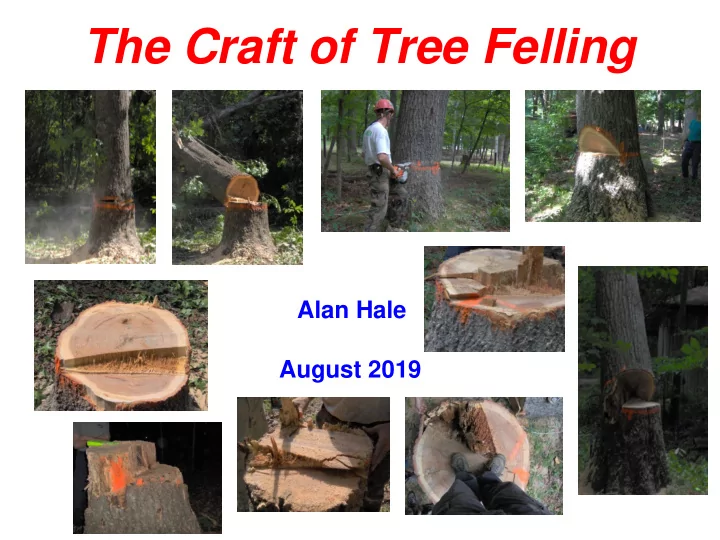
August 2019 Alan Hale
The Craft of Tree Felling Alan Hale August 2019 Outline Felling - - PowerPoint PPT Presentation
The Craft of Tree Felling Alan Hale August 2019 Outline Felling in the Direction of Slight Lean Facing Issues Felling Difficult Trees Sizeup Search for overhead hazards Debris falling from above causes over one-half of all felling
August 2019 Alan Hale
Felling in the Direction of Slight Lean Facing Issues Felling Difficult Trees
far enough away from the stump to avoid being struck or pinned
Stump Shot 2-5 Inches D Holding Wood Back Cuts Face Cuts 10% of D
1 2 3
1/3 D
Kerf Execute the cuts standing or on one knee with the saw at waist level Felling Direction Lean Direction
1 2 3
Holding Wood or Hinge Wood (HW) Vertically oriented wood connecting the stump to the tree
HW
– Prevents kickback from tree rotating about its center of mass – Prevents kickback when striking another tree in standing timber
– Controls the direction and fall of the tree – Without holding wood the tree is unguided during the fall
– Face should not close until the tree
– Improper facing (face cut too shallow, etc.)
D
Height Stump Shot Anti-Kickback Device Horizontal or Gunning Cut Width Hinging
45o
Sloping Cut Back Cut Holding Wood
Facing
Stump Shot Back & Gunning Cut in Same Plane View One of Five
HW HW Back Cut & Gunning Cut On Different Plane Back Cut & Gunning Cut On Same Plane
Stump Shot View Two of Five Back & Gunning Cut in Same Plane
HW HW
Stump Shot View Three of Five Back & Gunning Cut in Same Plane
HW HW
Felling Tree Strikes Another Tree Felling Tree Strikes Another Tree
Stump Shot View Four of Five
Back & Gunning Cut in Same Plane
HW HW Breaks Prematurely
Stump Shot View Five of Five Stump Shot Prevents Kickback Of The Felled Tree Felled Tree May Hit Sawyer Due To Kickback Back & Gunning Cut in Same Plane
HW HW HW Breaks Prematurely HW Breaks Appropriately When Sloping & Gunning Face Meet
Open Face Conventional Face Humboldt Face
70o to 90o 45o 45o 1/3 of D 1/3 of D 1/3 of D Tree Hits Ground Middle of Fall Middle of Fall 2-5 inches Above Face Intersection 2-5 inches Above Gunning Cut 2-5 inches Above Gunning Cut
Total Angle Depth Face Closure Back Cut Comments
Greatest Control Provided by Hinge Wood Greatest Accuracy in Constructing the Face Cuts Greatest Saving
D D D
HW HW HW
– Sloping cut is at a 45o angle to the horizontal (goal) – End with the saw blade horizontal
– Set your dogs on the bottom-face corner of the rectangle – Make the gunning cut (dictates the direction of tree fall) – Difficult to make the gunning and sloping cut meet
– The sloping and gunning cuts must not overlap (Dutchman) – Re-cut the sloping cut to correct misalignment – The face cuts must be cleaned out to prevent premature face closure – Verify that the re-cuts do not alter the felling direction – If the re-cuts will cause the face to extend too far into the tree, end the sloping cut directly over the gunning cut (fixed) D D D
Goal Dutchman Fixed
– Incorrect estimate of lean – Strong winds – Felling the tree in a different direction from the tree’s natural lean Holding Wood Holding Wood Back Cut Back Cut Face Cut Face Cut
Wind Reduces Stability Stable Configuration
Lean and Felling Direction
Danger Zone
Holding Wood Back Cut Face Cuts
Escape Route Escape Route
Escape Route
Felling Direction Never Attempt to Escape Directly Behind the Tree
Mark Horizontal Plane Mark 1/3 D, Sloping, & Back Cut Plane Insert Sighting Stick Into Kerf Felling Direction 1/3 D Top of Sloping Cut Ref Plane Back Cut Plane Gunning Cut Small Diameter Chord Sighting Stick Holding Wood
(Back Edge)
(Summarize)
felling approach)
– Select a face cut type: open, conventional, Humboldt – Always located on the desired felling direction side
– Check face location with a horizontal line centered and perpendicular to the intersecting face cuts – Re-cut if necessary
– Most are on the same plane – 2-5 inches above the face intersection cuts (establish stump shot) – Maintain holding wood (hinge wood) – Use wedges, jacks, and special back cuts to correct for lean – Watch overhead as a priority with quick glances
Felling in the Direction of Slight Lean Facing Issues Felling Difficult Trees
– No face cuts (only back cut) – Kerf face (saw blade thickness) – Face cut < 1/3 the tree diameter
– Dutchman cut across the entire face – Sloping and gunning angle too shallow
– Vertically angled face cut – Dutchman cut only on one side – Face not cleared out on one side
( Improper Facing – Barber-chair Split ) No Face Cuts Barber-Chair Split
Back Cut Any Tree Can Be Felled Without Facing – Costly And Dangerous
Shallow Face Cut
Back Cut Face Cut
Barber-Chair Split
Tree Kick back
( Improper Facing – Barber-chair Split )
Facing Cut Too Shallow
Back Cut Face Cut
Desired Felling Direction
HW
Back Cuts
Actual Felling Direction Actual Felling Direction
( Improper Facing – Barber-chair Split )
Face Cuts
– One of the face cuts extends beyond the
– Face within a face
– Dutchman closes
D D Sloping Face Dutchman D Result of the Dutchman Barber-Chair Split Gunning Face Dutchman ( Improper Facing – Felling Control Lost )
Facing Angle Too Small
Back Cut Face Cut
Face Cuts Desired Felling Direction
HW
Back Cut
Actual Felling Direction Actual Felling Direction
( Improper Facing – Felling Control Lost )
– Pivots the tree toward the open part of the face – The highest HW breaks behind the closed faces
– Continues to hold – Pulls the tree to the longer HW
Sloped Face Cuts
Gunning Cut
Desired Felling Direction Actual Felling Direction Face Cuts
HW
Back Cuts
Highest HW Breaks Highest HW Breaks Back Cut Face Cuts Sloping Cut
( Improper Facing – Felling Direction Altered )
– Pulls (pivots) the tree to the HW side of the tree – HW is eventually broken when the face cuts close
– Concept behind swing Dutchman
Desired Felling Direction Actual Felling Direction Face Cuts HW
( Improper Facing – Felling Direction Altered ) HW Cut On One Side
Back Cuts
Sloppy Face Cut (HW Lost)
– Concept behind step Dutchman
Obstructed Face
Desired Felling Direction Actual Felling Direction Face Cuts
HW
Back Cuts
Back Cut Face Cuts
HW
( Improper Facing – Felling Direction Altered )
Chainsaw Bar Too Short (Obstruction)
Felling in the Direction of Slight Lean Facing Issues Felling Difficult Trees
Moderate To Large Diameter Trees Small Diameter Trees
Chainsaw bar too short to reach completely across the stump Not enough room for chainsaw bar and wedges in the kerf Difficult to execute back cut fast enough to prevent loss of control or barber-chair Difficult to prevent sit-back
Face Cuts
HW
Back Cuts Desired Felling Direction Actual Felling Direction
Chainsaw Blade Too Short
Face Cuts
HW
Back Cuts Desired Felling Direction Natural Lean
No Room For Wedges
Natural Lean
Unwanted HW
(Side-boring)
– Stop the back cut short of the tree falling – Remove the saw blade before the back wood is severed
– Releases the tree to fall without pinching the saw blade – Allows sawyer and saw blade to readily escape the falling tree
Holding Wood Back Cuts Face Cuts Felling Direction Lean Direction
Maintain Holding Wood
6 5 7 8 5 6 7 8
Cleavage Line Cleavage Line
1 2 1 2 3 4 3 4
Holding Wood Back Cut Face Cuts Felling Direction Lean Direction Maintain Holding Wood
1 2 1 2 3 3
Saw Blade Saw Blade
Holding Wood Back Cut Face Cuts Felling Direction Lean Direction Maintain Holding Wood Hydraulic Jack and Footing Wedge 2 Wedge 1 Wedges Bearing Plate
1 2 1 2 3 3 4 4
– Divided back cut
– Back cut first
– Slot through holding wood
( Divided Back Cut )
Maintain Holding Wood
Holding Wood Face Cuts
1 2 3 Natural Falling Direction
– Watch out for saw kickback – Maintain holding wood (HW)
– Located at least one inch from the remaining back cut – Wedge will prevent the tree from setting back (wind)
– Head lean slight – normal back cut (back of tree to HW) – Head lean heavy – side-boring back cut (HW to back of tree) Felling Direction 1 2 3 4 4
Back Cuts 1 Inch
( Back Cut First )
Maintain Holding Wood
Holding Wood Face Cuts
2 3 1 Natural Falling Direction
– Not enough space available for both the saw blade and wedges – Maintain holding wood (HW)
Felling Direction 2 3 1
Back Cuts
The Order Of The Cuts Is Different, But The Theory Is The Same
( Slot Through Holding Wood )
Maintain Holding Wood
HW Face Cuts
1 2 4 Natural Falling Direction
Felling Direction 1 2 4 5 5
HW
3 3
Tree shifts in an unexpected direction
Proper cutting techniques almost always eliminate sit-backs
Solutions to the sit-back (assume wedges were used)
D Pinched Saw Blade
HW
tree’s lean, quality of holding wood, felling difficulty, and risk to people or property
evaluate what went right and what went wrong
direction like an artist marks up a canvas before painting
holding wood, stump shot, and types of back cuts allow on- the-fly cutting modifications for additional constraints
Jepson, Jeff; To Fell A Tree—A Complete Guide to Successful Tree Felling and Woodcutting Methods Dent, Douglas D., Professional Timber Falling (A Procedural Approach), 1974 http://www.osha.gov/SLTC/etools/logging/mainpage.html National Wildfire Coordinating Group, Wildland Fire Chain Saws (S-212), 2004
Utilizing Similar Triangles
Ground
Arm 32” stick + handle
Tree Height
Add distance from face cut to human eye Ground to human eye Face cut to human eye
Tree Height
Utilizing Similar Triangles
12” D 70' H = 840” H 1” WL 70” CD = 5.8' CD
Wedge Lift (in) x Tree Height (in) Tree Diameter (in) Crown Displacement (in) WL (in) x H (in) D (in) CD (in) 1 (in) x 840 (in) 12 (in) 70 (in) = 5.8 (ft)
Wedge Tree