SLIDE 1 ¡ ¡ ¡ ¡CS ¡491 ¡/ ¡DES ¡400 ¡ ¡ ¡ ¡Crea.ve ¡Coding ¡ ¡
Computer ¡Science ¡
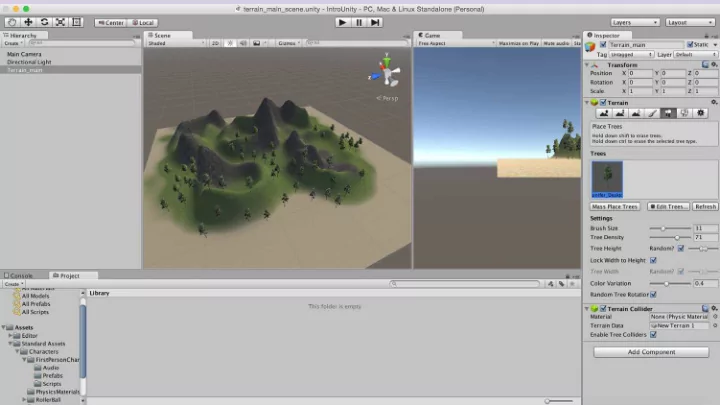
Terrain
Unity’s Terrain editor
- islands
- topographical landscapes
- Mountains
- And more
- 12. Create a new Scene “terrain” and save it
- 13. GameObject > 3D Object > Terrain
SLIDE 2
¡ ¡ ¡ ¡CS ¡491 ¡/ ¡DES ¡400 ¡ ¡ ¡ ¡Crea.ve ¡Coding ¡ ¡
Computer ¡Science ¡
Textures
Textures should be in the following format to enable ‘tiling’
Square and the power of two 128 x 128 256 x 256 512 x 512 1024 x 1024
Shaders control the rendering characteristics of textured surface
SLIDE 3 ¡ ¡ ¡ ¡CS ¡491 ¡/ ¡DES ¡400 ¡ ¡ ¡ ¡Crea.ve ¡Coding ¡ ¡
Computer ¡Science ¡
Prefabs
pre-fabricated objects Prefabs store a game object together with its components (transforms, appearances, scripts, etc.) and configurations for easy duplication/reuse.
- trees
- bullets
- characters, and anything else
Unity makes it easy to move around a world interactively (either in a first person or third person perspective) using prefabs.
SLIDE 4
¡ ¡ ¡ ¡CS ¡491 ¡/ ¡DES ¡400 ¡ ¡ ¡ ¡Crea.ve ¡Coding ¡ ¡
Computer ¡Science ¡
Prefabs
Object-oriented instances can be Instantiated at run time At run time a script can cause a new object instance to be created (instantiated) at a given location with a given set of properties Prefabs allow functional game objects to be reused in scenes or imported into other projects as external assets. The First Person Controller
SLIDE 5 ¡ ¡ ¡ ¡CS ¡491 ¡/ ¡DES ¡400 ¡ ¡ ¡ ¡Crea.ve ¡Coding ¡ ¡
Computer ¡Science ¡
First Person Controller
- 20. Assets > Import Package > Character Controller
Project Window > Standard Assets folder FP Character > Prefabs > FPController drag the FP Controller onto your scene delete the main camera Preview the game explore the terrain / look around with your mouse move with WASD or the arrow keys / jump with the space bar
SLIDE 6 ¡ ¡ ¡ ¡CS ¡491 ¡/ ¡DES ¡400 ¡ ¡ ¡ ¡Crea.ve ¡Coding ¡ ¡
Computer ¡Science ¡
First Person Controller
- 20. Assets > Import Package > Characters
Project Window > Standard Assets folder FPS Character > Prefabs > FPSController drag the FPS Controller onto your scene delete the main camera Preview the game explore the terrain / look around with your mouse move with WASD or the arrow keys / jump with the space bar
SLIDE 7
¡ ¡ ¡ ¡CS ¡491 ¡/ ¡DES ¡400 ¡ ¡ ¡ ¡Crea.ve ¡Coding ¡ ¡
Computer ¡Science ¡
Scripting
MONO compiler Scripts can be written in JavaScript Majority of introductory tutorials are written in Javascript C# Unity can be integrated with the Microsoft Visual Studio editor, to get full benefits of code completion, source version control, intergration, serious developers work in C# BOO (like Python) Smaller development in this
SLIDE 8 ¡ ¡ ¡ ¡CS ¡491 ¡/ ¡DES ¡400 ¡ ¡ ¡ ¡Crea.ve ¡Coding ¡ ¡
Computer ¡Science ¡
Scripting
scripting is Unity's most powerful tool gives you the ability to customize objects control how they behave in the environment
- how to create and attach JavaScript scripts to objects in Unity
- Intro to the development environment MonoDevelop
Variables Functions Triggers Collisions Sounds Colors
SLIDE 9
¡ ¡ ¡ ¡CS ¡491 ¡/ ¡DES ¡400 ¡ ¡ ¡ ¡Crea.ve ¡Coding ¡ ¡
Computer ¡Science ¡
JavaScript vs C#
#pragma strict var myInt : int = 5; function Start () { myInt = MultiplyByTwo(myInt); Debug.Log (myInt); } using UnityEngine; using System.Collections; public class VariablesAndFunctions : MonoBehaviour { int myInt = 5; void Start () { myInt = MultiplyByTwo(myInt); Debug.Log (myInt); } JavaScript C#
SLIDE 10
¡ ¡ ¡ ¡CS ¡491 ¡/ ¡DES ¡400 ¡ ¡ ¡ ¡Crea.ve ¡Coding ¡ ¡
Computer ¡Science ¡
Scripting
You can use both C# and Javascript in one project! (one way communication only)
Standard Assets (Compiled first) Script Script Script My Scripts Folder (Outside) (Compiled last) Script Script script C# JavaScript
SLIDE 11 ¡ ¡ ¡ ¡CS ¡491 ¡/ ¡DES ¡400 ¡ ¡ ¡ ¡Crea.ve ¡Coding ¡ ¡
Computer ¡Science ¡
JavaScript Variables
- A variable is a storage location and an associated symbolic
name (an identifier) which contains some known or unknown quantity or information, a value
- variables are used to store information about any aspects of a
projectʼs state
SLIDE 12
¡ ¡ ¡ ¡CS ¡491 ¡/ ¡DES ¡400 ¡ ¡ ¡ ¡Crea.ve ¡Coding ¡ ¡
Computer ¡Science ¡
JavaScript Variables
begin with a lowercase letter no special characters, numbers, (#, %, etc.) cannot contain reserved keywords such as “if”, “while”, etc. case sensitive descriptive no spaces Declaration/ Type/ Initialization var myVarBool : boolean = true; var myVarInt : int = 10;
SLIDE 13
¡ ¡ ¡ ¡CS ¡491 ¡/ ¡DES ¡400 ¡ ¡ ¡ ¡Crea.ve ¡Coding ¡ ¡
Computer ¡Science ¡
Data Types
Float 0.75 Int 10 String “Hello” Boolean true / false var myVarBool : boolean = true; var myVarInt : int = 10; Var myFloat : float = 1.4;
SLIDE 14 ¡ ¡ ¡ ¡CS ¡491 ¡/ ¡DES ¡400 ¡ ¡ ¡ ¡Crea.ve ¡Coding ¡ ¡
Computer ¡Science ¡
Creating scripts in Unity
- Project menu >Create > JavaScript
- Main Menu > Assets > Create Javascript
- Project window >RMC > Create > JavaScript
- Inspector >Add script
- Name the script in the Project/Assets window
- Assign the script to an object (drag and drop)
- Run and test
- Fix compiler errors
SLIDE 15 ¡ ¡ ¡ ¡CS ¡491 ¡/ ¡DES ¡400 ¡ ¡ ¡ ¡Crea.ve ¡Coding ¡ ¡
Computer ¡Science ¡
Creating scripts in Unity
- Project menu >Create > JavaScript
- Main Menu > Assets > Create Javascript
- Project window >RMC > Create > JavaScript
- Inspector >Add script
SLIDE 16 ¡ ¡ ¡ ¡CS ¡491 ¡/ ¡DES ¡400 ¡ ¡ ¡ ¡Crea.ve ¡Coding ¡ ¡
Computer ¡Science ¡
Creating scripts in Unity
- Project menu >Create > JavaScript
- Main Menu > Assets > Create Javascript
- Project window >RMC > Create > JavaScript
- Inspector >Add script
SLIDE 17 ¡ ¡ ¡ ¡CS ¡491 ¡/ ¡DES ¡400 ¡ ¡ ¡ ¡Crea.ve ¡Coding ¡ ¡
Computer ¡Science ¡
Creating scripts in Unity
- Project menu >Create > JavaScript
- Main Menu > Assets > Create Javascript
- Project window >RMC > Create > JavaScript
- Inspector >Add script
SLIDE 18 ¡ ¡ ¡ ¡CS ¡491 ¡/ ¡DES ¡400 ¡ ¡ ¡ ¡Crea.ve ¡Coding ¡ ¡
Computer ¡Science ¡
Creating scripts in Unity
- Project menu >Create > JavaScript
- Main Menu > Assets > Create Javascript
- Project window >RMC > Create > JavaScript
- Inspector >Add script
SLIDE 19 ¡ ¡ ¡ ¡CS ¡491 ¡/ ¡DES ¡400 ¡ ¡ ¡ ¡Crea.ve ¡Coding ¡ ¡
Computer ¡Science ¡
Creating scripts in Unity
- Project menu >Create > JavaScript
- Main Menu > Assets > Create Javascript
- Project window >RMC > Create > JavaScript
- Inspector >Add script
SLIDE 20 ¡ ¡ ¡ ¡CS ¡491 ¡/ ¡DES ¡400 ¡ ¡ ¡ ¡Crea.ve ¡Coding ¡ ¡
Computer ¡Science ¡
Creating scripts in Unity
- Project menu >Create > JavaScript
- Main Menu > Assets > Create Javascript
- Project window >RMC > Create > JavaScript
- Inspector >Add script
SLIDE 21 ¡ ¡ ¡ ¡CS ¡491 ¡/ ¡DES ¡400 ¡ ¡ ¡ ¡Crea.ve ¡Coding ¡ ¡
Computer ¡Science ¡
Creating scripts in Unity
- Project menu >Create > JavaScript
- Main Menu > Assets > Create Javascript
- Project window >RMC > Create > JavaScript
- Inspector >Add script
SLIDE 22
¡ ¡ ¡ ¡CS ¡491 ¡/ ¡DES ¡400 ¡ ¡ ¡ ¡Crea.ve ¡Coding ¡ ¡
Computer ¡Science ¡
Functions
Function is a collection of statements to perform a task Methods Functions are blocks of code which are written once and can then be reused as often as needed. begin with an uppercase letter function FuncName () { statement1; statement 2; }
SLIDE 23
¡ ¡ ¡ ¡CS ¡491 ¡/ ¡DES ¡400 ¡ ¡ ¡ ¡Crea.ve ¡Coding ¡ ¡
Computer ¡Science ¡
JavaScript Functions
Calling a function: FuncName (); myInt = MultiplyByThree(myInt);
SLIDE 24
¡ ¡ ¡ ¡CS ¡491 ¡/ ¡DES ¡400 ¡ ¡ ¡ ¡Crea.ve ¡Coding ¡ ¡
Computer ¡Science ¡
Function Parameters
function MultiplyByThree (number : int) : int { var ret : int; ret = number * 3; return ret; } Calling a function – myInt = MultiplyByThree(myInt);
SLIDE 25
¡ ¡ ¡ ¡CS ¡491 ¡/ ¡DES ¡400 ¡ ¡ ¡ ¡Crea.ve ¡Coding ¡ ¡
Computer ¡Science ¡
Functions
Default functions Start () executed only once before gameplay begins helpful for initialization Update() executed every frame for as long as the gameplay continues
SLIDE 26
¡ ¡ ¡ ¡CS ¡491 ¡/ ¡DES ¡400 ¡ ¡ ¡ ¡Crea.ve ¡Coding ¡ ¡
Computer ¡Science ¡
Functions
Collections of tasks Methods Functions are blocks of code which are written once and can then be reused as often as needed. begin with an uppercase letter function Start () { myInt = MultiplyByThree(myInt); Debug.Log (myInt); }
SLIDE 27
¡ ¡ ¡ ¡CS ¡491 ¡/ ¡DES ¡400 ¡ ¡ ¡ ¡Crea.ve ¡Coding ¡ ¡
Computer ¡Science ¡
Functions
var myInt : int = 5; function Start () { myInt = MultiplyByThree(myInt); Debug.Log (myInt); } function MultiplyByThree (number : int) : int { var ret : int; ret = number * 3; return ret; }
SLIDE 28 ¡ ¡ ¡ ¡CS ¡491 ¡/ ¡DES ¡400 ¡ ¡ ¡ ¡Crea.ve ¡Coding ¡ ¡
Computer ¡Science ¡
Arithmetic Operators
+ addition
/ division * multiplication ++ increment
% modulus
SLIDE 29
¡ ¡ ¡ ¡CS ¡491 ¡/ ¡DES ¡400 ¡ ¡ ¡ ¡Crea.ve ¡Coding ¡ ¡
Computer ¡Science ¡
Functions
1) Create 3D object cube 2) create new Javascript “rotateCube” 3) Assign the script to the cube (drag and drop) #pragma strict var speed = 5.0; function Start () { } function Update () { transform.Rotate(0, speed*Time.deltaTime, 0); }
SLIDE 30
¡ ¡ ¡ ¡CS ¡491 ¡/ ¡DES ¡400 ¡ ¡ ¡ ¡Crea.ve ¡Coding ¡ ¡
Computer ¡Science ¡
Functions
4) Change the value of var speed in the Inspector window (35) 5) Play and test
SLIDE 31
¡ ¡ ¡ ¡CS ¡491 ¡/ ¡DES ¡400 ¡ ¡ ¡ ¡Crea.ve ¡Coding ¡ ¡
Computer ¡Science ¡
Triggers and Collisions
Triggers are methods to detect collisions Triggers are useful for triggering other events in your project teletransportations automatic door openings displaying messages changing levels responsive events and many more
SLIDE 32
¡ ¡ ¡ ¡CS ¡491 ¡/ ¡DES ¡400 ¡ ¡ ¡ ¡Crea.ve ¡Coding ¡ ¡
Computer ¡Science ¡
Triggers and Collisions
4) select the game object in the Hierarchy window click on the little gear on the top right corner of the script property select “remove component” 5) Create new script “triggerScript” var target : collider; function OnTriggerEnter(cubeTrigger : collider) { if (cubeTrigger == target) { print("Collision"); } }
SLIDE 33
¡ ¡ ¡ ¡CS ¡491 ¡/ ¡DES ¡400 ¡ ¡ ¡ ¡Crea.ve ¡Coding ¡ ¡
Computer ¡Science ¡
Triggers and Collisions
6) Assign script to our cube 7) Check property “Is Trigger” in the Inspector 8) Create 3D plane 9) Import Character Controller Package 10) Drag FPC controller to the scene 11) Drag and drop the FPC from the Hierarchy window onto the variable Target in the Inspector
SLIDE 34
¡ ¡ ¡ ¡CS ¡491 ¡/ ¡DES ¡400 ¡ ¡ ¡ ¡Crea.ve ¡Coding ¡ ¡
Computer ¡Science ¡
Triggers and Collisions
checks if the position of the FPC intersects with the position of the trigger zone (the cube) prints out “Collision”
SLIDE 35
¡ ¡ ¡ ¡CS ¡491 ¡/ ¡DES ¡400 ¡ ¡ ¡ ¡Crea.ve ¡Coding ¡ ¡
Computer ¡Science ¡
Triggers and Collisions
To add a counter to collision Checks how many times collision happened var target : Collider; private var counter : int = 0; function OnTriggerEnter(cubeTrigger : Collider) { if (cubeTrigger == target) { counter = counter + 1; print("Collided: " + counter + " times!"); }}
SLIDE 36
¡ ¡ ¡ ¡CS ¡491 ¡/ ¡DES ¡400 ¡ ¡ ¡ ¡Crea.ve ¡Coding ¡ ¡
Computer ¡Science ¡
Triggers and Collisions
To add a counter to counter Checks how many times collision happened var target : Collider; private var counter : int = 0; function OnTriggerEnter(cubeTrigger : Collider) { if (cubeTrigger == target) { counter = counter + 1; print("Collided: " + counter + " times!"); }}
SLIDE 37
¡ ¡ ¡ ¡CS ¡491 ¡/ ¡DES ¡400 ¡ ¡ ¡ ¡Crea.ve ¡Coding ¡ ¡
Computer ¡Science ¡
Triggers and Collisions
to create an invisible trigger zone Select the object > Inspector > remove Mesh Renderer Component The object will be invisible but still allow collision detection
SLIDE 38
¡ ¡ ¡ ¡CS ¡491 ¡/ ¡DES ¡400 ¡ ¡ ¡ ¡Crea.ve ¡Coding ¡ ¡
Computer ¡Science ¡
Sounds
Supported Audio Formats MPEG layer 3 .mp3 Ogg Vorbis .ogg Microsoft Wave .wav Audio Interchange File Format .aiff / .aif Ultimate Soundtracker module .mod Impulse Tracker module .it Scream Tracker module .s3m FastTracker 2 module .xm
SLIDE 39
¡ ¡ ¡ ¡CS ¡491 ¡/ ¡DES ¡400 ¡ ¡ ¡ ¡Crea.ve ¡Coding ¡ ¡
Computer ¡Science ¡
Sounds
13) Import new Asset (sound effect/s) 14) Add Audio Source to the Cube (Inspector>Add Component >Audio Source) 15) Uncheck button “Play On Awake” 16) Drag sound effect to the Inspector > Trigger Script >My sound
SLIDE 40
¡ ¡ ¡ ¡CS ¡491 ¡/ ¡DES ¡400 ¡ ¡ ¡ ¡Crea.ve ¡Coding ¡ ¡
Computer ¡Science ¡
Sounds
var target : Collider; private var counter : int = 0; var mySound : AudioClip; function OnTriggerEnter(cubeTrigger : Collider) { if (cubeTrigger == target) { audio.PlayOneShot(mySound); counter = counter + 1; print("Collided: " + counter + " times!"); } }
SLIDE 41
¡ ¡ ¡ ¡CS ¡491 ¡/ ¡DES ¡400 ¡ ¡ ¡ ¡Crea.ve ¡Coding ¡ ¡
Computer ¡Science ¡
Sounds
13) Import new Asset (sound effect/s) 14) Add Audio Source to the Cube (Inspector>Add Component >Audio Source) 15) Uncheck button “Play On Awake” 16) Drag sound effect to the Inspector > Trigger Script >My sound
SLIDE 42
¡ ¡ ¡ ¡CS ¡491 ¡/ ¡DES ¡400 ¡ ¡ ¡ ¡Crea.ve ¡Coding ¡ ¡
Computer ¡Science ¡
Sounds
13) Import new Asset (sound effect/s) 14) Add Audio Source to the Cube (Inspector>Add Component >Audio Source) 15) Uncheck button “Play On Awake” 16) Drag sound effect to the Inspector > Trigger Script >My sound
SLIDE 43
¡ ¡ ¡ ¡CS ¡491 ¡/ ¡DES ¡400 ¡ ¡ ¡ ¡Crea.ve ¡Coding ¡ ¡
Computer ¡Science ¡
Sounds
13) Import new Asset (sound effect/s) 14) Add Audio Source to the Cube (Inspector>Add Component >Audio Source) 15) Uncheck button “Play On Awake” 16) Drag sound effect to the Inspector > Trigger Script >My sound
SLIDE 44
¡ ¡ ¡ ¡CS ¡491 ¡/ ¡DES ¡400 ¡ ¡ ¡ ¡Crea.ve ¡Coding ¡ ¡
Computer ¡Science ¡
Sounds
13) Import new Asset (sound effect/s) 14) Add Audio Source to the Cube (Inspector>Add Component >Audio Source) 15) Uncheck button “Play On Awake” 16) Drag sound effect to the Inspector > Trigger Script >My sound
SLIDE 45
¡ ¡ ¡ ¡CS ¡491 ¡/ ¡DES ¡400 ¡ ¡ ¡ ¡Crea.ve ¡Coding ¡ ¡
Computer ¡Science ¡
Colors
17) Create new material and add trasnparent/diffuse shader 18) Add material to the cube 19) Modify the script to add new material: private var orange : Color = Color(0.8, 0.4, 0.0, 0.3); renderer.material.color = orange;
SLIDE 46
¡ ¡ ¡ ¡CS ¡491 ¡/ ¡DES ¡400 ¡ ¡ ¡ ¡Crea.ve ¡Coding ¡ ¡
Computer ¡Science ¡
Color Systems
SLIDE 47
¡ ¡ ¡ ¡CS ¡491 ¡/ ¡DES ¡400 ¡ ¡ ¡ ¡Crea.ve ¡Coding ¡ ¡
Computer ¡Science ¡
Color Cube
SLIDE 48
¡ ¡ ¡ ¡CS ¡491 ¡/ ¡DES ¡400 ¡ ¡ ¡ ¡Crea.ve ¡Coding ¡ ¡
Computer ¡Science ¡
RGBA Color
Representation of RGBA colors Values for red, green, blue and alpha are floating point values with a range from 0 to 1 Alpha component (a) defines transparency alpha of 1 is completely opaque, alpha of zero is completely transparent Black RGBA is (0, 0, 0, 1) blue RGBA is (0, 0, 1, 1) Gray RGBA is (0.5, 0.5, 0.5, 1) Clear Completely transparent. RGBA is (0, 0, 0, 0)
SLIDE 49
¡ ¡ ¡ ¡CS ¡491 ¡/ ¡DES ¡400 ¡ ¡ ¡ ¡Crea.ve ¡Coding ¡ ¡
Computer ¡Science ¡
RGBA Color
Black RGBA is (0, 0, 0, 1) blue RGBA is (0, 0, 1, 1) Gray RGBA is (0.5, 0.5, 0.5, 1) Clear Completely transparent. RGBA is (0, 0, 0, 0) Magenta? Yellow? cyan?
SLIDE 50
¡ ¡ ¡ ¡CS ¡491 ¡/ ¡DES ¡400 ¡ ¡ ¡ ¡Crea.ve ¡Coding ¡ ¡
Computer ¡Science ¡
Colors
17) Create new material and add trasnparent/diffuse shader 18) Add material to the cube 19) Modify the script to add new material: private var orange : Color = Color(0.8, 0.4, 0.0, 0.3); renderer.material.color = orange;
SLIDE 51
¡ ¡ ¡ ¡CS ¡491 ¡/ ¡DES ¡400 ¡ ¡ ¡ ¡Crea.ve ¡Coding ¡ ¡
Computer ¡Science ¡
Colors
20) Create new material and add trasnparent/diffuse shader 21) Create new 3D object - cylinder 22) Add material to the cylinder 23) Modify the script to add new material: var cylinderMaterial : Material; cylinderMaterial.color = orange; 24) Assign cylinderMaterial to the var cylinderMaterial in the inspector
SLIDE 52
¡ ¡ ¡ ¡CS ¡491 ¡/ ¡DES ¡400 ¡ ¡ ¡ ¡Crea.ve ¡Coding ¡ ¡
Computer ¡Science ¡
Colors
20) Create new material and add trasnparent/diffuse shader 21) Create new 3D object - cylinder 22) Add material to the cylinder 23) Modify the script to add new material: var cylinderMaterial : Material; tcylinderMaterial.color = orange;