recording presentation how to guide
play

Recording Presentation How To Guide These instructions presume you - PDF document

Recording Presentation How To Guide These instructions presume you are using a desktop or laptop computer. Zoom will allow you to record video of yourself and/or video of your computer screen . 1. If you have not already done so, do to


  1. Recording Presentation How To Guide These instructions presume you are using a desktop or laptop computer. Zoom will allow you to record video of yourself and/or video of your computer screen . 1. If you have not already done so, do to https://zoom.us/ and download the Zoom Client for Meetings. After the file downloads, open it and follow the prompts to install. 2. Once Zoom is installed, open the app and you will be prompted to log in. 
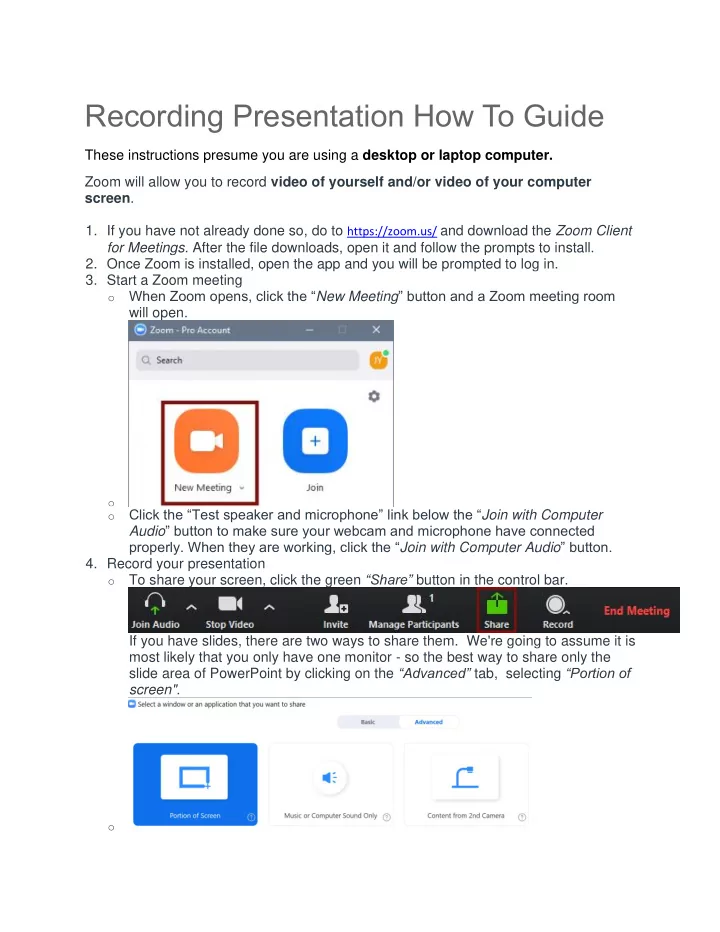
3. Start a Zoom meeting o When Zoom opens, click the “ New Meeting ” button and a Zoom meeting room will open. o o Click the “Test speaker and microphone” link below the “ Join with Computer Audio ” button to make sure your webcam and microphone have connected properly. When they are working, click the “ Join with Computer Audio ” button. 4. Record your presentation o To share your screen, click the green “Share” button in the control bar. If you have slides, there are two ways to share them. We're going to assume it is most likely that you only have one monitor - so the best way to share only the slide area of PowerPoint by clicking on the “Advanced” tab, selecting “Portion of screen". o

  2. o Then fit the green box around your slide. If you have 2 monitors, open your presentation in slide show view and share the monitor where the presentation is showing. o o When you’re ready to start, click the “Record” button at the bottom of the meeting window, or use the shortcut key Alt + R. (If you do not see the record button, mouse over the window that says "...More..." and it will appear.) o o Select “Record on this Computer” instead of " Record to the Cloud", as processing times in the Zoom cloud are very long. o When Zoom is recording you will see a small red dot at the top left of the meeting window. 5. Finish your recording and save your presentation

  3. o When you are done recording, click the “Stop Recording” button in the control bar (or Alt+R again) and then click “End Meeting” at the bottom right. o Zoom will ask if you want to keep the meeting running; click “End meeting for all.” o Once the meeting ends, a window will pop up that tells you the mp4 file is being converted. It will allow you to select a folder to save the file. We recommend saving it to some place you can navigate to again easily as the default is in a folder within the Zoom application labeled by date and meeting ID number. 6. Open the saved files o After Zoom processes your recording and saves it to your selected destination, there will be 3 files: audio_only (m4a file), playback (m3u file), and zoom_0 (mp4). o The zoom_0 mp4 file type is the one you will use to upload to YouTube!

Download Presentation
Download Policy: The content available on the website is offered to you 'AS IS' for your personal information and use only. It cannot be commercialized, licensed, or distributed on other websites without prior consent from the author. To download a presentation, simply click this link. If you encounter any difficulties during the download process, it's possible that the publisher has removed the file from their server.

Recommend


More recommend