SLIDE 1
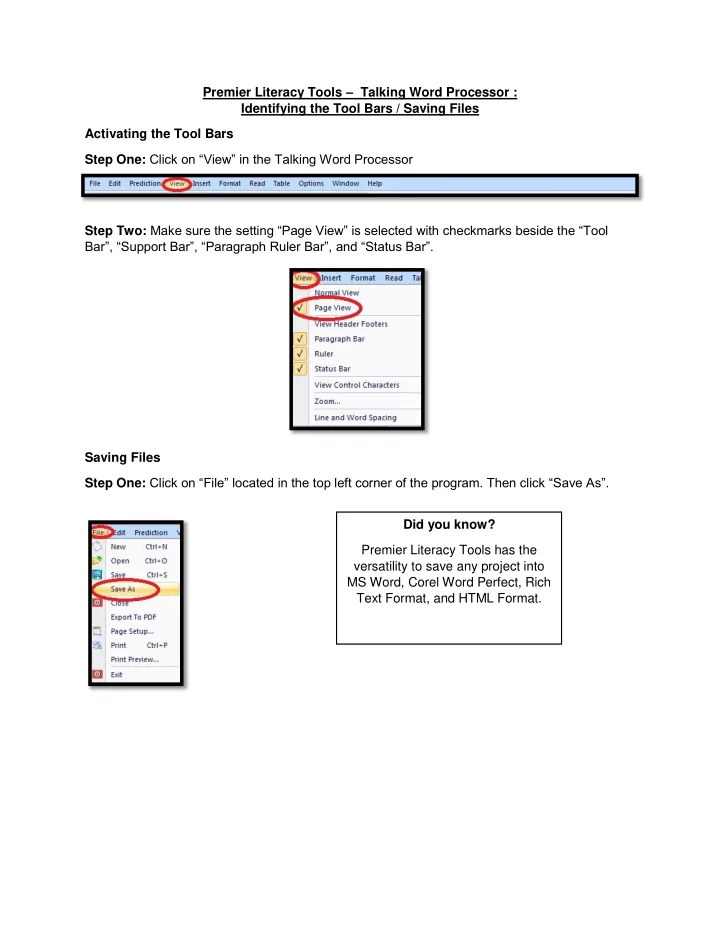
Premier Literacy Tools – Talking Word Processor : Identifying the Tool Bars / Saving Files Activating the Tool Bars Step One: Click on “View” in the Talking Word Processor Step Two: Make sure the setting “Page View” is selected with checkmarks beside the “Tool Bar”, “Support Bar”, “Paragraph Ruler Bar”, and “Status Bar”. Saving Files Step One: Click on “File” located in the top left corner of the program. Then click “Save As”. Did you know? Premier Literacy Tools has the versatility to save any project into MS Word, Corel Word Perfect, Rich Text Format, and HTML Format.
SLIDE 2
Step Two: Click on the drop down menu titled “Saved As Type” to choose which format you would like to save your document in. Click on the choice you desire. This file will then open in the desired program selected after exiting Premier Software Tools. Open A File Step One: Under the Home tab, click on the “Open” folder button. Step Two: Go to Desktop, Click the “Example” File, and choose the file. Double click to open.
SLIDE 3
Premier Literacy Tools – Talking Word Processor: Home and Reading Tool Bar Activate Spell Check Step One: Highlight the word that you want to use the spell checker with by holding down your trackpad or mouse to shade over the selected word. Step Two: Under the “Home” Tool Bar, click on the “Spell Check” icon. Step Three: The Spell Checker will give four options for you to choose from, which are “Change” where you can change the word to match the suggestion, “Change All” where it will change the word everytime it occurs in the document, “Ignore” where it will not change the spelling of the word, or “Ignore All” where it will not change the word in every place where it is typed in the document. Step Four: Double click on the word you would like to choose to replace the misspelt word. It will change that word where it is higlighted in the document. The program will also show a definition on the right where the user can listen to the definition. Click “Close” when finished.
SLIDE 4
Activate Dictionary Step One: Highlight the word you would like to look up in the dictionary by holding down your mouse or track pad to shade over the selected word. Step Two: Under the “Home” Tool Bar, click on “EN Dictionary”. Step Three: The dictionary definition will pop up in a separate window. You can choose to read the definition by clicking the “Read” button or you can choose to copy the definition to put in your document by clicking “Copy Selected Text”. After you are finished, click “Close” to return to your document. Activate Thesaurus Step One: Highlight the word you would like to look up in the thesaurus by holding down your mouse or track pad to shade over the selected word. Step Two: Under the “Writing” Tool Bar, click on the “Thesaurus” button to activate the thesaurus window.
SLIDE 5 Step Three: The thesaurus window will pop up and give you options on the left hand side of the window. Step Four: Double click on the word you would like to replace your original word with. After clicking the word, you have the option to read the definition by clicking “Read” on the bottom right of the dialogue box. If that is the word you would like to choose, click the “Replace” button
- n the bottom left of the dialogue box. When you are finished click on the “Close” button.
Read Text Step One: Place the cursor just before the text you would like the program to read. Step Two: Under the “Reading” Tool Bar, click on the “Read” button to start the program’s reading sequence.
SLIDE 6 Step Three: When you have clicked the “Read” button, the word window will appear depending
Step Four: To stop the reading of the text under the “Reading” tab, click on the “Stop” button. Set Voice Type and Rate Step One: Under the “Reading Tab”, click on the “Voices” tab. Step Two: To change the voice, click the arrow on the right to show the drop down menu of
- ptions. To change the speed of reading, drag the arrow on the “Voice Rate slider” to fit the
- speed. You can test the voice and speed by clicking the “Test” button. Press “Ok”.
SLIDE 7
Reading Options Step One: To change the reading options, under the “Reading” tab, click on the “Reading Options” button. Step Two: To use the “Word Tracking Features”, check “Display Word View Window while reading” for the tracking box to appear when in reading mode. To change the “Reading Style”, click the drop down arrow to change your options. The options are: Track by word only, track by sentence and word, track by word and paragraph, or no tracking. You can also have a word pause after reading each word by checking the “Enable Word Pause”. You can choose the length of pause for this option by clicking the “Pause Length” drop down menu. The pause length could be from 0.25 – 3.00 seconds. Step Three: When you are finished, click “Apply” then “Ok” to exit the reading options. Reading Bar W(ord) Repeat – Everytime the user types a word, it will be read.
SLIDE 8
S(entence) Repeat – Everytime the user completes a sentence with a period, the program will read back the sentence to the student. Writing Bar Writing Stats Step One: To take a look at the “Writing Stats” of the document, under the “Writing” tab, click the “Writing Stats” button. Step Two: Take a look at what each label represents in the text below. This would be a great place to show the student’s writing trends. Sentences – amount of sentences Average sentence length – amount of words per sentence on average Unique words – words that the dictionary cannot recognize Total words – total words in document Average word length – expresses grade level of words due to length Flesch-Kincaid Grade Level – based on the assessment testing Flesch Reading Ease Level – gives you the table on the right, most students aim for the standard but this is arbitrary depending on subject and grade level Confusable words – the program chooses words that it believes the user is using interchanging words that do not match with the sentence and the program labels the amount of occurrances Highlight colour – If the user double clicks the confusable word, the program will highlight that word in the document so that the user can look at the occurrances and double check their answers Step Three: Press ok to see the confusable word in document.
SLIDE 9
Writing Options Step One: Under the “Writing” Tool Bar, click on the “Writing Options” button. Step Two: Take a look at the “Writing Options” that the user can choose. Read underline misspelled words – necessary for spell check Auto – Correct – corrects commonly misspelled and you can add words specifically that the user commonly misspells Show Suggested Words – Great option for words that the user commonly misspells, a box will appear Spelling Options Ignore words with numbers – ex. “2nd of March” the “2nd” wouldn’t be considered a mistake if checked Ignore words in upper case – ex. “EXCLAIM” wouldn’t be considered a mistake if checked Ignore words in mixed case – ex. “HeLlO jOe” wouldn’t be considered a mistake if checked Prediction Options Step One: To choose the “Prediction Options”, under the “Writing” Tool Bar, click the “Prediction Options” button.
SLIDE 10
Word List font size – choose the word prediction font size for the list Display list after - common option is after two typed characters Display # of words – common option is four words Place a space after selected word – After word is selected with the word predictor, a space is inserted afterwards If the “P” is in the crystal ball, word prediction is on Studying Bar Highlight and Extract Notes Step One: Highlight the text by shading the sentence (like you did earlier using the spelling and dictionary tools) Step Two: Under the “Studying” Tool Bar, click the “Highlight” button to create highlighted text. Step Three: Create other highlights to represent other parts of the text needed (NOTE: cannot label the highlight colours so remember which colour was for which)
SLIDE 11
Step Four: Under the “Studying” Tool Bar, click on the “Extract HL” button. Step Five: Choose your options for the extract into notes. Choose the order level of the highlights, group the highlights by colour, and check off “Include Page Numbers”. After choosing your options press “Extract”. Step Six: Label your highlights by the topic.
SLIDE 12
Step Seven: Highlight your notes by dragging your mouse or track pad over the text to shade all the text. Press “Clear HL” to take away the colours and have the note print ready. Summarize Tool Step One: Under the “Studying” Tool Bar, click on the “Summarize” button. Summarize Option Check place in separate document Check highlight summary in the original document Choose summary method - sentences or percentage of document; if you choose percentage, slide the tab to reduce the document to 50-60% Step Two: Choose the options and then click “Summarize File”
SLIDE 13 Step Three: The program will tell the user when it is complete. The notes will be in a separate
- document. If you go to the original document, the user can see where the notes were pulled
from with the yellow highlight.
SLIDE 14 How to Make Audio Books with Premier Literacy Pack Step One: Find the pdf version of the audio book needed. Usually if you google the title using “pdf” after the title, you will most likely find a version. Save it to somewhere you can find it later. Step Two: Open Premier Literacy Productivity Pack. Click on the Studying tab and open PDF
- Equalizer. Open the pdf file in the PDF Equalizer part of the program using the open
button on the top left side under the home tab. Select the pdf of the book. Step Three: Click the Utilities tab and select the MP3 option before converting your file to audiobook. After clicking the MP3 option button, choose the destination of the files by clicking the folder button that is labelled “Select Path”. After clicking that button, choose the folder you would like the audiobook to be in. I suggest creating its own folder named the title of the book on the desktop for ease of access. When you have selected the path make sure it is “MP3 File”, “64 bit rate” for mp3, and “Leave Page As Is” as your final options.
SLIDE 15 Step Four: When you have completed step three, click “Voices” and choose the speed of the reading by adjusting the slider below the voice option to choose which speed is best for your audiobook, you can also change the voice on the top drop down menu in this
- ption. When this is completed click the green checkmark to complete the changes. It
will tell you the voice in the speed chosen after clicking the green checkmark. Step Five: Under the “Utilities” tab, click the “Convert to MP3” button and select the option “Range
- f Pages” and choose the page range of the document (usually it automatically fills that
information in). Press the green checkmark to start the conversion. After the conversion is complete, find the audio files in the folder you chosen to put the converted files in. After the conversion is completed, label the chapters accordingly by cross checking with the pdf file. Load your files on your mp3 playing device (suggestion: make a playlist that will ensure your book is read in its proper order). Enjoy your new audiobook!
SLIDE 16
Premier Literacy Tools – Worksheet Wizard Open File Step One: Under the “Home” Tool Bar, click on the “Open” button. Step Two: Choose your worksheet from your scanned documents (NOTE: make sure it is a pdf document). Create Text Box Step One: Drag your mouse or track pad to create a red box. Then under the “Worksheet” Tool Bar, click the “Text Box” button (NOTE: using the text box option gives you the same options in Talking Word Processor).
SLIDE 17 Step Three: Type in your answer and then under the “Home” Tool Bar, click “Post”. The text will show up in the designated space. Drawing Tool Step One: Under the “Worksheet” Tool Bar, click on the “Draw button”. By dragging your mouse
- r track pad, the user can circle multiple choice answers.
Erase Tool Step One: Under the “Worksheet” Tool Bar, click the “Erase” button to erase any markings on your page. Be careful of the erase tool because it can be destructive to the page.
SLIDE 18 Insert Page Option Step One: Under the “Worksheet” Tool Bar, click the “Insert Page” button to add a page in the
- test. The page options are graph paper, blank paper, notebook, or plain graph paper. This
would be best for math, science, or any subject that is diagram heavy that the user can draw using the computer capabilities. Questions? Contact the Learning Disabilities Association of Sudbury Phone: (705) 522 – 0100