Pacing/Teacher's Notes Investigation #8: Transformation Click on - - PDF document

pacing teacher s notes
SMART_READER_LITE
LIVE PREVIEW

Pacing/Teacher's Notes Investigation #8: Transformation Click on - - PDF document

Slide 1 / 31 Slide 2 / 31 New Jersey Center for Teaching and Learning AP BIOLOGY Progressive Science Initiative This material is made freely available at www.njctl.org and is intended for the non-commercial use of Investigation #8 students


slide-1
SLIDE 1

Slide 1 / 31

This material is made freely available at www.njctl.org and is intended for the non-commercial use of students and teachers. These materials may not be used for any commercial purpose without the written permission of the owners. NJCTL maintains its website for the convenience of teachers who wish to make their work available to other teachers, participate in a virtual professional learning community, and/or provide access to course materials to parents, students and others.

Click to go to website: www.njctl.org New Jersey Center for Teaching and Learning Progressive Science Initiative

Slide 2 / 31

AP BIOLOGY Investigation #8

Biotechnology: Bacterial Transformation

www.njctl.org Summer 2014

Slide 3 / 31 Investigation #8: Transformation

· Pre-Lab · Guided Investigation · Independent Inquiry

Click on the topic to go to that section

· Pacing/Teacher's Notes

Slide 4 / 31

Pacing/Teacher's Notes

Return to Table of Contents

Slide 5 / 31 Teacher's Notes

Lab procedure adapted from College Board AP Biology Investigative Labs: An Inquiry Approach Teacher's Manual Click here for CB AP Biology Teacher Manual
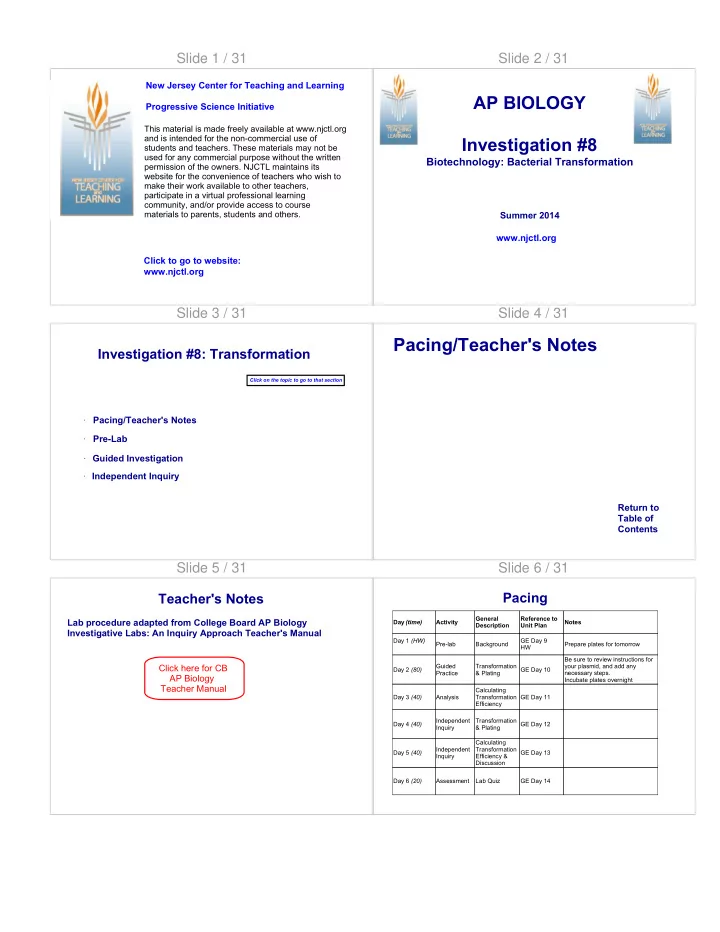
Slide 6 / 31 Pacing

Day (time) Activity General Description Reference to Unit Plan Notes Day 1 (HW) Pre-lab Background GE Day 9 HW Prepare plates for tomorrow Day 2 (80) Guided Practice Transformation & Plating GE Day 10 Be sure to review instructions for your plasmid, and add any necessary steps. Incubate plates overnight Day 3 (40) Analysis Calculating Transformation Efficiency GE Day 11 Day 4 (40) Independent Inquiry Transformation & Plating GE Day 12 Day 5 (40) Independent Inquiry Calculating Transformation Efficiency & Discussion GE Day 13 Day 6 (20) Assessment Lab Quiz GE Day 14

slide-2
SLIDE 2

Slide 7 / 31

Pre-Lab

Return to Table of Contents

Slide 8 / 31 Question/Objectives

How can we use genetic engineering techniques to manipulate heritable information?

In this lab we will: · Demonstrate the universality of DNA and its expression. · Explore the concept of phenotype expression in organisms. · Explore how genetic information can be transferred from one organism to another. · Investigate how horizontal gene transfer is a mechanism by which genetic variation is increased in organisms. · Explore the relationship between environmental factors and gene expression. · Investigate the connection between the regulation of gene expression and

  • bserved differences between individuals in a population of organisms.

Slide 9 / 31 Pre-Lab Questions

Read the background information and answer the following questions in your lab notebook.

  • 1. What causes mutations in bacteria? Can mutations affect

plasmids?

  • 2. What is the function of plasmids in bacteria?
  • 3. Do cells take up more plasmids in some conditions and less in
  • thers?

Slide 10 / 31 Pre-Lab Questions

Read the "Getting Started" and answer the following questions in your lab notebook. 1. Some bacteria are naturally resistant to antibiotics, but others are

  • not. How could you use two LB/agar plates, so E. coli, and some

ampicillin (an antibiotic) to determine how E. coli cells are affected by ampicillin? 2. What would you expect your experimental result to indicate about the effect of ampicillin on the E. coli cells? Do you think that exposure to ampicillin will cause the E. coli cells to evolve resistance to ampicillin? Why or why not? 3. How will you be able to tell if host E. coli cells have been genetically transformed?

Slide 11 / 31 Safety

When working with a culturing bacteria, it is important not to introduce contaminating bacteria or fungi into the

  • experiment. Because these microorganisms are ubiquitous,

i.e., you can find them everywhere - on fingertips, bench tops, lab tables, etc. - you must avoid these contaminating

  • surfaces. When working with inoculation loops, bulb

pipettes, micropipettes, and agar plates, do not touch the tips of them (or in the case of agar, the surface itself) or place them directly onto contaminating surfaces. Be sure to wash your hands before beginning the procedure and after - and cover your sneezes. Do not eat, drink, apply cosmetics,

  • r use personal electronic devices in the work area.

Slide 12 / 31

Guided Investigation

Return to Table of Contents

slide-3
SLIDE 3

Slide 13 / 31

Materials

Your Workstation · E. coli starter plate · 2 LB agar plates · 2 LB/amp agar plates · LB nutrient broth · Sterile inoculation loops · 100-1000 microliter bulb pipettes · 1-10 microliter micropipettes with sterile tips Common Workstation · DNA plasmid · 42oC water bath and thermometer · 37oC incubator · 20 microliter adjustable-volume micropipette · 10% household bleach · Biohazardous waste disposal bags · Masking or lab tape · Transformation solution (CaCl2) · Microcentrifuge tubes and holder · Container of crushed ice · Marking pen · Lab notebook

Slide 14 / 31

Guided Practice

Step 1 Familiarize yourself with sterile technique before beginning the experiment. Step 2 Label one closed microcentrifuge tube "+plasmid" and the other tube "-plasmid". Label both tubes with your group's number, and place them in the microcentrifuge tube holder. Step 3 Carefully open the tubes and using a 100-1000 microliter bulb pipette with a sterile tip, transfer 250 microliter of the ice cold transformation solution into each tube. Step 4 Place both tubes on (into) the ice.

Slide 15 / 31

Guided Practice

Step 5 Use a sterile inoculation loop to pick up a single colony

  • f bacteria from your starter plate. Be carful not to scrape off

any agar from the plate. Pick up the "+plasmid" tube and immerse the loop in the CaCl2 solution at the bottom of the tube. Spin the loop between your index finger and thumb until the entire colony is dispersed in the solution. Appropriately discard the loop. Step 6 Use a new sterile 100-1000 micropipette to repeatedly pulse the cells in solution to thoroughly resuspend the cells. Place the tube back on the ice. Step 7 Using a new sterile inoculation loop, repeat Steps 5 and 6 for the "-plasmid" tube.

Slide 16 / 31

Guided Practice

Step 8 Using a 1-10 microliter micropipette with a sterile tip, transfer 10 microliters of plasmid solution directly into the E. coli suspension in the "+plasmid" tube. Tap tube with a finger to mix, but avoid making bubbles in the suspension or splashing the suspension up the sides of the tube. Do not add the plasmid into the "-plasmid" tube! Step 9 Incubate both tubes (+plasmid and -plasmid) on ice for 10 minutes. Make sure the bottom of the tubes make contact with the ice. Step 10 While the tubes are sitting on ice, label each of your agar plates on the bottom (not the lid).

Slide 17 / 31

Guided Practice

Step 11 Following the 10-minute incubation at 0oC, remove the tubes from the ice and "heat shock" the cell in the tubes. It is critical that the cells receive a sharp and distinct shock! Make sure the tubes are closed tightly! Place the tubes into a test tube holders float, and dunk the tubes into the water bath, set at 42oC, for exactly 50 seconds. Make sure to push the tubes all the way down in the holder so that the bottom of the tubes with the suspension makes contact with the warm water. Step 12 When the 50 seconds have passed, place both tubes back on ice. For best transformation results, the change from 0oC to 42oC and then back to 0oC must be rapid. Incubate the tubes on ice for an additional two minutes.

Slide 18 / 31

Guided Practice

Step 13 Remove the holder containing the tubes from the ice and place on lab counter. Using a 100-1000 microliter micropipette with sterile tip, transfer 250 microliters of LB nutrient broth to the "+plasmid" tube. Close the tube and gently tap with your finger to mix. Repeat with a new sterile micropipette for the "-plasmid" tube. Step 14 Incubate each tube for 10 minutes at room temperature. Step 15 Use a 10-1000 microliter micropipette with sterile tip to transfer 100 microliters of the transformation (+plasmid) and the control (-plasmid) suspensions onto the appropriate LB and LB/ amp plates. Be sure to use a separate pipette for each of the four transfers.

slide-4
SLIDE 4

Slide 19 / 31

Guided Practice

Step 16 Using a new sterile inoculation loop for each plate, spread the suspension evenly around the surface of the agar by quickly "skating" the flat surface of the sterile loop back and forth across the plate surface. Do not poke or make gashes in the agar! Your teacher may suggest that you use small sterile beads to spread the suspensions by gently rocking the beads across the surface of the agar. Allow the plates to set for 10 minutes. Step 17 Stack your plates and tape them together. Place the stack upside down in the 37oC incubator for 24 hours.

Slide 20 / 31

Analyzing Results

Analysis Questions: · On which of the plates would you expect to find bacteria most like the original non-transformed E. coli you initially observed? Why? · If there are any genetically transformed bacterial cells, on which plate(s) would they most likely be located? Again, why? · Which plates should be compared to determine if any genetic transformation has occurred? Why? · What barriers might hinder the acquisition of plasmids? · How can the procedures described above (addition of Cl2 and "heat shocking") help facilitate the introduction of plasmids into the E. coli cells?

Slide 21 / 31

Calculating Transformation Efficiency

Transformation efficiency = Total number of colonies growing on the agar plate Amount of DNA spread on the agar plate (in milligrams)

  • 1. Calculate the total number of transformed cells.

Observe the number of colonies visible on your LB/amp plate. Do not open the plate! Each colony on the plate can be assumed to be derived from a single cell. As individual cells reproduce, more and more cells are formed and develop into what is termed a

  • colony. Thus, the most direct way to determine the total number
  • f bacteria that were transformed with the plasmid is to count the

colonies on the plate.

Slide 22 / 31

Calculating Transformation Efficiency

Transformation efficiency = Total number of colonies growing on the agar plate Amount of DNA spread on the agar plate (in milligrams)

  • 2. Calculate the amount of plasmid DNA in the bacterial cells

spread on the LB/amp plate. You need two pieces of information to find out the amount of plasmid DNA in the bacterial cells spread on the LB/amp plate: · the total amount of DNA with which you began the experiment · the fraction of the DNA in the bacteria that actually got spread

  • nto the LB/amp plate.

Slide 23 / 31

Calculating Transformation Efficiency

Calculate the total amount (mass) of plasmid DNA. The total amount of DNA with which you began the experiment is equal to the product of the concentration and the total volume used:

DNA in micrograms = (concentration of DNA of micrograms/microliter) volume of DNA in microliters

Slide 24 / 31

Calculating Transformation Efficiency

Calculate the fraction of plasmid DNA that actually got spread

  • nto the LB/amp plate.

Since not all the DNA you added to the bacterial cells will be transferred to the agar plate, you need to calculate what fraction

  • f DNA was actually spread onto the LB/amp plate.

Fraction of DNA used = volume spread on the LB/amp plate (microliters) total sample volume in test tube (microliters)

slide-5
SLIDE 5

Slide 25 / 31

Calculating Transformation Efficiency

Calculate the micrograms of plasmid DNA that you spread on the LB/amp plate. To answer this question, you multiply the mass of plasmid DNA used times the fraction of plasmid DNA you spread on the LB/ amp plate.

DNA spread in micrograms = total amount of DNA used x fraction of DNA used

Slide 26 / 31

Calculating Transformation Efficiency

Transformation efficiency = Total number of colonies growing on the agar plate Amount of DNA spread on the agar plate (in milligrams)

  • 3. Calculate transformation efficiency.

Slide 27 / 31

Evaluating Results

  • 1. What are some challenges you had in performing your

investigation? Did you make any incorrect assumptions?

  • 2. What are some possible sources of error in the

transformation procedure? If you had to repeat the procedure, what are ways to minimize potential sources of error?

  • 3. Were you able to perform without difficulty the

mathematical routines required to calculate transformation efficiency? Which calculations, if any, were challenging or required help from your classmates or teacher?

  • 4. Can you suggest other preliminary activities that would

have better prepared you to tackle this investigation?

  • 5. Does a bacterial cell take in a plasmid with genes the cell

already possesses? If so, would this affect your calculations?

Slide 28 / 31

Independent Inquiry

Return to Table of Contents

Slide 29 / 31

Designing and Conducting Your Investigation

Think about these questions again for a minute. · What causes mutations in bacteria? Can mutations affect plasmids? How would you be able to tell if any observed changes in phenotypes are due to the expression of genes carried on plasmids and are not attributed to a possible mutagen? · Do bacteria take up more plasmid in some conditions and less in others? What conditions favor uptake, and which ones inhibit it? · What other questions do you have about plasmids and transformation?

Slide 30 / 31

Designing and Conducting Your Investigation

You can design an investigation focusing on the information below OR design one based on a question(s) or observation you had as you worked through the genetic transformation you just conducted. Be sure that your experiment applies the science skills you acquired as you worked through this investigation.

slide-6
SLIDE 6

Slide 31 / 31