MyLO Student Guide v10.1 ePortfolio Create a Presentation This - - PDF document

mylo student guide v10 1 eportfolio create a presentation
SMART_READER_LITE
LIVE PREVIEW

MyLO Student Guide v10.1 ePortfolio Create a Presentation This - - PDF document

MyLO Student Guide v10.1 ePortfolio Create a Presentation This guide demonstrates how you can create a presentation within your ePortfolio in MyLO. Presentations let you compile portfolio items in a web project to showcase your achievements.


slide-1
SLIDE 1

Support: service.desk@utas.edu.au|www.utas.edu.au/learning-teaching-online CRICOS Provider Code: 00586B July, 2013 Page 1 of 10

MyLO Student Guide v10.1

ePortfolio – Create a Presentation

This guide demonstrates how you can create a presentation within your ePortfolio in MyLO. Presentations let you compile portfolio items in a web project to showcase your

  • achievements. Your presentations may have multiple pages and use different themes and
  • layouts. Presentations may also be required by your lecturers as part of assessment items.
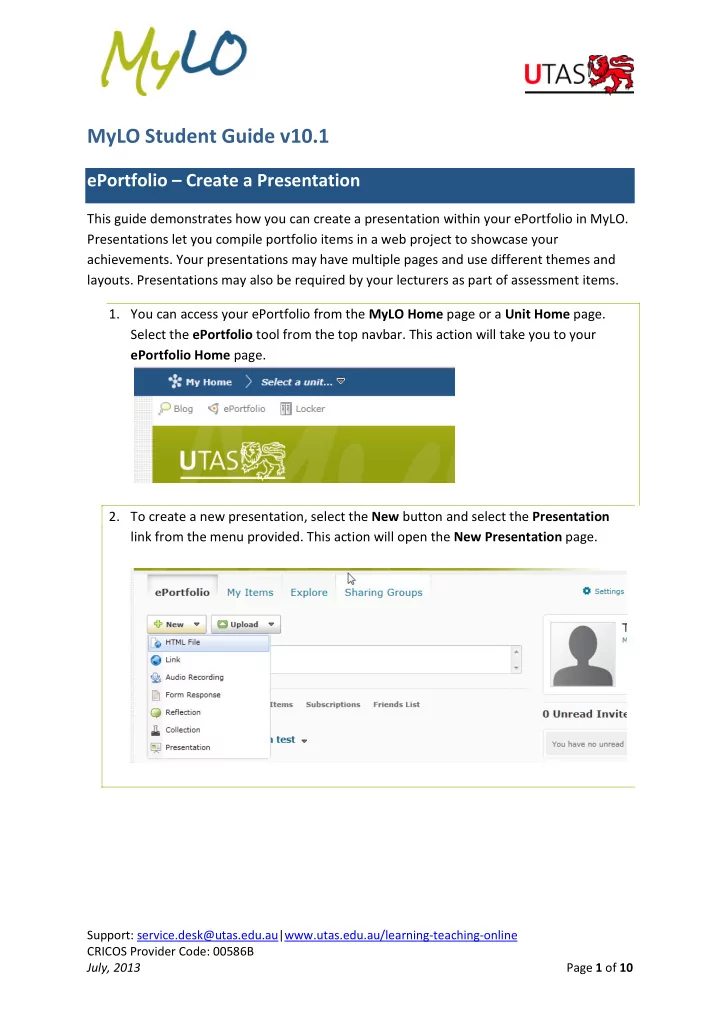
  • 1. You can access your ePortfolio from the MyLO Home page or a Unit Home page.

Select the ePortfolio tool from the top navbar. This action will take you to your ePortfolio Home page.

  • 2. To create a new presentation, select the New button and select the Presentation

link from the menu provided. This action will open the New Presentation page.

slide-2
SLIDE 2

Support: service.desk@utas.edu.au|www.utas.edu.au/learning-teaching-online CRICOS Provider Code: 00586B July, 2013 Page 2 of 10

  • 3. Give your presentation a meaningful Name, enter a description into the Description

field and add any Tags. Tags make your ePortfolio items easier to search. Select the appropriate permissions you would like on the presentation.

  • 4. Select the Content/Layout tab. This action will allow you to determine how you wish

your presentation to be displayed. You can add page by selecting the new page icon in the Pages box. This action will open the New Page pop up.

slide-3
SLIDE 3

Support: service.desk@utas.edu.au|www.utas.edu.au/learning-teaching-online CRICOS Provider Code: 00586B July, 2013 Page 3 of 10

  • 5. Enter the Page Name, then select Save. This action will return you to the

Content/Layout tab. You will be able to see the new page within the Pages box.

  • 6. To rename a page, select the action arrow next to the page title and select Page
  • Properties. This will open the Page Properties pop up seen before when creating a
  • page. Rename the page and then select Save.
slide-4
SLIDE 4

Support: service.desk@utas.edu.au|www.utas.edu.au/learning-teaching-online CRICOS Provider Code: 00586B July, 2013 Page 4 of 10

  • 7. You can add components to your presentation by selecting an Add Component

button in a content area. There are a number of different components you can add. Select Text area. This will open the Add Content area.

  • 8. Populate the Area Name and Content fields, then select Save and Close. This action

will return you to the Content/Layout page. The text area will now appear in the content.

slide-5
SLIDE 5

Support: service.desk@utas.edu.au|www.utas.edu.au/learning-teaching-online CRICOS Provider Code: 00586B July, 2013 Page 5 of 10

  • 9. Select the Add Component button in the Content Area 2. Select Information from

my profile. This action will return you to the Content/Layout page and a My Profile Information will appear.

  • 10. Select the Banner tab. Type the name of the presentation into the Banner Title field.
slide-6
SLIDE 6

Support: service.desk@utas.edu.au|www.utas.edu.au/learning-teaching-online CRICOS Provider Code: 00586B July, 2013 Page 6 of 10

  • 11. Select the Theme tab. Choose a design from the available themes by clicking on the

corresponding Select button. A Confirmation pop up will appear. Select the Set Theme button. This action will refresh the current theme.

  • 12. Once you have made your final selection, select the Close button at the bottom of

the page. This action will return you to the My Items tab in your ePortfolio.

slide-7
SLIDE 7

Support: service.desk@utas.edu.au|www.utas.edu.au/learning-teaching-online CRICOS Provider Code: 00586B July, 2013 Page 7 of 10

  • 13. To preview your presentation, select the presentation title. This action will open

your presentation in a new window.

  • 14. You can navigate through your presentation to test functionality. Close the window

to return to your ePortfolio.

slide-8
SLIDE 8

Support: service.desk@utas.edu.au|www.utas.edu.au/learning-teaching-online CRICOS Provider Code: 00586B July, 2013 Page 8 of 10

  • 15. To make further edits to your presentation, select the action arrow next to your

presentation title. Select Edit from the menu provided.

  • 16. To share a presentation, select the action arrow next to the reflection title and

select Share from the menu provided (see figure from point 15). This action will open the Sharing Settings pop up.

  • 17. There are two options when sharing a presentation; you can allows public access, or

grant permissions to a specific person or group of people. Select the Add Users and Groups button. This action will allow you to search for users.

slide-9
SLIDE 9

Support: service.desk@utas.edu.au|www.utas.edu.au/learning-teaching-online CRICOS Provider Code: 00586B July, 2013 Page 9 of 10

  • 18. Search for your lecturer or classmate by typing their name into the Search for field.

Select the appropriate user from the search results. The Selected Users section will update with your selection. Select any Permissions you would like your lecturer or classmate to receive, then select Add. This action will return you to the Sharing Settings screen.

  • 19. Select the checkbox next to the lecturer or classmate you have added. Select the

Send Invite button. This action will open the Invite settings.

slide-10
SLIDE 10

Support: service.desk@utas.edu.au|www.utas.edu.au/learning-teaching-online CRICOS Provider Code: 00586B July, 2013 Page 10 of 10

  • 20. Ensure the To: field has Selected Users checked. Populate the Subject and Message
  • fields. Select Ok.
  • 21. Your lecturer or classmate will now be able to see your reflection as a shared object

within their ePortfolio.