SLIDE 1 Part 1:
1.
Cervical or endometrial polyp removal
2.
IUD removal
3.
Vulvar biopsy (and vulvar lesions)
4.
Endometrial biopsy (and interpretation of EMB results) Part 2:
1.
Pessary placement
2.
IUD insertion— Copper T and Mirena Part 3:
1.
Nexplanon insertion
2.
Manual uterine aspiration with cervical dilation
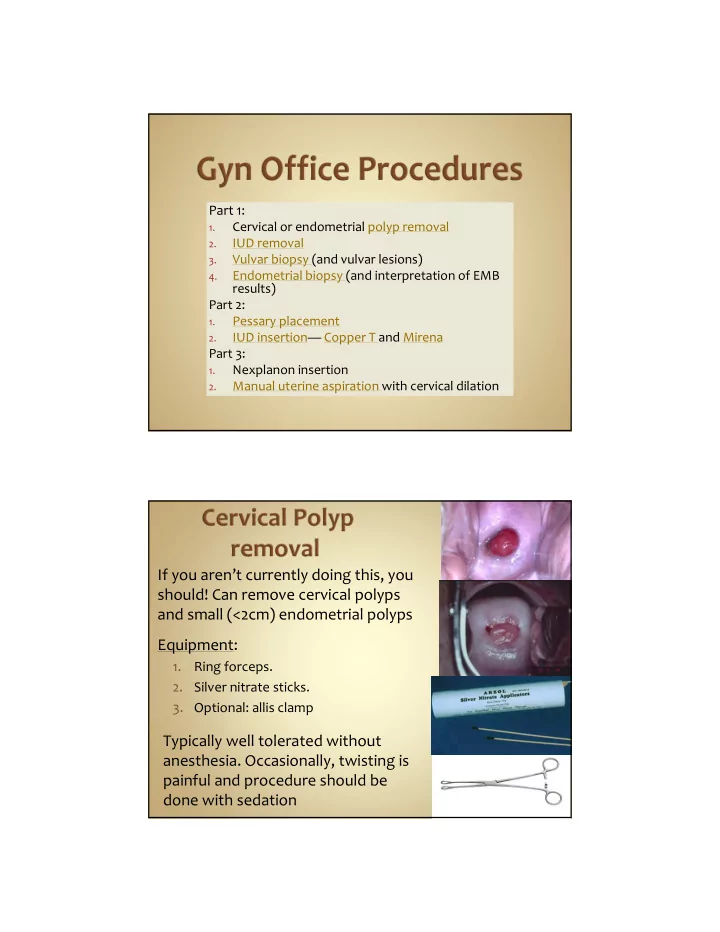
If you aren’t currently doing this, you should! Can remove cervical polyps and small (<2cm) endometrial polyps Equipment:
1. Ring forceps.
- 2. Silver nitrate sticks.
- 3. Optional: allis clamp
Typically well tolerated without
- anesthesia. Occasionally, twisting is
painful and procedure should be done with sedation
SLIDE 2
Clean with betadine
If polyp on a stalk, grasp as high as possible with ring
forceps and begin to twist in one direction. When meet resistance in that direction, twist other way. Do not pull. Continue twisting process until polyp has been removed. Cauterize base with silver nitrate (helps kill remaining cells)
If polyp not on a stalk: Unlikely that ring forceps will
grasp it. Try allis clamp to “chomp it off”. Cauterize base with silver nitrate
Send to pathology.
Return
If you aren’t currently doing this, you should.
No training necessary!
Most important: offer other form of reliable contraception, if desired.
Equipment: Ring forceps. Cytology brush.
SLIDE 3
If strings visible, ask pt to cough and pull quickly
- n strings as she coughs (this helps with the
visceral feeling pt will have you remove it).
If strings not visible: try to tease them out by twisting cytology brush within the endocervix.
Complications: none that I know of. String can break off or if IUD embedded you won’t be able to remove it. Occasionally it hurts to remove (usually not).
Return
SLIDE 4
Supplies:
1.
Punch biopsy (4 or 5 mm)
2.
1% lidocaine
3.
Insulin syringe (not PPD syringe)
4.
Suture removal kit (pick‐ups and scissors)
5.
Gauze/silver nitrate for hemostasis
1.
Clean with betadine or alcohol
2.
1% lidocaine in insulin syringe (PPD needles have barbs!). Have her cough as you stab. This hurts a lot!
3.
Twist punch on skin as pushing. Push fairly hard. Check intermittently to see if through skin. Easy to go very deep once you penetrate skin.
4.
Once circumferentially cut, use pick‐ups to lift plug of tissue and cut off with scissors
5.
Use pressure to stop bleeding. Silver nitrate if necessary but burns.
SLIDE 5 Potential biopsy site Potential biopsy site
SLIDE 6 Potential biopsy site
SLIDE 7 Potential biopsy site Potential biopsy site Return
SLIDE 8 Supplies:
1.
Ibuprofen (Pre‐procedure)
2.
EMB pipelle
3.
1% lidocaine for 12:00 cervix tenaculum site
4.
Tenaculum
5.
Fox swabs/ silver nitrate for hemostasis
1.
BME to check size, position of uterus
2.
Clean cervix with betadine
3.
Attempt passing pipelle without using tenaculum. Place pipelle just inside os, she bears down while you push. If it “pops” through the internal os, get your sample as noted
- below. If it doesn’t pass, you’ll need tenaculum.
4.
Always give lidocaine at tenaculum site. Good evidence that it decreases pain of the procedure. 2‐3 cc 1% lidocaine to 12:00 anterior cervix to get a 1 cm white bleb (I like 22 gauge, 4 in spinal needle). Have her “cough it in”.
5.
Tenaculum: 1 cm wide bite, slowly close.
6.
Pull firmly back on tenaculum as you push pipelle through os. Tenaculum should move about 2 cm.
SLIDE 9 7.
Once pipelle passes or “pops” through the internal os, push it gently up to fundus and then back it away from fundus by about 1 cm. Do not push hard against the fundus. Do not repeatedly touch the fundus. Touching fundus=painful.
8.
Obtain suction by pulling the stylette all the way back
9.
Move the pipelle up and down within the uterus (below the
fundus) while twisting. Count to 10 out loud. Remove pipelle at
10 seconds.
- 10. Carefully plunge specimen into specimen cup without
touching the pipelle to the formalin or sides of cup.
11.
Check specimen adequacy by shaking formalin and looking for tissue pieces.
12.
If adequate and uterus gritty: done. If not gritty or inadequate: do another pass.
SLIDE 10
Ibuprofen when hits the door.
Help her with breathing. No breath holding.
Count to 10? Gives her control and a time frame. Tell her
you’ll count to 10 during the biopsy and will stop at 10 (and do so!). If need to do another pass, ask permission—I’ve never had anyone say no (they don’t want to go through this again if insuff sample!)
If she can’t tolerate, STOP. Offer another visit with
ativan, or procedure under sedation, or ultrasound if post‐ menopausal (no evidence that intrauterine lidocaine is helpful)
If trouble passing pipelle, use different vectors of traction on the tenaculum (up, down, right, left).
If still can’t pass it and she can tolerate, paracervical block can relax os (~6‐8 cc 1% lido or
chloroprocaine at 4:00 and 8:00 vag ‐ cervical junction).
Can also try os finder, small dilators or ultrasound guidance.
If known to be anxious or if attempt and fail, give ativan for next attempt (if pt willing). Works wonders.
If known to be atrophic or if fail to place, try again (if patient willing) after giving misoprostol 400 mcg buccal
- r vaginal, 30‐60 min prior
SLIDE 11 “Secretory endometrium”?
Ovulation has occurred. Rules out anovulation. Likely anatomic lesion. “ Proliferative endometrium”?
Unopposed estrogen effect. Either anovulatory bleeding or first half of cycle.
If premenopause: treat as for anovulation (hormonal methods). If post‐menopause, give progestin to prevent endometrial hyperplasia.
“Plasma cells”?
Chronic endometritis: treat with Doxy or Clinda for 2 wks “Proliferative with stromal breakdown and karyorrhexis” ‐‐‐>
Classic for anovulation. Prolonged unopposed estrogen
- effect. Treat as above for proliferative.
“Benign endocervical cells, no endometrium.” ‐‐>
Non‐diagnostic. Could be atrophy but without endometrium, can’t r/o neoplasia. If post‐menopausal: Ultrasound to check endometrial
- thickness. If >=5 mm, needs repeat attempt at sampling
(EMB vs D&C). If pre‐menopausal: Repeat EMB. Consider misoprostol pre‐ treatment (400mcg buccal or vaginal)
SLIDE 12
“Benign superficial fragmented endometrium. No intact glands or stroma. No hyperplasia or carcinoma. Suboptimal for evaluation” Either atrophy or insufficient sample.
If atrophy suspected clinically: do not re‐sample. Observe or add vaginal premarin if vaginal sx. If bleeding persists/recurs‐‐> Ultrasound (if post‐meno). D&C if continued blding If atrophy NOT suspected clinically: Post‐meno: U/S. Pre‐ meno: resample
“Simple hyperplasia”
1% chance of progression to carcinoma.
Treat with progestin (Mirena is best). Rebiopsy 3‐6 months. Follow closely. “Simple hyperplasia with atypia”
Atypia is most important risk indicator for cancer progression.
8% chance of progression to Ca.
Progestin (prefer Mirena) or hysterectomy (esp if difficult to follow or biopsies difficult or not tolerated.) Biopsy q3‐6 mos until 2 normal.
SLIDE 13 Complex, atypical hyperplasia
27% chance of progression to Ca.
And, 30‐50% already have co‐existing carcinoma.
Recommend hysterectomy. If refuse, do D&C to rule‐out coexisting carcinoma. High dose progestin (Megase) or Mirena IUD. Biopsy q3‐6 months until 3 normal. Failure to revert to normal by 9 mos is assoc with progression.
Return
Ring with support For prolapse plus incontinence: Incontinence dish with support Incontinence Ring with knob
Start with these 3 types. Get multiple sizes and keep in
- ffice. If these don’t work, refer
SLIDE 14
Test correct size:
1.
Have her valsalva—shouldn’t come out
2.
Walk around—shouldn’t feel it
3.
Urinate—should be able to F/u in 2 wks and 4 wks for careful vaginal exam to ensure no vaginal ulcerations
Fold it like taco and slide it in vagina. When you feel it reach top of vagina, use your index finger to tilt it up behind the pubic symphysis
If post‐menopausal: always start premarin cream twice weekly one month prior to placement and continue while uses pessary (to prevent ulceration)
Placement is trial and error. Guess a size and try it
Tilting it up behind the symphysis
SLIDE 15 Can be tough to remove: Hook finger under ring, change angle to dislodge it from under symphysis, then pull out Teach self removal and insertion at subsequent visit. If unable to do, see her q 6‐8 wks for removal, wash, reinsert
Return
Both require tenaculum
Sounding recommended before insertion
I use plastic emb pipelle
Levonorgestrel can be placed without sterile gloves
Copper has to be loaded sterilely
SLIDE 16
Ibuprofen pre‐procedure
IUD
Sterile gloves to load IUD
Speculum
Betadine swabs
1% lidocaine for 12:00 tenaculum site
EMB pipelle (to sound)
Tenaculum
Long, sharp scissors to cut strings
TCu 380A
Get all supplies set up (don’t forget scissors, don’t
Prepare the patient:
BME to check uterine position and size Betadine to cervix 2‐3 cc 1% lidocaine to 12:00 anterior cervix to get a 1 cm white bleb (I like 22 gauge spinal needle). Have her “cough it in”. Tenaculum: 1 cm wide bite, slowly close. YES, you must use a tenaculum! Teneculum straightens out the endometrial canal. Without it, increased chance of perforation or of placing IUD below the fundus.
SLIDE 17
I prefer EMB pipelle to metal sound (disposable, less likely to perforate with it)
Why sound?
1. Measure depth of the uterus (use this to set the blue “depth gauge” on the device
- 2. Check its position (retro, mid, anteflexed)
- 3. Most important: to ensure that the IUD will pass through
the cervix (so you don’t waste an IUD).
- 1. Fully peel back package so
IUD is sitting on top.
- 2. Put on sterile gloves.
- 3. Place the white plunger rod
in the clear insertion tube—
use care not to plunge the IUD
- ut the top of the tube!
- 3. Load the Copper T
- 4. Push ends of the arms of the T
downward into the insertion tube. Hold the white plunger in place while you do this.
SLIDE 18
Gently advance the loaded IUD into the uterine cavity.
STOP when the blue depth‐gauge comes in contact with the cervix or when you reach fundus (light resistance is felt) Hold the tenaculum and white plunger rod stationary, while partially withdrawing the insertion tube. This releases the arms of the Copper T.
Arms are down when inside inserter. Withdrawing tube while holding inserter still allows arms to pop up and out. Unlike Mirena, this is done at fundus b/c arms swing lateral and up.
SLIDE 19
Gently push the insertion tube up until you feel a slight resistance.
Hold the white plunger rod stationary
This step ensures placement high in the uterus
Gently and slowly withdraw the inserter tube and white insertion rod from the cervical canal until strings can be seen protruding from the cervical opening.
Carefully trim strings to 3 cm using long scissors
(short scissors can get caught
- n strings and pull out IUD)
Return
SLIDE 20
Ibuprofen pre‐procedure
IUD
Sterile gloves to load IUD
Speculum
Betadine swabs
1% lidocaine for 12:00 tenaculum site
EMB pipelle (to sound)
Tenaculum
Long, sharp scissors to cut strings
SLIDE 21 sound IUD Insertion tube Use EMB pipelle instead Position blue flange at the sounded length
SLIDE 22
Alternatively: Push IUD up to fundus then withdraw 1.5 cm
SLIDE 23 Arms are up while inside inserter. Pulling back blue tab releases the arms so they are initially straight up and then open laterally. Need space for this to occur which is why you need to be 1- 2 cm below the fundus. The device has “memory” and if it has been inside the inserter too long, the arms tend to stay upright instead of bending laterally. Counting to 10 gives time for them to bend laterally and stay that way (prevents inadvertent removal of device as you withdraw inserter)
SLIDE 25
Safe way of removing uterine contents
Can be used for endometrial biopsy, early pregnancy loss, abortion, and management of septic abortion
Highly effective
Can be done in outpatient / ED setting
There is generally no need to do sharp curettage after
SLIDE 27 Potential biopsy site Potential biopsy site