
SLIDE 1
Handlaying Turnouts
Point, Stub, and Exotic
Wayne Perrier
O Scale West 2012 www.americantieandtimber.com 1
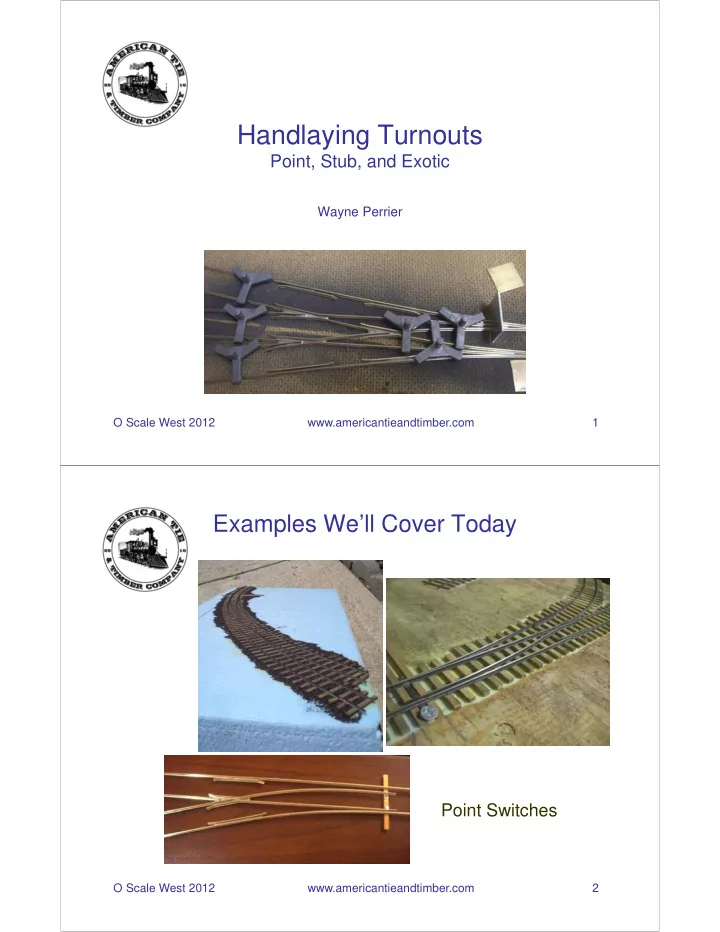
Examples We’ll Cover Today
O Scale West 2012 www.americantieandtimber.com 2
Handlaying Turnouts Point, Stub, and Exotic Wayne Perrier O Scale - - PDF document
Handlaying Turnouts Point, Stub, and Exotic Wayne Perrier O Scale West 2012 www.americantieandtimber.com 1 Examples Well Cover Today Point Switches O Scale West 2012 www.americantieandtimber.com 2 Examples Well Cover Today
Wayne Perrier
O Scale West 2012 www.americantieandtimber.com 1
O Scale West 2012 www.americantieandtimber.com 2
O Scale West 2012 www.americantieandtimber.com 3
O Scale West 2012 www.americantieandtimber.com 4
derailments can happen.
O Scale West 2012 www.americantieandtimber.com 5
can hit them, particularly with smaller rail sizes like code70
O Scale West 2012 www.americantieandtimber.com 6
O Scale West 2012 www.americantieandtimber.com 7
O Scale West 2012 www.americantieandtimber.com 8
Soldering
– Small Butane torch – Bernzomatic + refill canister – Welder’s Torch Lighter – Steel wool #0000 – Muriatic acid flux, liquid (Alpha Metals) – Silver solder, either acid core flux or (preferably) solid wire – Old toothbrush & hand soap
Measuring / Marking
– NMRA standards gauge – 3-point track gauges or Simpson roller gauges – Caliper – O Scale ruler
O Scale West 2012 www.americantieandtimber.com 9
– O Scale ruler – Black Sharpie pen
Metal and Metal-forming
– Seamer – Airplane snips – LH and RH, large offset – MicroMark tracklaying toolkit – rail nippers, spiking tool – Mill file – Needle files – Jeweler’s saw and fine blades – Hacksaw blade – Copper or brass sheet, 0.010” – 0.015” – Nickel-silver, unweathered rail – Sheet aluminum, 0.040” – 0.060” – Motorized disc sander
O Scale West 2012 www.americantieandtimber.com 10
O Scale West 2012 www.americantieandtimber.com 11
O Scale West 2012 www.americantieandtimber.com 12
Nickel silver is a metal alloy of copper with nickel and often but not always zinc. It is named for its silvery appearance, but contains no elemental silver unless plated. Other common names for this alloy are German silver, paktong, new silver and alpacca (or alpaca). Composition
According to Wikipedia:
O Scale West 2012 www.americantieandtimber.com 13
Many alloys fall within the general term of "nickel silver". All contain copper and nickel, while some formulations may additionally include zinc, antimony, tin, lead, or cadmium. A representative industrial formulation, Alloy No. 752, is 65% copper, 18% nickel, and 17% zinc. The white alloy of 75% copper and 25% nickel used in coins, such as the United States nickel, is better known as copper-nickel, cupro-nickel or cupronickel. Some nickel silver alloys, especially those containing high proportions of zinc, are stainless (corrosion-resistant). Nickel silver alloys are commonly named by listing their percentages of copper and nickel, thus "nickel silver 55-18" would contain 55% copper, 18% nickel, and 27% other elements, most probably entirely zinc. A two-element alloy may be named for its nickel content alone, thus NS-12 is 88% copper and 12% nickel.
O Scale West 2012 www.americantieandtimber.com 14
O Scale West 2012 www.americantieandtimber.com 15
– Note the colour and width of railhead and base – Your hobby shop will love you for this.
– It does not solder well and is impossible to fully clean off
O Scale West 2012 www.americantieandtimber.com 16
– One is redundant
– I use black for -, red for +, and white for frogs
– It is considerably stronger
– This is easy to do
O Scale West 2012 www.americantieandtimber.com 17
O Scale West 2012 www.americantieandtimber.com 18
O Scale West 2012 www.americantieandtimber.com 19
O Scale West 2012 www.americantieandtimber.com 20
O Scale West 2012 www.americantieandtimber.com 21
O Scale West 2012 www.americantieandtimber.com 22
O Scale West 2012 www.americantieandtimber.com 23
O Scale West 2012 www.americantieandtimber.com 24
O Scale West 2012 www.americantieandtimber.com 25
O Scale West 2012 www.americantieandtimber.com 26
O Scale West 2012 www.americantieandtimber.com 27
O Scale West 2012 www.americantieandtimber.com 28
O Scale West 2012 www.americantieandtimber.com 29
O Scale West 2012 www.americantieandtimber.com 30
O Scale West 2012 www.americantieandtimber.com 31
O Scale West 2012 www.americantieandtimber.com 32
O Scale West 2012 www.americantieandtimber.com 33
O Scale West 2012 www.americantieandtimber.com 34
Turn assembly over and solder linkage bracket to underside (for Tortoise)
O Scale West 2012 www.americantieandtimber.com 35
O Scale West 2012 www.americantieandtimber.com 36
O Scale West 2012 www.americantieandtimber.com 37
O Scale West 2012 www.americantieandtimber.com 38
O Scale West 2012 www.americantieandtimber.com 39
it
rails, ahead of where you will gap
spike into place
O Scale West 2012 www.americantieandtimber.com 40 y g p
frog on both closure rails – this generally involves making a hole in the roadbed
O Scale West 2012 www.americantieandtimber.com 41
O Scale West 2012 www.americantieandtimber.com 42
O Scale West 2012 www.americantieandtimber.com 43
O Scale West 2012 www.americantieandtimber.com 44
O Scale West 2012 www.americantieandtimber.com 45
and sand the cut curved rails to a point
sander.
together.
O Scale West 2012 www.americantieandtimber.com 46
O Scale West 2012 www.americantieandtimber.com 47
O Scale West 2012 www.americantieandtimber.com 48
O Scale West 2012 www.americantieandtimber.com 49
O Scale West 2012 www.americantieandtimber.com 50
O Scale West 2012 www.americantieandtimber.com 51
O Scale West 2012 www.americantieandtimber.com 52
O Scale West 2012 www.americantieandtimber.com 53
O Scale West 2012 www.americantieandtimber.com 54
O Scale West 2012 www.americantieandtimber.com 55
O Scale West 2012 www.americantieandtimber.com 56
O Scale West 2012 www.americantieandtimber.com 57
and closure rails as shown below. Use silver solder and weather these.
O Scale West 2012 www.americantieandtimber.com 58
O Scale West 2012 www.americantieandtimber.com 59
O Scale West 2012 www.americantieandtimber.com 60
pieces
O Scale West 2012 www.americantieandtimber.com 61
O Scale West 2012 www.americantieandtimber.com 62
O Scale West 2012 www.americantieandtimber.com 63
O Scale West 2012 www.americantieandtimber.com 64
wiring
brass for screws for limit switches and threaded rod
O Scale West 2012 www.americantieandtimber.com 65
O Scale West 2012 www.americantieandtimber.com 66
O Scale West 2012 www.americantieandtimber.com 67