creating a simple interactive movie in flash cs3 overview
play

CREATING A SIMPLE INTERACTIVE MOVIE IN FLASH CS3 Overview Welcome - PDF document

CREATING A SIMPLE INTERACTIVE MOVIE IN FLASH CS3 Overview Welcome to the simple Interactive movie lab. In this lab session you will be introduced to some new Flash conventions. This will further develop your Flash skills beyond simple animations


  1. CREATING A SIMPLE INTERACTIVE MOVIE IN FLASH CS3 Overview Welcome to the simple Interactive movie lab. In this lab session you will be introduced to some new Flash conventions. This will further develop your Flash skills beyond simple animations and introduce the concept of a linear presentation. In this lab you will create an interactive but with more emphasis on clear-cut professional programming techniques and practices. These conventions should be used throughout your Flash / ActionScript development. Introduction 
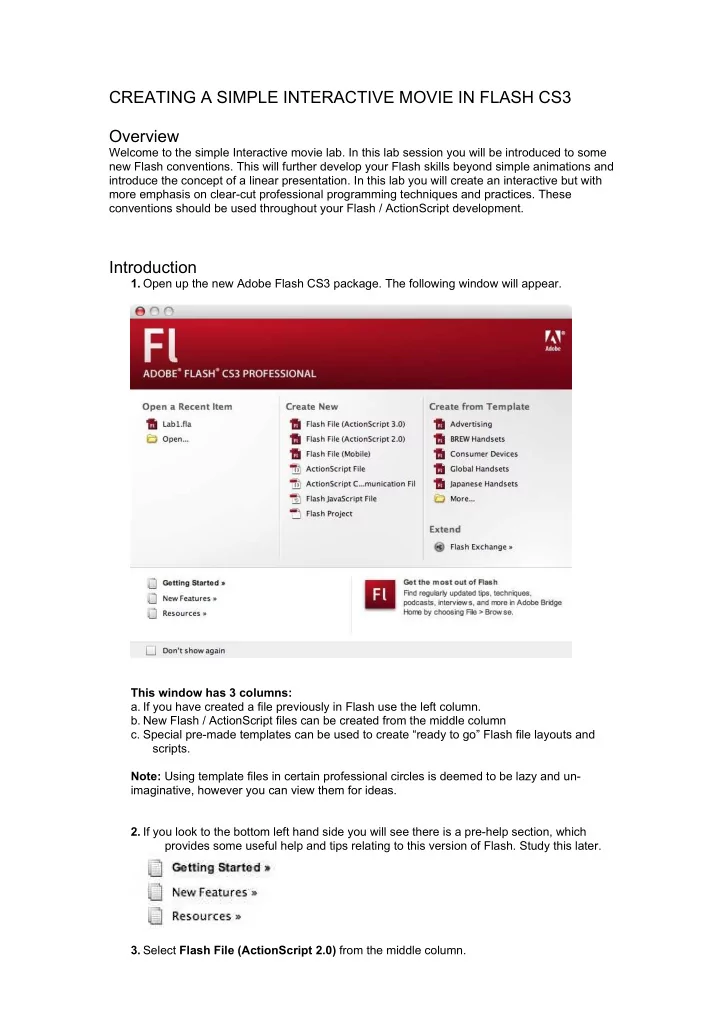
1. Open up the new Adobe Flash CS3 package. The following window will appear. This window has 3 columns: a. If you have created a file previously in Flash use the left column. b. New Flash / ActionScript files can be created from the middle column c. Special pre-made templates can be used to create “ready to go” Flash file layouts and scripts. Note: Using template files in certain professional circles is deemed to be lazy and un- imaginative, however you can view them for ideas. 2. If you look to the bottom left hand side you will see there is a pre-help section, which provides some useful help and tips relating to this version of Flash. Study this later. 3. Select Flash File (ActionScript 2.0) from the middle column.

  2. Note: ActionScript 3 is the latest “ActionScript flavor” available. It uses high level object oriented programming conventions, which are not fully supported by industry at present so we will not be using this ActionScript type for lab sessions this year. Remember to select Flash File (ActionScript 2.0) as the ActionScript file type. The following interface appears. You will notice that it is very similar to the previous versions of Flash, which used the MUI (Macromedia User Interface). Adobe is also using a similar universal interface look and feel for its Adobe Suite of products. 4. Spend a few minutes exploring the interface and also go to the drop down menus to explore any changes. 5. Use the default Document size. However this can be changed from Modify>Document 6. Ok. One of the first things one should always do is to create some form of order to our Flash file. This can be achieved through the use of layers to separate content. N.B. To be a successful Flash / ActionScript user, the use of layers to organize content for re-usability, trouble shouting, tidiness, organization and safety etc. are of the outmost importance. Pre-planning your projects on paper first, forces you to make decisions and helps direct your project structure and helps avoid making mistakes. Create a paper sketch to help you visualize a Flash presentation, which will have 3 different sections. The user should be able to navigate backwards and forwards between each section. 7. To create a navigate-able movie with 3 sections we could get away with using 2 basic layers (or even one layer). a. Content Layer. - This will hold the content i.e. images etc.

  3. b. Buttons Layer - Used to store the navigation buttons. 8. However to only have 2 Layers (or one) to hold all our content is considered bad practice. The following convention can be used to create clear, easily identifiable elements in our flash movie. LAYERS IN ORDER FROM TOP TO BOTTOM: Actions Layer - Used to store ActionScript code Frame Labels Layer - Used for Frame labels Navigation Layer - Separates the navigation elements Content Layer - Used for images text video etc. (These elements can be further separated in to separate layers with suitable names.) 9. Create 3 new layers (you will now have 4 layers in total) and rename them: Actions , Frame Labels , Navigation , Content . 10 . Save your file as Presentation as a CS3 flash file Note: Files saved as Flash 8 may lose some functionality. This is true for saving to any previous versions of Flash, so pre-planning is very important in advance to avoid any disasters later on with your projects. ALWAYS CHECK WHAT FUNCTIONALITY YOU INTEND TO USE IN YOUR PROJECTS TO MAKE SURE IT IS SUPPORTED BY PREVIOUS VERSIONS OF THE FLASH PLAYER 11 . As there is only one frame on each layer so far in our movie one should create different keyframe sections to separate each section. First start with the Content layer and create a keyframe at frame 20. Select frame 20 with the mouse on the content layer and ( Ctrl + click) on a Mac or (Right Click) on a PC The following window will appear. Select Insert Keyframe .

  4. After inserting a keyframe or Blank Keyframe, the following frames appear in the timeline. Notice how the Keyframe on frame 1 (which is a blank Keyframe denoted by the circle with a white fill) is on frame 1 and the frames extend to frame 19. Frame 20 is a blank Keyframe also. 12 . Repeat the above step on frame 20 . We can also extend the keyframe on frame 20 by inserting frames on frame 29 . The result of inserting a frame: 13 . Repeat the above steps for the Actions , Frame Labels and Navigation Layers. The result:

  5. 14 . Next locate the Content folder (which contains 3 images). These images need to be imported into the library. Note: You may get a popup window appear when you try to import different files types in to Flash, as these files may need to be converted in to a format that Flash can recognise and work with. Choose File > Import To Library Shift select all the image files and click the Import to Library . 15 . Drag the file Eros (or any image) to frame 1 of the content layer. Notice how it fills the contents of all the frames up to frame 9 . This happens because we inserted the image on a keyframe. The keyframe’s contents will appear on all frames on the same layer until a blank keyframe or a keyframe is encountered. Notice how the empty circle on the keyframe 1 is now black and frame up till 9 are greyed out, which denotes that there is content on these frames as opposed to empty frames. 16 . Repeat the above step for the Lake and Paddington images (or any other image you want to use) . Place the Lake image on frame 10 . Be careful to select frame 10 first and then drag the image from the library on to the stage. Place the Paddington image on frame 20 .

  6. 17 . Align the images on the stage by going to the Window drop down menu and selecting Align . Content can also be aligned by using Guides which can be added by choosing View > Rulers . Then click and drag the mouse from the rulers (either from the vertical or horizontal ruler) on to the Stage. This creates vertical and horizontal Guides. Note: CONTENT SHOULD ALWAYS BE ALIGNED AS IT IS CONSIDERED UNPROFESSIONAL” TO HAVE SLOPPY RANDOMINGLY PLACED CONTENT IN YOUR MOVIE, UNLESS YOU WANT THAT EFFECT. 18. The next task is to create 2 buttons, which will be used to navigate backwards and forwards between the different content sections. To create simple buttons you can use the Rectangle Tool to create a simple square and use Flash’s smart snap function to convert the shape into a triangle . Then duplicate the triangle and flip the duplicated triangle so that it points in the opposite direction. You know have to simple shapes that can be used as navigation buttons. See the following diagram: Note: On a professional project a more elegant navigation system would be expected, but the above shapes will be acceptable for this exercise. 19. To convert these shapes to buttons select individually and ( Ctrl + click) on a Mac or (Right Click) on a PC and select Convert to Symbol from the dropdown menu. From the popup window select button as the symbol and name the back button Backwards and the forward button Forwards . Hint: Many of Flash’s stage objects or frame functionality can be accessed by either selecting an object on the Stage, or by accessing the dropdown menus at the top of the programs main window. 20. Copy the buttons and to each section of the interface so that each section has got access to a backward and forward button for navigation. 21. To make the jump between sections possible each button should be programmed to go to a specific location. Instead of using frame numbers (which can change if frames are added etc.), it is considered good practise to use Frame Labels because if you move frames, ActionScript follows the specified name of the frame as opposed to tracking frame numbers. Label frames in the labels box in the Properties floating window as follows: Section 1: Eros Frame Label: Eros Frame number: 1 Section 2: Lake Frame Label: Lake Frame number: 10 Section 3: Paddington Frame Label: Paddington Frame number: 20

Download Presentation
Download Policy: The content available on the website is offered to you 'AS IS' for your personal information and use only. It cannot be commercialized, licensed, or distributed on other websites without prior consent from the author. To download a presentation, simply click this link. If you encounter any difficulties during the download process, it's possible that the publisher has removed the file from their server.

Recommend


More recommend