Calcification Accretion Units(CAUs) Ocean Acidification may hinder - - PowerPoint PPT Presentation

calcification accretion units caus
SMART_READER_LITE
LIVE PREVIEW

Calcification Accretion Units(CAUs) Ocean Acidification may hinder - - PowerPoint PPT Presentation

Calcification Accretion Units(CAUs) Ocean Acidification may hinder calcifying organisms in forming their skeletons Physical structure of coral reef is at risk Net calcification rate (g/cm 2 /yr) is one indicator of how coral


slide-1
SLIDE 1

Calcification Accretion Units(CAUs)

  • Ocean Acidification may hinder

calcifying organisms in forming their skeletons

  • Physical structure of coral reef is

at risk

  • Net calcification rate (g/cm2/yr)

is one indicator of how coral reefs are responding to ocean acidification

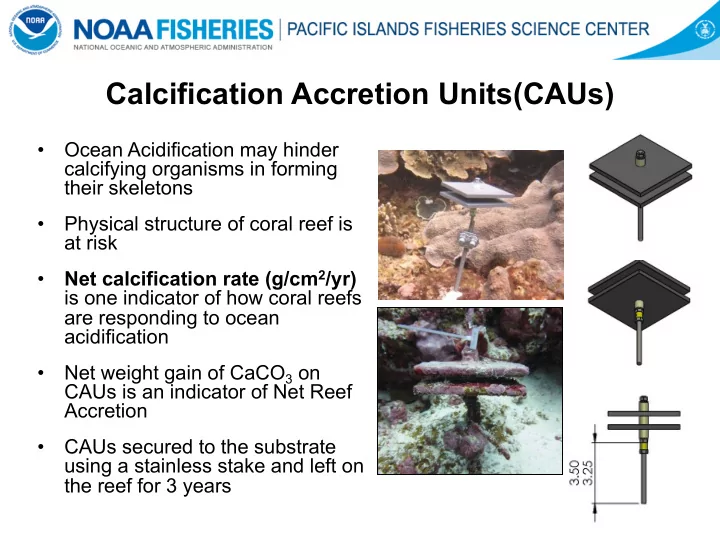
  • Net weight gain of CaCO3 on

CAUs is an indicator of Net Reef Accretion

  • CAUs secured to the substrate

using a stainless stake and left on the reef for 3 years

slide-2
SLIDE 2

CAU Locations

  • American Samoa

40 Sites, 5 Islands 200 CAUs

  • Pacific Remote Islands

44 Sites, 7 Islands 240 CAUs

  • Hawaiian Archipelago

40 Sites, 8 Islands 200 CAUs

  • Guam & the CNMI

40 Sites, 8 Islands 200 CAUs

slide-3
SLIDE 3

CAU Processing Overview

Vacuum filtration Air dry for at least 24 h

PHRR39_2013_1278_U PHRR39_2013_1278_L

After 24 h, weigh filtered fleshy material; continue to oven-dry at 24 h intervals until the change in weight is less than 0.1 g Oven dry for 24 h Thaw frozen CAU for at least 12h Disassemble and place each plate in dish with sw

UPPER LOWER

UPPER TOP UPPER BOTTOM LOWER TOP LOWER BOTTOM

Photograph both sides of each plate

PHRR39_2013_1278_L

Air dry for 24 h Place plates in glass dishes and decalcify in 5% HCl for >12h Frequent mushing and pulverizing of calcified materials; add new acid as needed Oven dry for 24h After 24h, weigh each CAU plate; continue to oven-dry at 24 h intervals until the change in weight is less than 0.1 g Scrape fleshy materials from PVC plate, oven- dry (24h) and weigh

slide-4
SLIDE 4

Net CaCO3 Equation

CAU PLATE Dry Weight * Fleshy material Dry Weight * PVC Plate Dry Weight

* Weight (g) after multiple oven-drying periods (wherein change in weight is less than 0.1 g)

slide-5
SLIDE 5

1. Thaw each batch of frozen CAUs for at least 12h 1. Disassemble and place each of the two CAU plates into a glass dish filled with saltwater 2. Photograph each side of the plate

UPPER TOP UPPER BOTTOM LOWER TOP LOWER BOTTOM

CAU Processing Steps

slide-6
SLIDE 6

4. Rinse each CAU plate in fresh water and place on pre-weighed paper trays (“plate assembly”) 4. Place each plate assembly onto cooling racks and air dry for 24h 5. After 24h, place plate assembly in the oven at 60°C for 24h 6. After 24h, weigh the plate assembly 7. Continue to oven-dry the plate assembly at 24h intervals until the change in weight between current and one taken 24h prior is less than 0.1g

CAU Processing Steps

slide-7
SLIDE 7

9. Place each CAU plate onto a glass dish and pour 5% HCl to dissolve CaCO3 materials. Allow to sit in acid solution for 12-24h

  • 10. Mush and pulverize intact calcified materials

(e.g. coral, CCA, shell). If needed, decant and add more acid solution until all CaCO3 have dissolved

  • 11. Scrape remaining fleshy materials from the

CAU PVC plate. Rinse PVC in fw, oven dry for 24h and weigh.

CAU Processing Steps

slide-8
SLIDE 8
  • 12. Vacuum filter the acid bath and

remaining fleshy material of each CAU plate through a Buchner funnel and pre- weighed filter paper

  • 13. Place fleshy material residue on a pre-

weighed paper tray (“filterpaper assembly”) and air dry for at least 24h

  • 14. Oven-dry the filterpaper assembly at

60°C for 24h

  • 15. After 24h, weigh the filterpaper assembly
  • 16. Continue to oven-dry the filterpaper

assembly at 24h intervals until the change in weight between current and

  • ne taken 24h prior is less than 0.1g
  • 17. Place filterpaper assembly in pre-labeled

re-sealable bags for archival

* Refer to CAU Lab Analysis SOP for more info

CAU Processing Steps

slide-9
SLIDE 9

Bioerosion Monitoring Units (BMUs)

  • Bioerosion is the biological destruction of

hard structures, such as coral skeletons

  • If rates of bioerosion are higher than those
  • f calcification, healthy reef habitats can

fall apart

  • BMUs are constructed of an exactly

measured piece of calcium carbonate mounted on a PVC base

  • They are deployed on the seafloor

collocated with CAUs

  • After 3 years in the ocean, BMUs are

collected for analysis of changes in density, volume, and mass, which provide an indication of bioerosion rates

slide-10
SLIDE 10

BMU Processing Steps

  • 1. Dry BMU in oven at 60˚C for until dry, may

take 24-96hrs.

  • 2. Weigh dry BMU using analytical balance.
  • 3. Place BMU in a 15% diluted hydrogen

peroxide solution for two hours to remove non-calcified organics (Kobluk & Risk, 1977).

  • 4. Rinse with fresh water to remove

hydrogen peroxide.

  • 5. Dry BMU in oven at 60˚C for until dry, may

take 24-48hrs.

  • 6. Weigh dry BMU using analytical balance.
  • 7. Measure all dimensions and volume (3D

scanning).

  • 8. Remove PVC base plate from coral block.
slide-11
SLIDE 11

BMU Processing Steps

  • 9. CT scan block using Skyscan 1174 microCT configured with the CT scan

parameters noted in the BMU SOP.

  • 10. Check for CT Scan drift by using calibration standards at least once

throughout the course of BMU analysis.

  • 11. Reconstruct the scanned images into 3D image stacks.
  • 12. Volumetrically partition secondary accretion, external bioerosion, and

macroboring.

  • 13. Using a consistent and unbored region of interest, compare attenuation

coefficients of pre and post-scans, calibrated with carbonate density phantoms to calculate microboring.