SLIDE 1
1
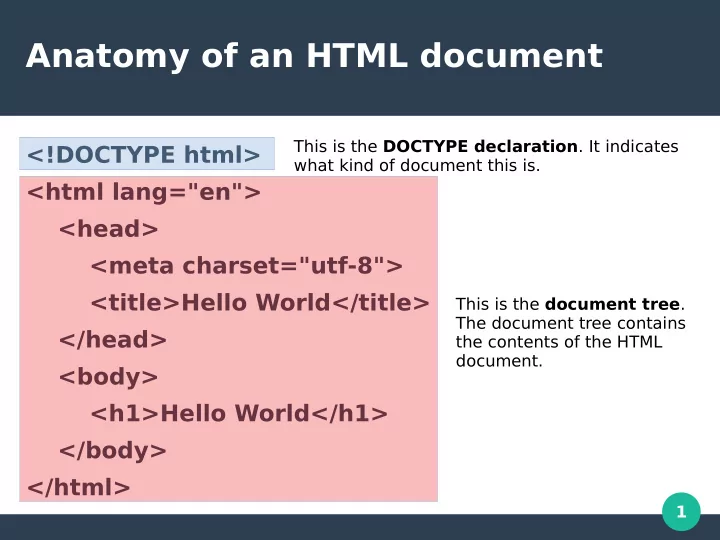
Anatomy of an HTML document
<!DOCTYPE html> <html lang="en"> <head> <meta charset="utf-8"> <title>Hello World</title> </head> <body> <h1>Hello World</h1> </body> </html>
This is the DOCTYPE declaration. It indicates what kind of document this is. This is the document tree. The document tree contains the contents of the HTML document.
SLIDE 2 2
Why is it called a document tree?
- When you map out the document, it
looks like an upside down tree.
- All HTML elements, besides the root
element, are children of another element.
SLIDE 3
3
Document tree for the Hello World example
<html lang="en"> <head> <meta charset="utf-8"> <title>Hello World</title> </head> <body> <h1>Hello World</h1> </body> </html>
html head body meta title Hello World Hello World h1
SLIDE 4
4
Anatomy of the document tree
<html lang="en"> <head> <meta charset="utf-8"> <title>Hello World</title> </head> <body> <h1>Hello World</h1> </body> </html>
The root element is the base of the document tree The head element contains information about the HTML document The body element contains the contents of the HTML document
SLIDE 5
5
Questions?
SLIDE 6 6
Anatomy of an HTML element
<article id="thesis">Lorem Ipsum ...</article>
- This is a typical HTML element.
SLIDE 7 7
Anatomy of an HTML element
<article id="thesis">Lorem Ipsum ...</article>
- This section of the element is the start tag.
- Every HTML element has an start tag.
- The start tag tells the web browser that we are
starting a new element and to add it to the document tree.
- The start tag must start with ‘<’ and end with
‘>’.
SLIDE 8 8
Anatomy of an HTML element
<article id="thesis">Lorem Ipsum …</article>
- This is the name of the element.
- The name describes the content that this
element represents. Browsers use this to determine how to handle the content within the element.
SLIDE 9 9
Anatomy of an HTML element
<article id="thesis">Lorem Ipsum ...</article>
- This is an attribute for the HTML tag.
- Attributes are in the format name=value
- Boolean attributes do not need a value
- If the value of an attribute contains spaces or
tabs, it must be surrounded by a pair of single
- r double quotes
- You can have multiple attributes as long as you
place a space between each one
SLIDE 10 10
Anatomy of an HTML element
<article id="thesis">Lorem Ipsum ...</article>
- This section of the element is the closing tag.
- The closing tag tells the browser where the
end of the element is.
- The closing tag must start with ‘</’ and end
with ‘>’.
- It is a common mistake to forget to put a
closing tag on an element that requires one.
SLIDE 11 11
Anatomy of an HTML element
<article id="thesis">Lorem Ipsum ...</article>
- This is the contents of the HTML element.
- The contents of an HTML element can be plain
text, other HTML elements or a mixture of both.
- If the contents of an HTML element is another
- element. You must ensure that you close out
the child element with a closing tag, if needed, before you close out the parent element with a closing tag.
SLIDE 12 12
Empty Tags
- Not all HTML elements require an opening and
closing tag. These types of elements are called empty tags.
- You can add attributes to an empty tag just as
your would an opening tag.
- An example of an empty tag is img.
<img src=”picture.jpg” alt=”profle picture”>
SLIDE 13 13
HTML comments
- Comments are elements that are not
presented to the users of your web page.
- Comments are used to add additional
information about your HTML or to “comment out” an element to hide it or help with fxing an error.
- A comment starts with ‘<!--’ and ends
with ‘-->’.
- Comments can exist inside and outside
the document tree.
SLIDE 14
14
Example HTML comments
<!DOCTYPE html> <!-- The classic Hello World in HTML --> <html lang="en"> <head> <!-- Set character set to utf-8 --> <meta charset="utf-8"> <title>Hello World</title> </head> <body> <!-- <h1>Hello World</h1> --> </body> </html>
SLIDE 15 15
Whitespace in HTML
- Whitespace is the spaces, tabs, and new
lines/carriage returns in your HTML document.
- Web developers typically use white space
to make HTML fles easier to read.
- Whitespace is generally ignored by web
- browsers. The one exception to this is
within a line of text. Within a line of text, all whitespace is condensed to one space. For example, “HTML rocks!” becomes “HTML rocks!”.
SLIDE 16
16
Whitespace in HTML
<!DOCTYPE html> <html lang="en"> <head> <meta charset="utf-8"> <title>Hello World</title> </head> <body> <h1>Hello World</h1> </body> </html>
SLIDE 17
17
Questions?
SLIDE 18 18
Anatomy of a CSS fle
- A CSS fle consists of one or more
style rules. h1 { color: blue; text-decoration: underline; } p { }
A style rule consists
number of declarations surrounded by ‘{‘ and ‘}’. A style rule can have no declarations. Although this does nothing.
SLIDE 19
19
Anatomy of a CSS style rule
h1 { color: blue; text-decoration: underline; }
The selector indicates what HTML elements this rule applies to. The declarations are the set of styles that are to be applied to any HTML elements the selector matches.
SLIDE 20 20
There are three basic CSS selectors
- Type – This is the name of the html element. This
is written as is, like the h1 from our previous example.
- ID – This is the id assigned to an element with the
id attribute. This is written as ‘#’ followed by the
- id. For example, you would match <h1 id=”main-
title”>Hello World</h1> with the #main-title selector.
- Class – This is a class value assigned to an
element with the class attribute. This is written as ‘.’ followed by the class. For example, you could match <h1 class=”underlined bold”>Hello World</h1> with either .underlined or .bold.
SLIDE 21 21
Anatomy of a CSS declaration
color: blue; text-decoration: underline;
- The property and value are separated
by a ‘:’ and there must be a ‘;’ after the value.
- It is a common error in CSS to forget
the ‘;’.
Property Value
SLIDE 22 22
Whitespace and comments in CSS
- Whitespace is ignored except within a
- value. For example, the border
property has three parts to its value (width, style and color) that are separated by spaces.
- As with HTML, you can have
- comments. You start a comment with
‘/*’ and end it with ‘*/’.
SLIDE 23
23
Anatomy of a CSS fle
/* Style rules for my website */ h1 { color: blue; /*text-decoration: underline;*/ } p { }
SLIDE 24
24
Questions?
SLIDE 25 25
Testing and debugging
- Testing a web page is when you load your
web page in every browser that your users are likely to use. For this course, that will be Firefox and Chrome.
- Debugging is the process of solving any
errors you may fnd. This typically involves rereading your markup to fnd the erroneous section and make small changes to it. After each small change, you will reload the page in the web browser to see if that change fxed the error.
SLIDE 26 26
Validating your HTML and CSS
- The W3C makes validators available web
developers to use to test their HTML and CSS.
- These validators will read your HTML and
CSS and tell you any issues that they fnd.
- For HTML, use https://validator.w3.org/
- For CSS, use
https://jigsaw.w3.org/css-validator/
- Although not required, you should always
validate your HTML and CSS.
SLIDE 27
27
Lets Try!