logging in
play

Logging in: 1. You will receive an email indicating that a user - PDF document

Drupal Use Case Providers Logging in: 1. You will receive an email indicating that a user account has been created for you. The email will include an activation URL. 2. Click the first URL. Once the URL is clicked, youll be presented with


  1. Drupal Use Case – Providers Logging in: 1. You will receive an email indicating that a user account has been created for you. The email will include an activation URL. 
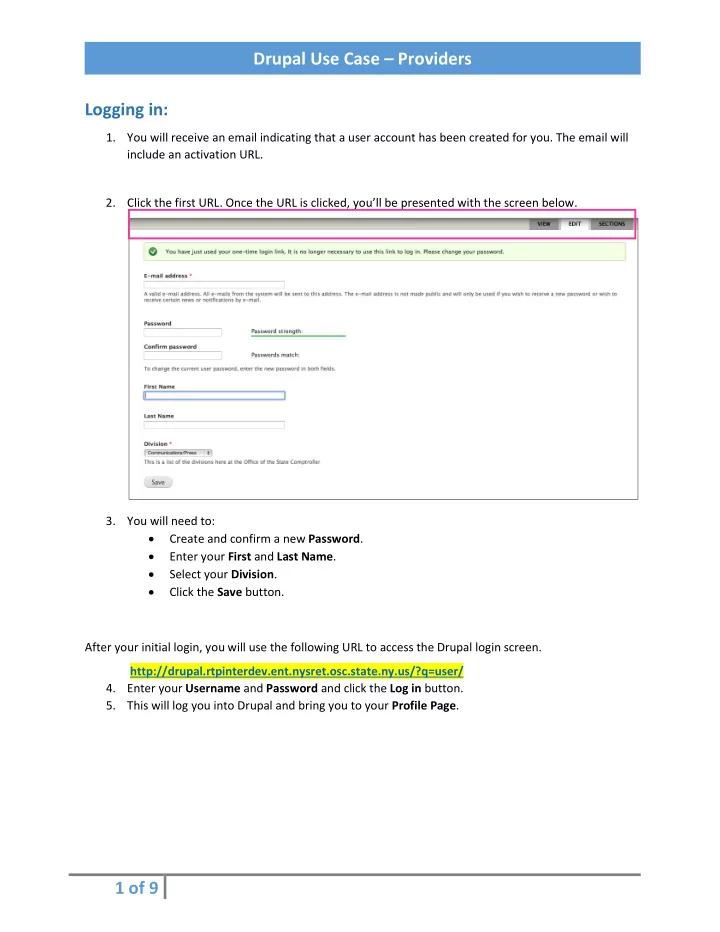
2. Click the first URL. Once the URL is clicked, you’ll be presented with the screen below. 3. You will need to: • Create and confirm a new Password . • Enter your First and Last Name . • Select your Division . • Click the Save button. After your initial login, you will use the following URL to access the Drupal login screen. http://drupal.rtpinterdev.ent.nysret.osc.state.ny.us/?q=user/ 4. Enter your Username and Password and click the Log in button. 5. This will log you into Drupal and bring you to your Profile Page . 1 of 9

  2. Drupal Use Case – Providers Creating a new basic page 1. Log in to Drupal . 2. Select the Create Content tab. 3. Select Basic page . FORMATTING CONTENT 4. Enter the page title in the Title field. 5. Enter the page content into the Body field. 6. Using the WYSIWYG editor, format the text as needed. 2 of 9

  3. Drupal Use Case – Providers 7. To enable spell check, select Enable SCAYT (SpellCheckAsYouType) from the Spelling icon dropdown menu. 8. When SCAYT is enabled misspelled words will be underlined. To correct any errors, right-click the word and make a selection from the the suggested options. 9. You can also run a Spell Checker by selecting Check Spelling from the Spelling icon dropdown menu. Adding text, links and images to an existing page 1. Log in to Drupal (see login instructions above). 2. Under All Recent Content, find the Content that you created in the Actions column. 3. Use the WYSIWYG editor to add and format text. 3 of 9

  4. Drupal Use Case – Providers ADDING A LINK 4. To add a link, highlight the text you wish to make a hyperlink and then click the Link icon, 5. Next, enter the URL into the URL field. Click OK to embed the link and return to the WYSIWYG editor. 6. The text you highlighted will now be an active link. ATTACHING A FILE 7. To attach a file scroll down to the File Uploader and click Choose File . 4 of 9

  5. Drupal Use Case – Providers 8. After clicking the Choose File button you will be presented with a file selector. Browse to the file you want to upload and click Open . 9. The file you selected will now be in the File Uploader . To the right of the file name, click Upload. 10. The uploaded file will be listed in the File Information box. You can enter a description in the Description field. The file can be deleted with the Remove button to the far right. 5 of 9

  6. Drupal Use Case – Providers 11. The file will now appear as a clickable link. INSERTING AN IMAGE 12. To add an image click the Add Media button in the WYSIWYG editor. 13. This will bring you to the Library . Select the image you want and click the Submit button. 14. The image will now appear in the Embedding dialog box. Click the Submit button. ADDING MEDIA TO THE LIBRARY 15. If you could not find your image in the Library, you will need to add it. 16. Select the Save button to save your work and return to My Workbench . 17. From My Workbench, select the Create Content tab. 18. Select Upload Media . 19. From the Add Media window, click Choose File . 20. After clicking the Choose File button you will be presented with a file selector. Browse to the file you want to upload and click Open . 6 of 9

  7. Drupal Use Case – Providers 21. Your file will now be listed in the Add Media window. 22. Click Submit to upload it to the Library. 23. To return to the page you are working on select My Workbench from the top menu. 24. Select the My Content tab. 25. Under All Recent Content, find the Title and select Edit in the Actions column to return to the editor. 26. Now that your image is in the Library, follow Steps 14-16 above to add the image to your page. 7 of 9

  8. Drupal Use Case – Providers Creating and managing users: 1. Log into Drupal 2. Click on the People option 3. Click on the Add user link 4. Next, enter the information for the user 5. Assign the user a Role. 6. Save by clicking the “ Create new user account ” option. If you’ve provided an email account and selected the “notify user” option, the new user will receive a notification email. 8 of 9

  9. Drupal Use Case – Providers Debugging & Performance issues A good rule of thumb when experience performance issues it to clear your cache. If you’ve made a change or added a module and don’t notice the changes; try clearing your cache and see if that addressed the issue. To clear cache, go to the “ Configuration” section. Click on Finally, click on thee ‘ Clear Cache ’ option 9 of 9

Download Presentation
Download Policy: The content available on the website is offered to you 'AS IS' for your personal information and use only. It cannot be commercialized, licensed, or distributed on other websites without prior consent from the author. To download a presentation, simply click this link. If you encounter any difficulties during the download process, it's possible that the publisher has removed the file from their server.

Recommend


More recommend